
Learning to resize images in Photoshop is essential. People need smaller photos for websites or for print. Making an image smaller makes it easier to handle. It saves space on your computer. Resizing is an important step for your work. This process is not difficult at all.
Adobe Photoshop provides great tools. You can use the Image Size tool for exact control. The Free Transform tool offers a quicker method. Adobe Photoshop Elements 2026 also has these features. It works well on Windows 10, macOS M1 Mac mini. You should learn this useful skill.
Let’s dive below for a detailed explanation!
Method 1: Using Image Size (for specific dimensions)
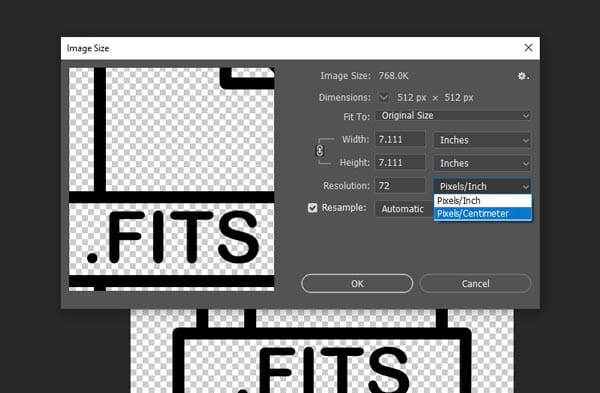
Open your photo in Photoshop. Go to Image > Image Size. Uncheck the Resample box. Enter the target Width and Height. Click OK to apply the changes. Navigate to the Image menu. Select Image Size from the dropdown list.
A dialog box will appear on the screen. You will see the current Pixel dimensions. Change these Dimensions to your required Pixels. Ensure the Aspect ratio link icon is active. This prevents the photo from stretching. You can adjust the Resolution here. Consider Retina screens and HiDpi monitor needs. Use Bicubic Sharper when reducing size. This tool is precise.
Open the image in Photoshop and go to Image > Image Size
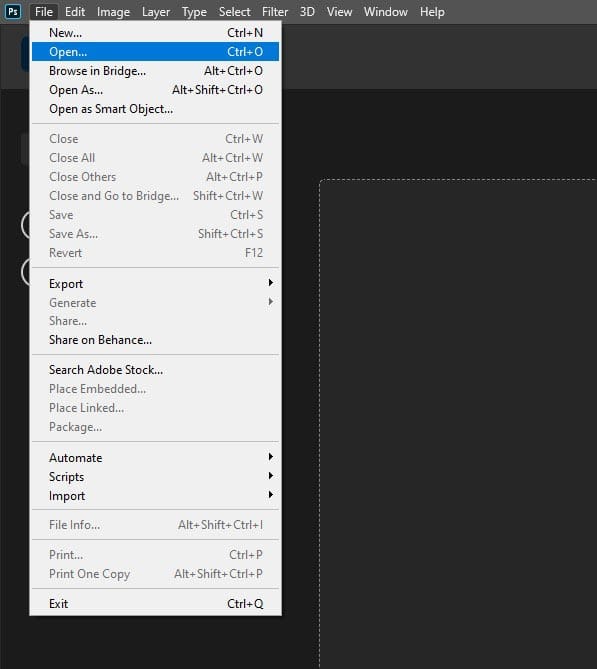
To start, you need to get your picture open in the Photoshop program. You find your picture file on your computer and you drag it into Photoshop. Or you can go to File and then Open to find your picture. Once the picture is there on your screen, you look at the very top of the screen where the words are.
You click on the word that says ‘Image’. When you click it, a list will come down. You look down this list for the words that say ‘Image Size’. You click on that. Then a new window will show up. This window is where all the magic of making things smaller happens. It has lots of numbers and boxes you can click.
Ensure the chain link icon (Constrain Proportions) is highlighted to maintain the aspect ratio
The chain link is a very important little picture in the Image Size window. It looks like a little chain or a link. You need to see if it is clicked on and look like it is connected. This chain link job is to keep your picture from looking funny. It makes sure that when you make the width smaller, the height gets smaller too by itself.
If the chain link is not on, then you can change the width and the height separately. This is a bad thing because it will make your photo look all squishy and stretched. People will look fat or skinny, and it will not look good. So always check the chain link is on so your picture proportions stay constrained and look normal and not weird to everyone who sees it.
Enter the new desired values for Width and Height in the corresponding fields
Now you see the boxes for Width and Height. You can put the new numbers you want in these boxes. Maybe you want the width to be 500 pixels. You just click in the box and you type 500. You can see the height box change its number, too, if the chain link is on. This is how you make the picture the new size you desire.
There is another box called Resample. This box should be checked so that Photoshop can add or take away pixels to make the new size. If you uncheck it, you only change how big it will print, not how many pixels it has. This is for more advanced people. For just making it smaller, you keep a Resample check. Then you click the OK button, and your picture will now be the new size.
If you need to change the number of pixels, make sure the Resample box is checked. If you are only changing the dimensions in terms of inches or pixels without adding or removing pixels, uncheck it.
Click OK to apply the changes.
After you type all your new numbers for the size, the last step is very easy. You just have to click the button that says ‘OK’. This OK button is usually at the top of the Image Size window. When you click it, the window will go away and you will see your picture on the main screen again.
But now your picture will be the new size that you type in. It will appear smaller on the screen. This shows it worked. To undo, press Ctrl + Z. The image will return to its original size. Then you can try the steps over to make it a different size.
Method 2: Using Free Transform (for interactive resizing)
This method quickly lets you resize a picture. You use the Free Transform tool easily. You can drag the corners with your mouse. This allows you to visually scale the image. It is an interactive way to adjust Layers. This method is not for exact dimensions.
It is great for a fast on-the-fly fix. You see the change happen live on your Screen. You can quickly adjust the Horizontal and vertical scaling. Hold Shift to maintain the Proportions Aspect ratio. This quick Transform tool is very popular. You have more freedom to just try things. This affects the final File size and Image pixel count.
Open your image
For better results, especially if you will be resizing multiple times, right-click the layer in the Layers panel and select Convert to Smart Object.
First, you open your picture like normal. But for this Free Transform, there is a smart thing to do first. You look on the right side of Photoshop for the Layers panel. You will see your picture layer there. You put your mouse on that layer and you click the right button on your mouse.
A menu will pop up. You look for the option that says ‘Convert to Smart Object’. You click on that. Now your picture layer has a little badge on it. This makes it a Smart Object. This is a good thing because now you can make it small and then make it big again many times, and the picture will not get all blurry and lose its quality. It keeps the picture looking sharp.
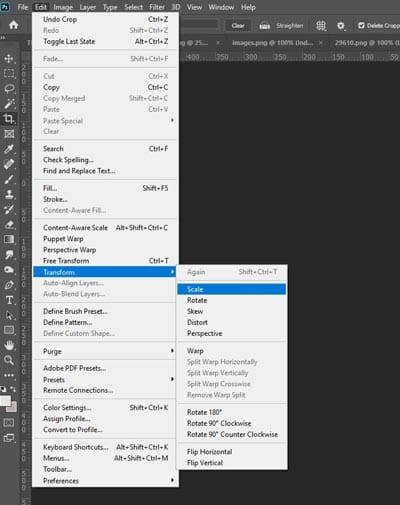
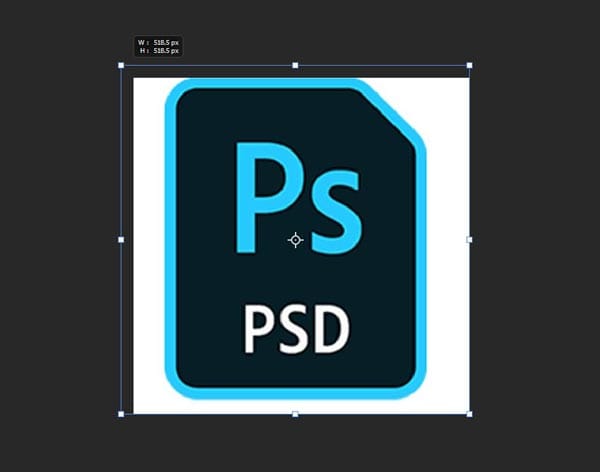
Go to Edit > Free Transform or press Ctrl + T (Windows) / Cmd + T (Mac)
Now you are ready to use the Free Transform. You go to the top of the screen again and you click on the word ‘Edit’. From the dropdown list, you find the words ‘Free Transform’ and you click on it. A quicker way is to just push the buttons on your keyboard. On a Windows computer, you push the Ctrl button and the T button at the same time.
On an Apple Mac computer, you push the Command button and the T button. When you do this, a box with little squares will appear around your picture. This box is called the transform box. The little squares on the corners and the sides are called handles. You use these handles to make the picture smaller or bigger.
Drag a corner handle of the transform box to resize
To make your picture smaller, you put your mouse cursor on one of the little square handles on the corner of the box. You click and hold the left button on your mouse. Then you drag the handle towards the center of the picture. As you drag, you will see the picture get smaller. You can let go when it is the size you want.
But you must remember to hold down the Shift key on your keyboard while you drag. The Shift key makes sure the picture stays in its right shape. It does not let the picture get squished or stretched. It constrains the proportions so it looks normal. If you forget to hold Shift, your picture might look very wide or very tall, and it will distort and look bad.
To scale from the center, hold down the Alt (Windows) / Option (Mac) key while you drag a corner
There is another trick you can do. Sometimes you want the picture to get smaller from its very center point. To do this, you hold down a different key on your keyboard. On a Windows computer, you hold the Alt key. On a Mac computer, you hold the Option key.
While you are holding that key, you then click and drag a corner handle. Now the picture will get smaller from the middle, and all the sides will move in together. This is good for when you have your picture in the perfect center and you don’t want it to move away. When you are happy with the new small size, you can press the Enter key on your keyboard to make the transform box go away.
Press Enter (Windows) or Return (Mac) to apply the transformation
After you drag the corners and make the picture the size you want, you need to make it permanent. To do this, you just press a button on your keyboard. If you are using a Windows computer, you look for the Enter key and you press it. On an Apple Mac computer, you press the key that says Return, which is usually in the same place as the Enter key.
When you press this key, the transform box with the little handles will disappear. This means the change is now applied to your picture, and it is officially smaller. Your picture is now resized, and you can save it. If you forget to press Enter or Return, the box will remain open, and you will be unable to make other edits. Therefore, remember that this last step is crucial to completing the job.
Photographers and designers face a big editing workload. You can outsource this resizing work easily. This saves time for more important tasks. Consider hiring experts for photo editing. Zenith Clipping offers professional support. You can also seek help from a Community Expert. Join a Facebook group or Q&A communities like Stack Overflow.
FAQs
How to make an image smaller in Photoshop in 2026?
To resize an image in Photoshop, first open your JPEG image. Go to the Image menu. Select the Image Size option. A window will appear on your screen. Adjust the desired width or height. Make sure the Constrain Proportions box remains checked. This keeps the image’s correct aspect ratio. Click OK to apply the new size. This simple action changes the canvas size. It also adjusts the underlying screen pixel information. You can check the final size with the Zoom tool.
How to make an image smaller in Photoshop in 2026 online?
You can resize an image using Photoshop online. Use Adobe’s cloud version of Photoshop or Adobe Express. These tools work directly in your web browsers. You simply upload your image first. Then navigate to the resizing tool in the menu bar. You can adjust the dimensions easily. The tool offers options like Bicubic Smoother for quality. Once the resize is complete, download the smaller image. This process is quick and simple.
How to make an image smaller in Photoshop in 2026 for free?
You can resize an image for free easily. Download the free trial of Adobe Photoshop. Alternatively, you can use the free online tools in Adobe Express. Upload your image to the program. Use the Image Size option to perform the resize. You must maintain the Aspect Ratio correctly. This ensures Proportional scaling of the image. It prevents any distortion. The File Menu helps you save the result. You can use sRGB for web colors.
How to resize images without losing quality in Photoshop online?
To resize an image without losing quality, use Photoshop online. Ensure the Resample option is checked. Select Bicubic Sharper for resampling. This retains maximum pixel information. You can use Adobe Express for resizing. Work with vector-based graphics there. This avoids pixelation entirely. Always check the final image quality afterwards. Zoom in to verify clarity in detail. This is essential for professional print images. These steps help website creators and media professionals.
How to resize an image in Photoshop using a shortcut?
You can quickly resize an image in Photoshop. Use a simple keyboard shortcut command. Press Alt + Ctrl + I on a Windows machine. Press Option + Command + I on a Mac computer. This action opens the Image Size dialog box. You can then adjust the new dimensions. You need to set the desired size there. Hit OK to apply your changes. This saves time for a busy makeup artist or hairstylist. It is an essential skill for handling digital data.
How to resize an image in Photoshop for printing?
To resize an image for printing, use Photoshop. Go to Image, then select Image Size. Adjust the Resolution setting appropriately. Use 300 dpi for high-quality prints. Set the desired physical size now. This includes the width and the height. Match these to your required print dimensions. Ensure these settings meet your printer’s requirements. Finalize the settings by clicking OK. This prepares your image for professional printing.
Final Thought
Resizing images in Photoshop is a very useful skill. It helps pictures fit on websites easily. It saves storage space on your computer. Use Image Size for exact numbers. Use Free Transform for quick adjustments. Always use Smart Objects with Free Transform. Hold the Shift key to maintain proportions.
If the work feels hassle to you, seek the help of experts from Zenith Clipping!


