
Photoshop is tied in with controlling layers. Those astounding banners and cool drawings you see are done in various layers. It’s exceedingly difficult to make everything in one single layer, that is the reason you’ll continuously need to make add a layer on photoshop. The question is..
How to Add a Layer on Photoshop
I have been working with Photoshop for a long time and believe me, you would rather not mess things up here, and let each layer go about its job. Requiring two or three seconds to make another layer will just do you great. Not misrepresenting, you can make a technique utilizing one of the strategies underneath in one little while.
What are Layers in Photoshop?
Layers in Photoshop permit you to work non-horrendously by stacking pictures on top of different pictures without interfacing and blending the pixels of pictures. “Layer” is the main thing that makes Photoshop an astonishing photograph-altering and compositing apparatus. Layers can be used to stack numerous pictures, add vector designs, add text to a picture, and many more.
Layers are helpful because they let you add parts to a picture and work on them each in turn, without forever changing your unique picture., You can change tone and splendor for each layer, apply embellishments, reposition layer content, determine haziness and mixing values, etc. You can likewise revise the stacking request, and interface layers to chip away at them at the same time and make web movements with layers.
Layers are like transparent sheets of glass or stacked on which you can paint pictures. You can see through the transparent region of a layer to the layers. You can deal with each layer autonomously, testing to make the impact you need. Each layer stays autonomous until you consolidate (blend) the layers. The bottommost layer in the Layers board, the Background layer, is constantly locked (secured), meaning you can’t change its stacking request, mixing mode, or obscurity (except if you convert it into a customary layer).
Layers are coordinated on the Layers board. Keep this board apparent while you’re working in Adobe Photoshop Elements. With one look, you can see the dynamic layer (the chosen layer that you are altering). You can interface layers, so they move as a unit, assisting you with overseeing layers. Since different layers in a picture increment the record size, you can decrease the file size by combining layers that you’re finished altering. The Layers panel is a significant wellspring of data as you alter photographs. You can likewise utilize the Layer menu to work with layers.
Customary layers are pixel-based (picture) layers. There are a few other layer types you can use to make special effects:
Fill Layers
Adjustment Layers
Empower you to calibrate and fine-tune color, brightness, and immersion without rolling out long-lasting improvements to your picture (until you straighten, or break down, the change layer).
Type Layers And Shape Layers
Allow you to make vector-based text and shapes. You can’t paint on a change layer, even though you can paint on its cover. To paint on fill or type layers, you should initially change over them into ordinary picture layers.
About the Layers Panel
The Layers panel (Window > Layers) records all layers in a picture, from the top layer to the Background layer at the base. In Expert mode, assuming that you are working in the Custom Workspace, you can drag the Layers board out and tab it with different boards.
The dynamic layer, or the layer that you are dealing with, is featured for simple ID. As you work in a picture, check which layer is dynamic to ensure that the changes and alters you perform influence the right layer. For instance, if you pick an order and nothing appears to occur, check to ensure that you’re checking the dynamic layer out.
Involving the symbols in the board, you can achieve many errands —, for example, making, stowing away, connecting, locking, and erasing layers. For certain exemptions, your progressions influence just the chosen, or dynamic, layer, which is featured.
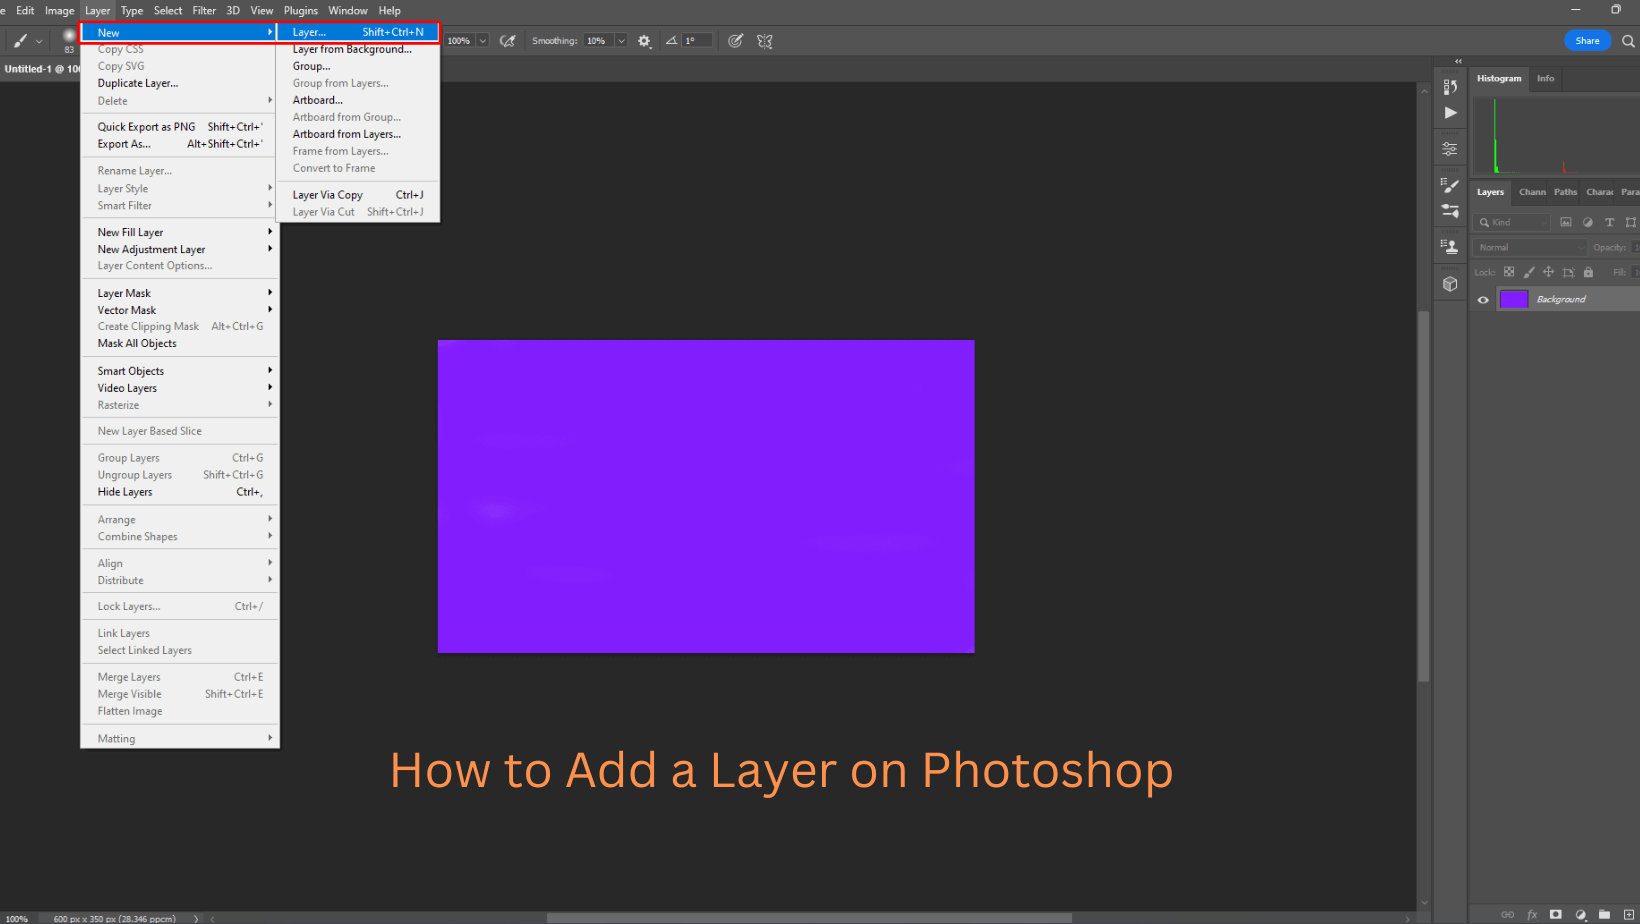
Adding Layers
Recently added layers show up over the chosen layer in the Layers board. You can add layers to a picture by utilizing any of the accompanying techniques:
- Make new, clear layers or transform determinations into layers.
- Convert a foundation into a customary layer or the other way around.
- Paste selections into the picture.
- Utilize the Type tool or a shape tool.
- Copy a current layer.
- You can make up to 8000 layers in a picture, each with its mixing mode and murkiness. In any case, memory limitations might bring down this cutoff.
Make And Name Another Blank Layer
Do one of the following in Photoshop Elements:
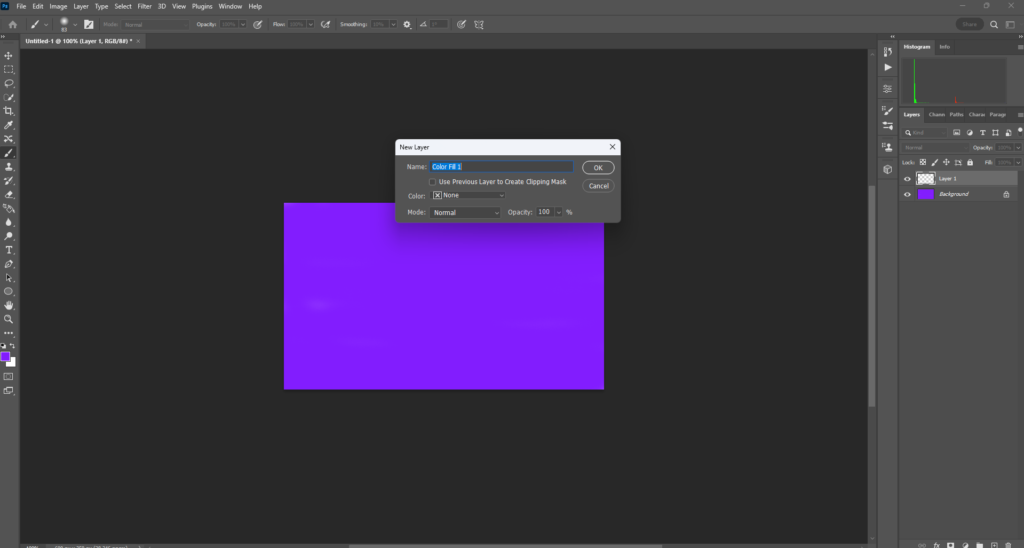
To make a layer with the default name and settings, click the New Layer button on the Layers board. The subsequent layer utilizes Normal mode with 100% opacity and is named by its creation order. (To rename the new layer, double-tap it and type another name.).
To make a layer and indicate a name and choices, pick Layer > New > Layer, or pick New Layer from the Layers board menu. Determine a name and different choices, and afterward, click OK.
The new layer is consequently chosen and shows up on the board over the layer that was last chosen.
Make A New Layer From Part Of Another Layer
You can move part of a picture from one layer to a recently made one, leaving the first in one piece. Select a current layer, and decide. Pick one of the following:
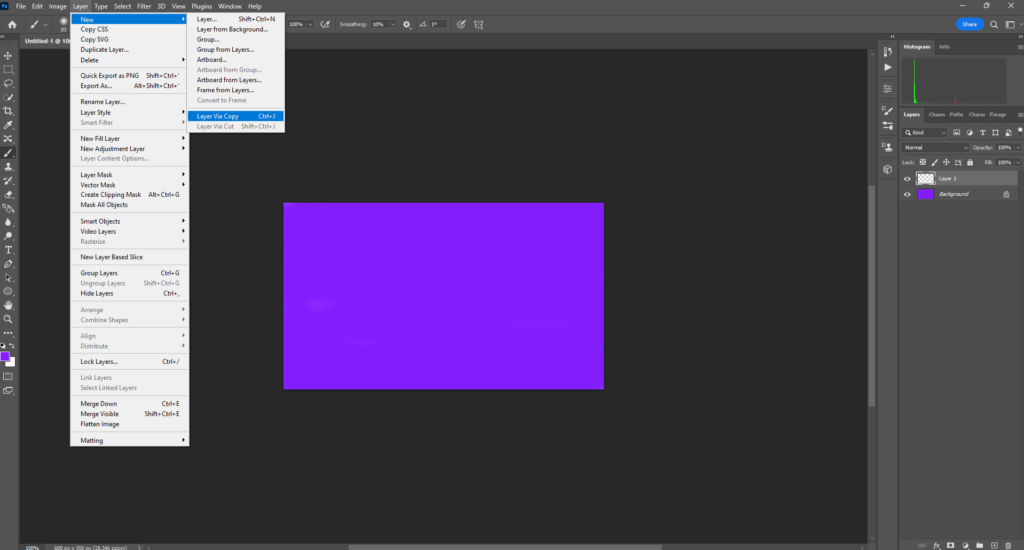
Layer > New > Layer Via Copy to duplicate the selection into another layer.
Layer > New > Layer Via Cut to cut the choice and paste it into another layer.
The selected region shows up in another layer similarly situated comparatively with the picture limits.
Transform The Background Layer Into An Ordinary Layer
The Background layer is the base layer in a picture. Different layers stack on top of the Background layer, which for the most part (however not consistently) contains the genuine picture information of a photograph. To safeguard the picture, the Background layer is constantly locked. To change its stacking request, mixing mode, or murkiness, you should initially change over it into a customary layer.
Do one of the following:
- Double-tap the Background layer on the Layers board.
- Pick Layer > New > Layer From Background.
- Select the Background layer, and pick Duplicate Layer from the Layers board flyout menu, to leave the Background layer in one piece and make a duplicate of it as another layer.
- Note: You can make a copy layer of the changed-over Background layer regardless of how you convert the layer; just select the changed-over Background layer and pick Duplicate Layer from the Layer menu.
- Name the new layer.
- Note: If you drag the Background Eraser tool onto the Background layer, it is consequently changed over into an ordinary layer, and deleted regions become straightforward.
Make A Layer The Background Layer
You can’t change over a layer out of the spotlight layer if the picture as of now has a Background layer. For this situation, you should initially change over the current Background layer into a standard layer.
- Select a layer in the Layers board.
- Pick Layer > New > Background From Layer. Any transparent regions in the first layer are loaded up with the background color.
Oversee Layers
Make another gathering
You can make another gathering to forestall jumbling and arrange the layers. Do one of the following:
To make another gathering with default settings, make the Click A New Group symbol in the Layers board in the Expert mode.
To make another group with modified settings, follow these means:
- Select Layer > New > Group.
- In the dialog box, determine a name as well as other options, and click OK.
Allocate A Colour To A Layer Or A Group
Color coding layers and gatherings assist you with recognizing related layers in the Layers board. Essentially right-click the layer or gathering and select a color.
FAQs
Why layers are used in Photoshop?
You can consider layers of transparent sheets of glass stacked on top of each other, which permit various pieces of each layer to appear on the other side. There are a few sorts of layers you’ll use in Photoshop, and they fall into two primary classes:
Content Layers: These layers contain various kinds of content, similar to photos, text, and shapes.
Adjustment Layers: These layers permit you to apply acclimations to the layers beneath them, similar to immersion or brightness. Adjustment layers are a kind of nondestructive altering since they don’t transform anything about the first picture.
While utilizing layers, it could be useful to turn individual layers on and off to perceive what they mean to the picture. You can do this by tapping the eye symbol close to each layer name.
Layers in Photoshop permit you to work non-damagingly by stacking pictures on top of different pictures without associating and blending the pixels of pictures. “Layer” is the main thing that makes Photoshop an astounding photograph-altering and compositing device. Layers can be utilized to stack various pictures, add text to a picture, add vector designs, and so on.
What are layers in image editing?
A layer is one kind of object or component in a synthesis — a picture, text, or shape. Whenever you open a photograph, you’ll have only one layer, yet you can without much of a stretch add more. Layers stack on top of one another and make up a wide range of advanced pictures and realistic plans.
Involving layers in your photograph-altering programming is one of the main things you can do to make extraordinary pictures. Layers are so strong, that even the most fundamental comprehension of them can further develop your photography hugely. Fortunately utilizing layers is incredibly simple, and extremely speedy. If you track this instructional exercise and integrate the methods, you’ll see a colossal distinction like your pictures.
The Layers board in Photoshop records all layers, layer gatherings, and layer impacts in a picture. You can utilize the Layers board to show and conceal layers, make new layers, and work with gatherings of layers. You can get extra orders and choices in the Layers board menu.
What is the advantage of using layers?
Layers are helpful because they let you add parts to a picture and work on them each in turn, without all-time changing your unique picture. You can change tone and brightness for each layer, apply embellishments, reposition layer content, determine obscurity and mixing values, etc. You can likewise revamp the stacking request, connect layers to work on them at the same time and make web activities with layers.
The principal benefit of layers is that can make each alter simple to switch, by altering on isolated layers. One choice here is to have an establishment layer, then, a correcting layer, then, at that point, a layer for some other added objects (text, slope channels, focal point flares, and so forth), and a layer for variety conditioning.
Layers are like stacked, transparent sheets of glass on which you can paint pictures. You can see through the transparent region of a layer to the layers beneath. You can work on each layer autonomously, testing to make the impact you need. Each layer stays autonomous until you consolidate (combine) the layers.
What are the types of layers?
Photoshop layers can make your professional life more transparent by saving time and giving you profound customization prospects. The following are a few sorts of layers in Photoshop and how to utilize them:
1. Picture Layers
The first photo and any pictures you import into your record involve an Image Layer. You can likewise make another layer by reordering cool pictures from different folders.
2. Type Layers
Make text in your report with this tool. Text in Photoshop is vector-based naturally, so you can alter and resize it all through the creation cycle.
3. Adjustment Layers
By adding an Adjustment Layer, you can alter photograph qualities in a non-horrendous, non-long-lasting way. If you conclude later that you need to get rid of hue/saturation or contrast/brightness changes, simply delete the layer.
To add this kind of layer, go to Layer > New Adjustment Layer and pick one of the choices. You can have however many layers dynamic as you need. Changes just influence the layers, so you can move them around to target explicit pictures.
4. Smart Object Layers
Convert any pictures, text or objects to a Smart Object Layer by going to Layer > Smart Objects > Convert to Smart Object. A Smart Object Layer saves the first type of any pictures in your record, following all changes made to them. Whenever, even after saving the changes, you can fix them as far back as you wish.
5. Fill Layers
To add a Fill Layer, for example, an inclination to obscure or color a sky foundation, go to Layers > New Fill Layer > Gradient. If you set one of the inclinations focuses to Transparent, a piece of the fill layer will have a transparent quality.
Can you make layer folders in InDesign?
Utilizing the Layer Groups plugin is extremely basic. To get the Layer Groups board, go to Window > Layer Groups. Layer Groups board can do all that like the ordinary Layer board, besides adding the Group usefulness (that is the reason individuals who began involving our plugin quit utilizing the first Layers board). You can see bunches like folders where you have your documents. In any case, rather than folders and records, we are discussing gatherings and layers, individually. Likewise to folders, a gathering can contain another gathering.
Make another Layer Group through a little button on the lower edge of the Layer panel board or go to the Layer Group board menu > New Group. Another gathering will appear on the Layer Group board. You can undoubtedly add layers or different gatherings inside a gathering by just a “drag and drop” highlight.
How do you forward layers in InDesign?
Objects in InDesign are layered on top of each other in the similar order they were made. This is in some cases called the stacking order. The primary article made is behind the second, the second behind the third, etc. However you may not see the layering when items are next to each other, it is evident when they cross over.
To go up or down the whole stack:
- Select an object you need to move.
- Pick Object > Arrange > Bring to Front to move the article before all the others in its layer. Impacts of the Bring to Front order.
- Pick Object > Arrange > Send to Back to move the article behind all the others in its layer
How do I add an image to a layer in Illustrator?
Adobe Illustrator has an enormous toolbox for making and altering designs, yet it additionally permits you to paste separate picture documents into a venture. Beneath, we’ve shared how to insert pictures in Illustrator, so that they’re contained in an undertaking at full resolution.
1. Before launching Illustrator, we suggest preparing the picture that you might want to install. Illustrator isn’t intended for photograph altering, so it’s more straightforward to utilize Photoshop or a conventional altering system to deal with any editing, contrast, and other significant settings.
2. Now launch Illustrator and go to “Window” > “Layers” to show the Layers board, if it isn’t now apparent. Click the “Add New Layer” symbol situated on the base right half of the board.
3. With your new layer chosen, pick “Document” > “Spot” to embed your picture record. A document catalog will show up, permitting you to find the Illustrator project folder. Click on the picture thumbnail, and afterward click “Spot”.
4. If vital, you can snap and delay the picture corners to change the aspects or change the picture arrangement with the Transform Palette.
5. When these works are finished, it’s not difficult to figure out how to insert pictures in Illustrator. Simply ensure that your picture is chosen and pick “Insert” from the top toolbar.
6. At long last, we suggest holding on until you’ve finished the undertaking before installing the picture record. The Embed option is planned so that if you share an Illustrator project document with another client, the picture will be incorporated.
How do you organize layers in Photoshop?
Layer groups can assist you with getting sorted out an archive in Adobe Photoshop so it’s more straightforward to find text and other design components as you make. Layer bunches additionally make it more simple to work with a few layers at once.
Create a New Group at the lower part of the Layers board, double-tap the new group name, and change it to Logo. Click the arrow close to the Logo layer group to see how the layers are presently coordinated into a folding group.
How to Create Smart Objects in Photoshop?
A smart object is a definitive non-disastrous layer in Photoshop. Any alters that you apply to a smart object can be scattered or returned; they’re never heated for all time into the layer.
Changing a layer completely to a smart object is extremely simple in Photoshop. You essentially right-click on the layer being referred to and select “Convert to Smart Object.”
You can likewise make a smart object out of different layers. Shift + click (or Ctrl/Cmd + click) to choose the layers you need, right-snap, and select “Convert to Smart Object.” The layers will converge into a single smart item layer. Then Photoshop allows you to pick how the part layers inside the smart object mix; simply go to Photoshop’s top menu > Layer > Smart Objects > Stack Mode, and you’ll see various choices.
You can likewise change a layer over completely to a smart object from Adobe Camera Raw, which I enthusiastically suggest. After you’ve opened a crude record in Adobe Camera Raw and completed your alters, simply hold down the Shift key, and you’ll see that the “Open” button at the lower part of Camera Raw changes to “Open Object.” Click it, and the photograph you’ve been altering will open straightforwardly as a brilliant article for additional altering in Photoshop.
Final Words
The absolute initial step to dominating Photoshop is to get to know the layers. Whether you’re adding a background color or applying different effects, making another layer is the top priority and essential step that you can’t miss. You can use the above strategies to rapidly add layers and do your enchantment.


