Have you caught a photograph in some unacceptable direction? Using Photoshop to rotate an image is a basic ability that lets you precisely change the orientation of your pictures.. There are likewise numerous different events when you’d have to turn or shift your pictures, and Photoshop has every one of the apparatuses you want to do precisely that. Remember mastering the art of image rotation empowers you to enhance the composition and visual impact of your photographs effortlessly.
Go ahead and pick the strategy that works for your specific necessities. In this article, we show you a couple of ways How to Rotate an Image in Photoshop.
So let’s get started.
The Most Effective Method To Rotate An Image In Photoshop
Contingent upon whether you’re hoping to pivot a whole picture or a layer inside your picture, you can involve one of the accompanying strategies in Photoshop.
1. How to Rotate A Whole Picture in Photoshop
If you have any desire to completely pivot your image by a specific degree, Photoshop has a tool that turns your material. This turns all that is perched on the material (your image and whatever other components that you might have added with Photoshop).
This is the way to turn the material in Photoshop:
- Try to save your rotated picture before shutting Photoshop.
- If the rotation doesn’t look great or on the other hand if it isn’t the way you needed it, press Ctrl + Z (for Windows) or Command + Z (Mac) to fix your revolution.
2. How To Rotate Some Parts On A Picture With Layers
If you’re simply hoping to turn specific parts in your picture, and these parts have their singular layers, you can just rotate the layer to pivot your picked components.
This uses a tool that is not quite the same as the one utilized in the above strategy. Transform tool is one of the Photoshop tools that turn individual items into your photographs.
You can utilize this tool as follows to pivot an image on your primary picture, or turn different items as long as they have their singular layers:
- Launch your picture with Photoshop and click the layer you need to turn in the layers list.
- Click Edit at the top, select Transform, and pick one of the turn choices.
- To rotate your picture by a custom point, select Edit > Free Transform. You can now turn the edges to pivot your picture.
- Try to tap the mark symbol at the top to save your turn.
3. Instructions to Rotate an Image Using the Crop Tool
This is the ideal instrument to use when you need to both yield and pivot your photographs. The crop tool can assist you with trimming your pictures in Photoshop. But you can also utilize this tool to pivot your pictures.
This is the way to involve this tool in rotation:
- While your picture is as yet open in Photoshop, click the output tool in the toolbar on the left. On the other hand, press C on your keyboard to enact the apparatus.
- Click on your picture once and carry your cursor to one of the four corners of the picture.
- When your cursor transforms into a double bolt symbol, you’re prepared to turn the picture. Hold down the mouse button and begin pivoting the picture.
- Click the mark of approval symbol at the top to save your changes.
4. Step By Step Instructions To Rotate A Picture Just To See How It Looks
In some cases, you might need to turn a picture just to perceive how it looks pivoted. Photoshop has a tool for this undertaking too, and this tool won’t roll out any long-lasting improvements to your photograph.
The tool is called Rotate View and it helps review your pivoted pictures. You can utilize it as follows:
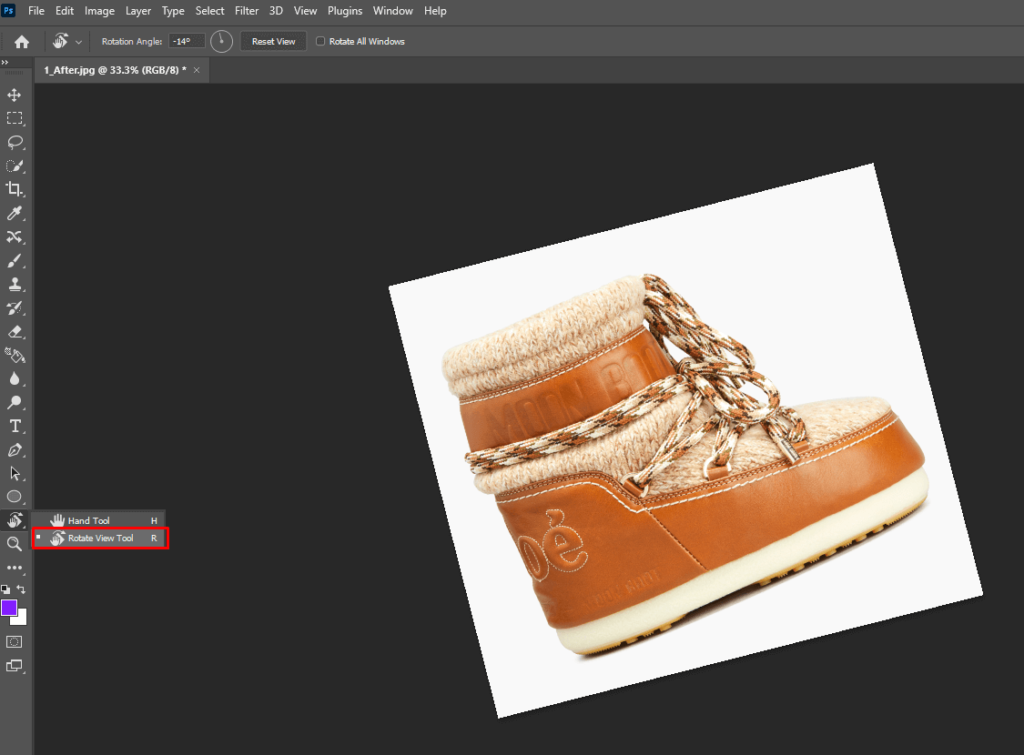
- Now press the Rotate View Tool in the toolbar on the left. If you don’t see it, snap and hold on to the hand symbol and you’ll see the tool. On the other hand, press R on your keyboard and that will actuate the apparatus for you.
- Click on your picture and you can turn it in for anything course you need.
- To turn your picture by a specific degree, enter that degree in the container at the top and press Enter.
- To return to the unrotated picture, click on the Reset View button at the top. This will reset all of your rotation changes.
How to Automate Image Rotation in Photoshop
If you have a few pictures to rotate, utilizing the above techniques to do that will take for eternity. A more effective methodology is the utilization of a robotization highlight that is incorporated into Photoshop.
Photoshop has an element called Actions which empowers you to record your photograph-altering errands. You can record an activity that pivots your pictures, and you can then involve this activity for every one of your pictures that should be turned. At the point when the activity runs, it will bunch turn every one of your pictures immediately.
Here are the two phases to set this element up in Photoshop
1. How to Create an Action to Rotate Images in Photoshop:
- Make a folder named Rotated on your desktop. This folder will save your rotated pictures.
- Open one of the pictures you need to pivot with Photoshop.
- Click the Window option at the top and then select Actions.
- Select the Create new activity choice, enter a name for your activity, and click Record.
- Presently, rotate your picture how you might want to turn your different pictures. This typically incorporates clicking Image > Image Rotation and picking a turn choice.
- At the point when your picture is pivoted, click File > Save As.
- Select the rotated folder on your desktop, leave the picture name as is, pick a format from the Format dropdown menu, and lastly hit Save at the base.
- Click the stop button in the Actions sheet to stop your activity recording.
2. How to Use an Action to Rotate Images in Photoshop:
Make an organizer called To Rotate on your work area; duplicate every one of the pictures you need to rotate to this folder.
- Open Photoshop and then click File > Automate > Batch.
- Select the activity you made in the past stage from the Action dropdown menu.
- Pick the Folder from the Source dropdown menu.
- Click the Choose button and pick the To Rotate organizer containing all of your pictures on the desktop.
- Click OK and Photoshop will begin turning all of the pictures in that folder.
- Your subsequent pictures will be saved in the Rotated organizer on your desktop.
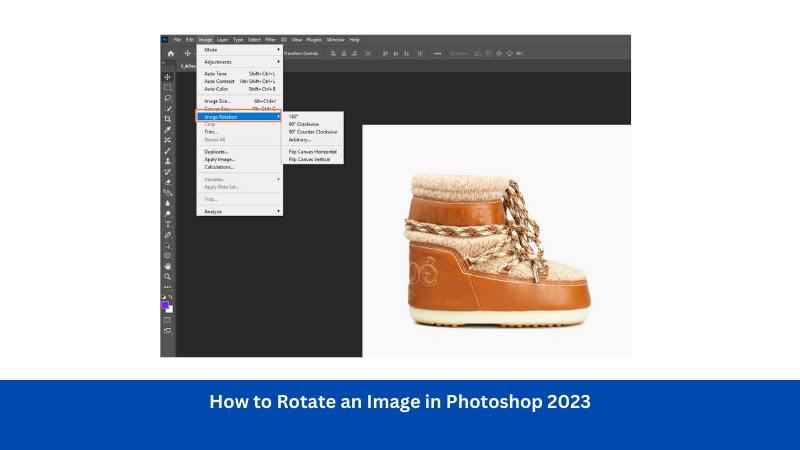
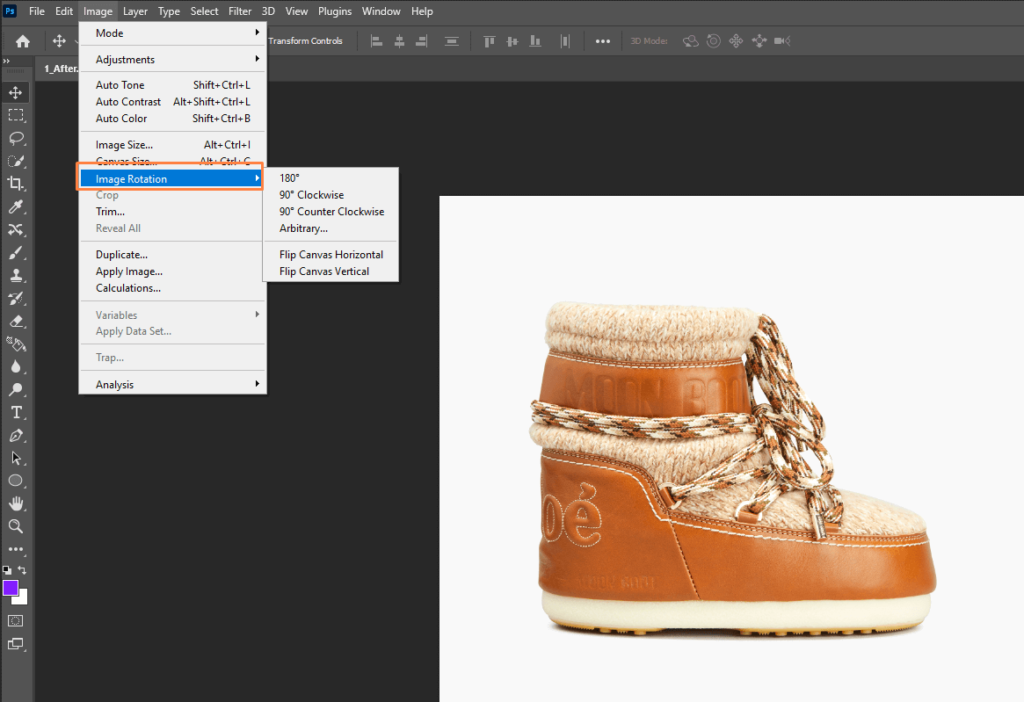
How to Rotate the Canvas in Photoshop
There are a couple of ways of turning a picture in Photoshop. Turning a picture in Photoshop can mean pivoting individual components inside the image or the whole material itself.
Turning the whole material when it contains a picture is the least difficult method for performing huge rotations precisely – wonderful when the picture is topsy turvy or turned aside or the other. To do as such:
- Select Image in the top menu bar.
- Select Image Rotation.
- Select 180 Degrees, 90 Degrees Clockwise, or 90 Degrees Counter Clockwise for a fast pivot, or select Flip Canvas Horizontal or Flip Canvas Vertical to switch the image. On the other hand, select Arbitrarily and input a particular point of revolution that you need.
- If you could do without the revolution you’ve made, press Ctrl (or CMD)+Z to fix your activity. On the other hand press Ctrl (or CMD)+Alt+Z to make a few fixed strides.
Step by Step Instructions to Transform a Layer
To perform comparative rotations to the above choice, yet need to apply it to a particular layer, you need to utilize the Transform tool all things being equal.
- Select the layer you need to turn.
- If you don’t see the Layers window, you can empower it by going to Windows > Layers.
- Select Edit > Transform.
- There you can choose to pivot the layer 90 degrees clockwise or counterclockwise, as well as turn it 180 degrees. There are likewise choices for flipping the picture upward and on a level plane.
- To turn a particular component inside a picture you can utilize a similar strategy framed above, yet you’ll have to put that specific piece of the image on its layer. To do as such, follow the ways to choose portions of a picture in our manual for how to eliminate a foundation. Then reorder those components onto another layer, or select them and press Ctrl (or CMD)+J.
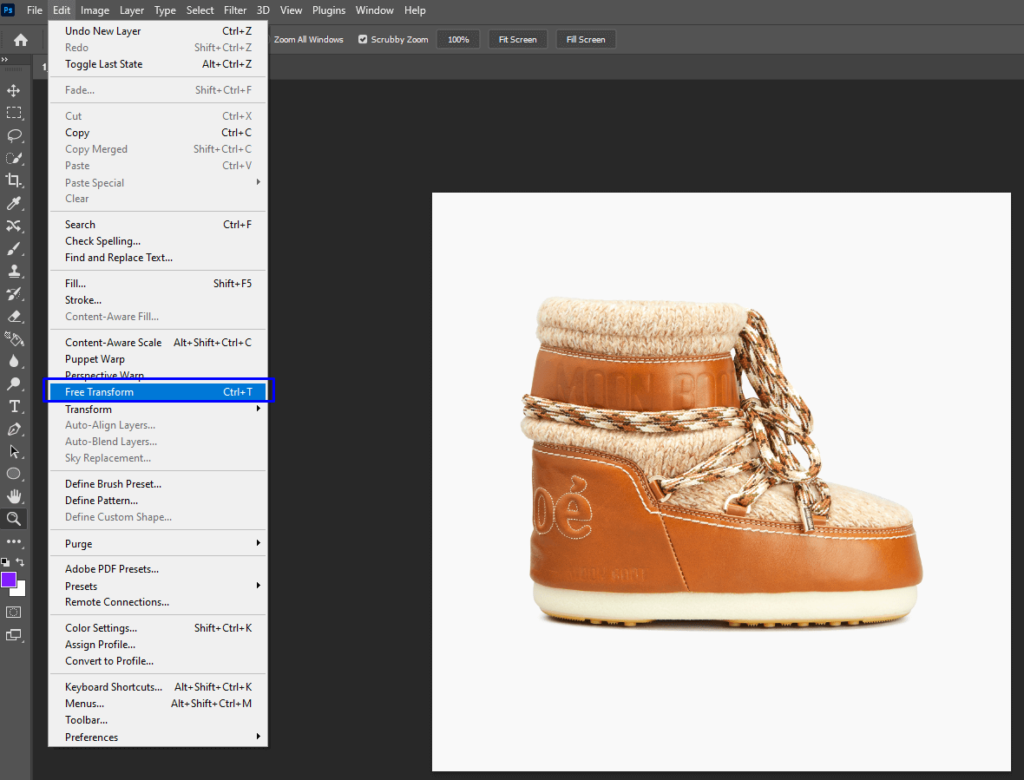
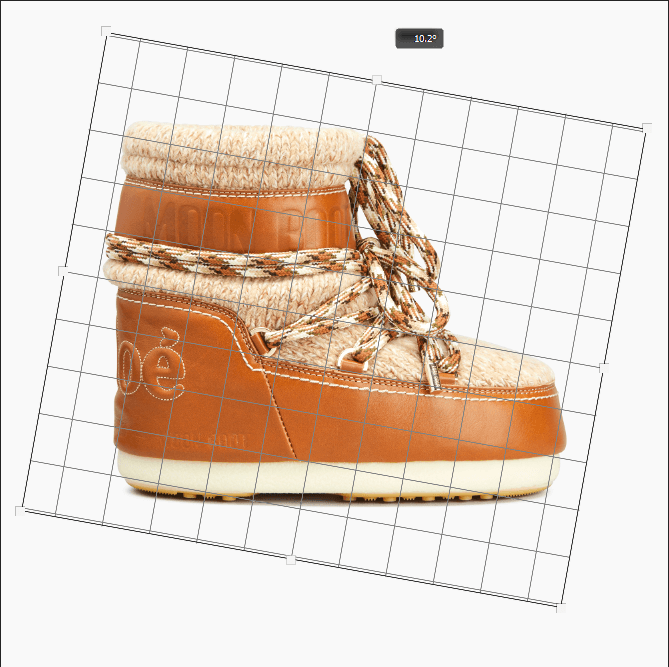
How to Free Transform an Image
Although not generally so precise as the other technique, turning a picture by hand utilizing Free Transform is one of the fastest.
Select the picture or piece of a picture you need to turn, then press Ctrl (or CMD)+T. Then again, you can choose Edit > Free Transform. Select around the edge of the bounding box of your selection and drag toward the path you wish to rotate it.
At the point when you’re blissful, either double-tap/tap or press Enter to affirm your revolution.
The Most Effective Method to Crop an Image
Although not stringently a revolution instrument, Crop encapsulates that capacity and it implies you can turn and chop down a picture simultaneously for a superior plan.
- Select the Crop tool from the Tools menu. It’s commonly the fourth from the top and seems to be a couple of crossed-set squares.
- If you can’t find the Tools menu, then select Window > Tools.
- Select your picture, then select and haul outside the picture’s jumping box to pivot it. The review will show how the picture will be trimmed as it pivots. At the point when you’re cheerful either double-tap/tap or press Enter to affirm your rotation and crop.
Instructions to Rotate an Image for Better Composition
Turning a picture is normally something you do to fix an image so it’s straighter, or lines up better relatively. Photoshop has a couple of stunts and tools you can use to make the cycle simpler and make your pivots more significant. The following are a couple of additional things to consider.
Empower Rulers
Rulers can assist you with arranging a picture in a particular direction or help with estimating the components of an image. Select View > Rulers to empower them. At the point when set up, you can choose them to show a level or vertical line on the picture. While rotating can make the most common way of constraining a skyline to be even a lot more straightforward.
Empower Overlay Options
While utilizing the Crop tool, the top menu has the choice to show a few overlay options, including the photographic artist’s Rule of thirds and the exemplary painter’s Golden Triangle. To empower this, select the Crop tool, then, in the top menu, select the little white triangle close to the machine gear-piece symbol. They will then show up as lattice lines when you play out a harvest as well as turn.
Turn Your Images, Not Your Computer Screen
Regardless of how and why you need to rotate pictures, Photoshop has all of the turn options that you’ll at any point require. It even offers a programmed rotation saving you from manually rotating all of your pictures thus.
Photographs situated the incorrect way aren’t the main issue individuals have with their pictures. Here and there your pictures might be hazy and need fixing. Fortunately, Photoshop can assist with that as well.
FAQs
What is the shortcut to rotating an object in Photoshop?
To rotate the picture and layer them together, go up to the menu bar > select “picture” > “picture turn” > desired rotation. If you want to rotate text, Utilize the transform tool, use Ctrl+T, and then take the cursor outside of the box. You can turn it by moving the cursor.
How do you rotate an object 90 degrees in Photoshop?
To begin with, click on the ‘image’ dropdown menu in the menu bar. Then, go to Image Rotation>90° Counter Clockwise.
Where is the Rotate View tool in Photoshop?
Press the R key or snap and hold the Hand tool at the lower part of the Toolbox and find the Rotate View tool.
How do you rotate horizontally in Photoshop?
In Photoshop’s menu bar, click “Edit” and afterward float over the “Transform” option. From the “Transform” menu, select “Flip Horizontal” to flip your layer on a level plane, or select “Flip Vertical” to an upward direction to flip your layer.
How do I adjust an image in Photoshop?
To adjust an image in Photoshop, first of all, choose image > image size. Measure width and level in pixels for pictures you intend to utilize on the web or in inches (or centimeters) for pictures to print. Keep the connection symbol featured to safeguard extents. Select Resample to change the number of pixels in the picture. This changes the picture size and then click OK.
How do I manually resize an object in Photoshop?
The most effective method to resize a layer in Photoshop,
- Select the layer you need to resize.
- Go to “Alter” on your top menu bar and afterward click “Free Transform.” The resize bars will spring up over the layer.
- Intuitive the layer to your ideal size.
- Mark the mark in the top choices bar.
Final Words On How To Rotate An Image In Photoshop
Hope you have found this blog very helpful and now you will be able to rotate an image in Photoshop. Because Photoshop makes it incredibly easy to rotate an image in just a few steps. As Photoshop makes it incredibly easy to turn a picture in only a couple of steps.