
iPhones are known overall for their astounding camera quality and camera highlights. Also, if you own an iPhone and snap imperfection photographs like a new kid on the block then sad to report that you are counting the pennies while grasping a case of fortune.
iPhone cameras can rival top-notch DSLRs. If even without monitoring the utilization of iPhone camera highlights you can click a photograph or record a video that grapes your eyeballs for quite a while then give an idea that how might an impeccably clicked photograph from an iPhone will seem to be. However, you should be familiar with all the features of your iPhone camera for that. This is the thing we are hanging around for.
In this article, we will impart to you the best iPhone camera tips and tricks so you can take entrancing photographs and shoot proficient videos without your DSLR convenience. So let’s get started with the iPhone photography hacks.
1. Adjusting Exposure and Focus
If you learn the secret to giving the ideal focus and exposure to your photographs, you will see a significant change in your photography abilities. To give the focus to your photograph, you want to tap on the article that you want to catch. This will eliminate any haziness from that item and sharpen it up a bit.
Exposure just means giving the perfect light to your photograph. A lot of light or too minimal light will diminish the nature of the photograph. After you tap the screen, you will see a splendor bar showing up on the screen. You want to climb the bar to give all the more light and drop it down to give less light to your photograph.
2. Obscure Background with Portrait Mode
Certain individuals probably won’t know what’s truly going on with portrait mode while others probably won’t know how to click those expert photographs where the background is obscured. Indeed, the portrait method of your phone is the one that clicks those photographs.
Firstly, open the camera application on your iPhone and look at the PORTRAIT choice. Ensure the item is between two to eight feet from the camera.
Click the ƒ symbol in the upper-right corner. This will show a slider at the base which you can use to change the central length. Then, click the photograph with an ideal point.
In the most recent iPhones, you can likewise change the blur you need to keep behind the scenes.
- Open the photograph in the Photos app.
- Tap on the Edit choice on the top.
- Move the slider given at the base to increment or diminish the obscuring power.
3. Clicking Photographs While Recording Video
While recording a video, there could come a moment when you need to click a photograph yet need no interruption in your video. iPhone permits you to do that and it’s very simple to do as such.
While recording a video, you can see a white round button showing up as an afterthought. Just by tapping on it, you can click a photograph while your video is getting recorded typically.
4. Take Your Night Photoshoot To A Higher Level
For clicking photographs in the daytime, you have a ton of features and the regular light is adequate to give a decent light exposure to the photographs. However, that is not the situation when it’s evening. The typical working of the camera won’t click photographs that make you go WOW! That is the reason iPhones accompany a night mode include that changes the camera quality to make your photograph’s night cordial and you have great light exposure in your photographs.
At the point when your iPhone is in a low-light climate, it will naturally turn on night mode include. You will see a night mode symbol at the upper right corner which becomes yellow when it is dynamic. iPhone is sufficiently shrewd to adjust to the low light and it consequently picks the best settings to take dazzling pictures around evening time.
Contingent upon how much light your iPhone camera is getting, it could require a significant period to click photographs in night mode. The mystery behind low-light photography is to keep the shade speed slow with the goal that the camera can catch increasing light.
iPhone consequently picks this screen speed by examining the climate, nonetheless, you can likewise set it physically by tapping on the night mode symbol. You will see a slider at the base where you can change the period for how long you need to keep the screen open. This can go max as long as 10 seconds which you can use to take photographs of the sky in the light.
Tip: When snapping a picture in night mode, make a point to keep your iPhone as still as could be expected. The more still it is, the more great outcomes you will get. We will prescribe you to put it on a strong and secure surface. You can use a mobile stand for this work
5. Smoot Time-lapse Recordings
You might have seen time-lapse recordings in the films or the shorts taken by proficient photographic artists where they show the mists moving from nightfall till first light and the vehicles proceeding to accompany speed. iPhones likewise accompany a period pass highlight utilizing which you can make similar sorts of shots.
Open your iPhone camera and look at the choices given at the base till you figure out TIME-LAPSE. Now fit or hold your phone at an ideal point and tap on the red button to begin the video. The interesting part here is to keep your iPhone however still as conceivable while the video seems to be recording.
6. Changing Resolution and FPS
Just by changing the resolution and FPS of a video, you can improve the general nature of the recorded video. This is how you can make changes in the resolution and FPS.
- Go to your iPhone Settings.
- Select the camera option.
- Now change the resolution to the most noteworthy or fairly comparable. Enables delayed the video up to half.
7. Making Ultra Slo-mo Recordings
Slow-mo recordings give a true-to-life view to your recordings, particularly when completed with an abrupt impact where an ordinarily moving video changes to slo-mo. You can utilize the slo-mo choice on your iPhone with these means.
While making the slo-mo video, try to keep the resolution and FPS of the video recording as high as conceivable to get the best out of your slo-mo recording. You can change the FPS from the upper right corner.
8. Rejuvenate Photographs with Live Photo Mode
iPhone camera has a live photograph mode which catches the entire second another way rather than simply taking a still picture. With this element, iPhone records a progression of shots that happens in 1.5 seconds when you snap a photo alongside the sound. If you long-push on the live photograph, it becomes fully awake appearing the second as a brief video. Aside from that, you can apply different impacts to live photographs like skip, long-exposure, and circle.
To take live photographs on iPhone, open the Camera application and snap on the three-circles symbol at the upper right corner of the photo mode. Make a point to keep your gadget still for several seconds when tapping on the catch button. As a matter of course, you will see live photographs as still pictures. To apply another impact, swipe up the live photograph or snap on the LIVE choice in the upper right corner and afterward pick the impact you need to utilize.
You can likewise alter live photographs as you alter ordinary pictures with the Photos application on your iPhone. Click the Edit choice in the upper right corner. You will see different altering apparatuses at the base including channels and editing.
9. Take Shocking Long-exposure Photographs
Have you seen those astounding pictures in which water shows up exceptionally smooth or night photography with light paths of stars? Such sorts of photographs are called long-exposure in proficient terms which are taken at a slow shutter speed. The camera shutter is open for a significant stretch which permits all the more light to enter the camera. This adds more brilliance and gives a smooth blur impact to the moving items in the photograph.
You can likewise take those shocking long-exposure photographs with your iPhone. This is conceivable with the Live Photo mode. So fundamentally what you want to typically do is first take a live photograph. Try to keep your gadget as still as could be expected. The more still it is, the more great outcomes you will get. You can involve a mobile tripod for this errand. Presently once the photograph is taken, open it and swipe up or tap the LIVE choice in the upper left corner. Pick Long Exposure and this will apply an astonishing movement blur impact to your photograph.
10. Take Boomerang Recordings With An iPhone Camera
A boomerang is an eruption of photographs that play to and fro to make a circle video. You will be intrigued to realize that you can make fun boomerang recordings with your iPhone camera. Like long exposure, you can transform live photographs into boomerangs with a Loop impact. Simply snap a picture with live mode turned on and afterward open it in the Photos application. From that point onward, click on the Live choice or swipe up the photograph and afterward pick Loop Impact.
11. Smooth Zoom Impact
Unexpected zoom-in and zoom-out impacts in the recordings can offer proficient shifts of focus over to your shots. Yet, you want to utilize the zooming impact flawlessly for that. While recording a video, you will see a zooming wheel right over the play button. If you hold the zoom wheel it will bust open and you can move your thumb right or avoided to zoom in or zoom about the video in a characteristic smooth manner.
12. Utilization of Burst Photographs
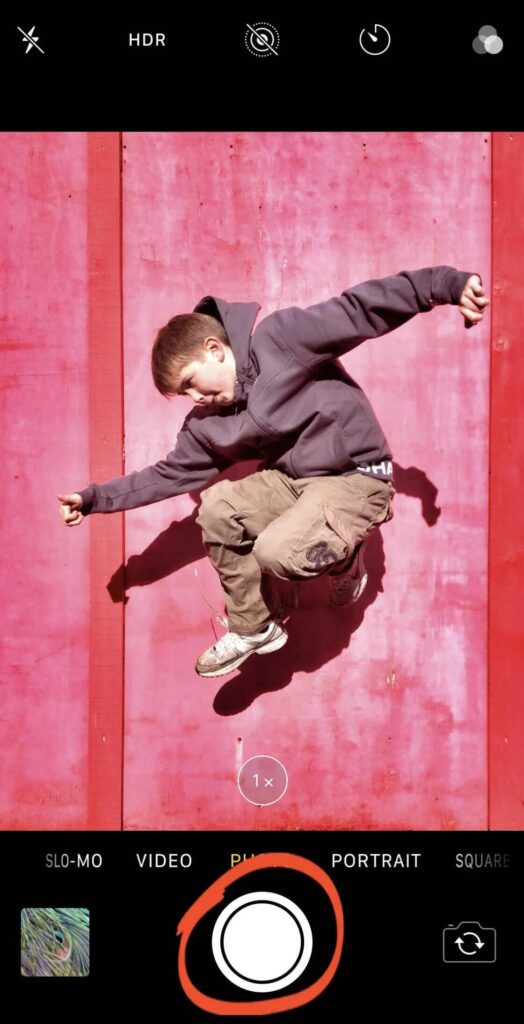
The burst photographs element can prove to be useful when you need to click an ideal shot of a moving object. It is additionally an extraordinary component when you want to click on your pets or your child who give an ideal response now and again.
Taking burst photographs on iPhone is a little stunt as there is no immediate option accessible for that. You need to tap on the catch button and afterward in a split second drag it to the left side. You will see the count of the number of pictures that have been clicked at the base. To stop the burst mode, just release the capture button.
After a lot of photographs are clicked, you can pick the ones that you want to keep and afterward effectively erase the other photographs. To do this, open the burst in the Photos app and tap on the Select option at the base. Now select the photographs that you like and wish to keep and afterwards tap on the Done to save the changes. The selected photographs will be saved.
13. Immediately Take A Video From Photo Mode
How about we guess you are in Photo mode and abruptly you need to record a video. Before you change to the Video mode, you might miss catching the second meanwhile. There is a simple iPhone camera stunt utilizing which you can take a video from the Photo mode. So what you want to do is press and hold the catch button. This will begin recording the video in a flash. To keep it on without hands mode, just drag the button to the lock symbol on the right side.
14. Add Framework To iPhone Camera
If you are a photographic artist, you would be aware of the standard of thirds which permits you to take more attractive photographs. More often than not when you snap a photo, you don’t think about the arrangement on your camera. An ideal photograph is one in which items are mathematically adjusted according to each viewpoint.
This can be accomplished by utilizing networks on your iPhone camera that separates the screen with vertical and flat lines into 9 sections. With the reference of these lines, you can apply the standard of thirds and adjust the objects in your image to the skyline or some other reference point. To empower frameworks, basically, go to Settings on your iPhone and open the camera. From that point forward, flip the button close to the Grid choice and that is all there is to it.
15. Set A Clock To Take Pictures
Does it ever happen that you want to snap a photo of your gathering of companions yet have nobody around to click it? You can take automatic photographs by setting a clock on your iPhone camera. To do this, go to the Photo mode and snap the drop-up button at the top. This will uncover a few options at the base. Click on the clock (clock) symbol and afterward put down the point in the period after which you need to make your effort.
There are 2 options: 3s and 10s. Whenever you have set the clock, put the iPhone at your ideal spot and fix the camera view as you maintain that the image should be taken. From that point forward, press the capture button and this will begin the commencement. When it gets done, your iPhone will consequently tap the image.
FAQs
How can I get better iPhone photography?
There are some tips below that you can use for better iPhone photography.
- Take more photographs than you need.
- Catch action shots utilizing Burst mode.
- Explore different avenues regarding points of view.
- Look at HDR mode for high-difference shots.
- Utilize the standard of thirds for the adjusted composition.
- Use Portrait mode for lovely bokeh.
- Add profundity to your photographs.
- Try using an external lens.
Can you do professional photography with an iPhone?
With the technology incorporated into iPhone cameras and altering apps, you can accomplish professional-looking photographs simply by utilizing your phone.
How do I take photos like a pro?
You can take beautiful photos like a pro in the following ways,
- Catch Multiple Shots.
- Realize What Your Camera Can Do.
- Stick to Outdoors and utilize normal light where conceivable.
- Stay away from Digital Zoom.
- Use HDR.
- Use Editing Tools.
- If that is dim, lay the phone on a level surface.
How can I take better pictures of myself with my phone?
You can take better pictures of yourself in the following ways,
- In the first place, begin with a fresh state.
- A tiny amount of outlining makes a remarkable difference.
- Ditch the digital zoom.
- Search for light before making your own.
- Keep an eye out for cloud storage trickery.
- Use a stand.
- Go remote with a shutter button.
How do you pose in iPhone pictures?
You can pose in different ways in iPhone pictures,
- Make Your Subject Comfortable.
- Pick Flattering Postures.
- Position Your Subject At An Interesting Angle.
- Position Your Subject’s Hands.
- Assist Your Subject With picking A Smile.
Does iPhone 12 take good pictures?
The iPhone 12 can take dynamic, well-exposed pictures with little input from you.
How do I turn on HDR on my iPhone?
You can turn on the HDR in the following ways,
- Firstly, Open the Settings application.
- Tap Camera.
- Look down to HDR (High Dynamic Range).
- Switch Keep Normal Photo on to save both the HDR photograph and the non-HDR photograph.
- Switch Keep Normal Photo off to save just the HDR form.
Final Words on 15 iPhone Photography Hacks in 2023
iPhone undoubtedly has the best camera quality yet you probably won’t have the best photography abilities. These are a few valuable tips and tricks that can assist you with taking hypnotizing photographs and capitalizing on your iPhone camera. So it is the ideal time to take care of business and evaluate these things yourself. We want to believe that you find this guide supportive to gain some new useful knowledge.


