Captions and subtitles are vital for making videos accessible. People who are new to Premiere Pro need to learn how to add subtitles. It’s not as easy as just flipping a switch to add subtitles to Premiere Pro 2025. There is always some job that needs to be done by hand.
Automatic Speech Recognition (ASR) is a feature of Premiere Pro. This can make subtitles for Premiere Pro on its own. But this might not always be the best way. We will talk about some easy techniques to add subtitles in Premiere Pro. This also covers software made by other companies. You will learn how to simply add subtitles to Premiere Pro 2025.
Let’s dive below for a detailed explanation!
How to Automatically Add Subtitles in Premiere Pro
The ASR tool in Premiere Pro lets you add automatic subtitles. You may find this in the Text panel. This method works well and is easy to use. It cuts down on a lot of editing time. The Adobe Premiere Pro subtitles generator makes captions right away. You can quickly make subtitles with Premiere Pro.
Know More: Subtitles Closed captions display synchronized text. They always serve different purposes. Subtitles translate spoken dialogue for viewers who cannot hear. Closed captions transcribe all meaningful audio for the deaf. This includes sound effects and speaker identification. Closed captions use specific technical standards. They are delivered as a separate sidecar file. Viewers can turn them on or off easily. Subtitles are often open captions or burned-in titles.
They are permanently embedded in the video image. Premiere Pro uses a unified Text panel for both. You can use Automatic Transcription to create time-coded caption clips. You can import standard files like SRT and VTT. Customize appearance using the Properties panel. This sets the subtitle default track style. Choose Create Sidecar File or Burn Captions Into Video upon export. This selects the appropriate caption format.
Step 1: Navigate to the Captions Workspace
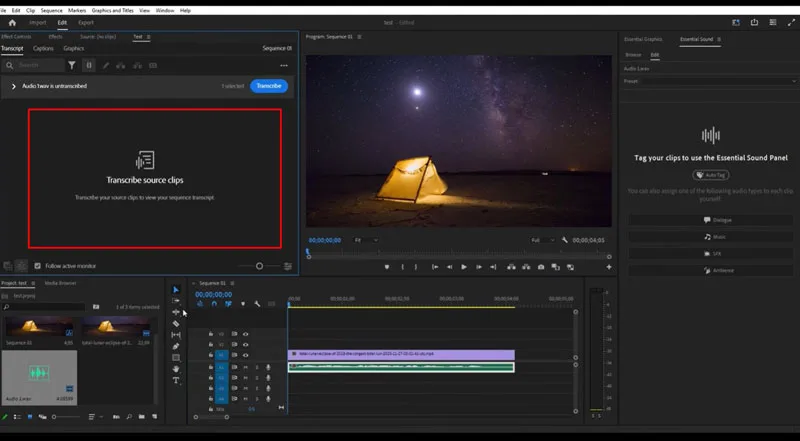
You open the panel for text. From the menu, choose Window > Text. You have a sequence that plays a sound. Press the big Transcribe button. A box opens up for settings. Check the audio tracks for the language. In the dialog box, click Transcribe. Premiere Pro makes a full transcript.
Step 2: Generate Automatic Subtitles and Captions
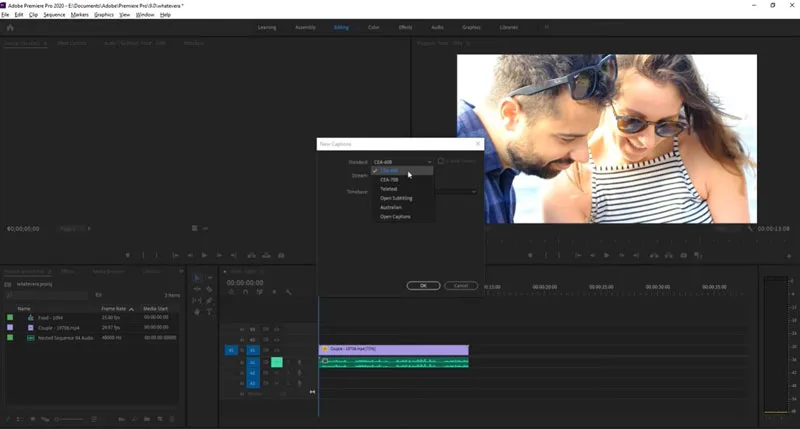
The automatic transcribing is done now. Click the CC icon or the Create Captions button. This opens the dialog box for making captions. Set the options for the subtitle clips. Set the maximum number of characters that can fit on a line. Set the minimum line length. Click on “Create Captions.” A caption track is made by Premiere Pro. There are separate subtitle clips on the track.
Step 3: Edit and Customize the Subtitles
You need to check the subtitles that were made. Check the subtitles in Premiere Pro for spelling mistakes. To fix the text, double-click on it in the panel. You can change the timing by dragging clip points. Choose all of the subtitle clips. Open the panel for Properties. Edit the style of subtitles in Premiere Pro here. Change the background color and font size. Select Burn Captions Into Video to export. You can also choose “Create Sidecar File.”
How to Add Subtitles to a Video in Premiere Pro Manually
You may make subtitles in Premiere Pro by hand. First, open the Text panel. Make a new caption track. Use the Type Tool. Press the Program Monitor button. It’s easy to type your subtitle text. The text seems like a visual clip. Change the length of the clip edges. To set the timing, drag the whole clip. Use the Properties panel to change how things look. Do this for every piece of conversation.
How to Add SRT Subtitle Files and Other Formats in Premiere Pro
This is the best way to do it. You may import subtitles into Premiere Pro from a file. This file has exact timestamps for text. SRT, VTT, and XML are some of the subtitle file types that are supported. This strategy makes it easy to use data that is already there.
Step 1: Prepare Your Subtitle File
Make sure your subtitle file is ready. The file has to be in a format that is supported. A lot of people choose SRT files. There are timestamps in the text in this file.
Step 2: Import the Subtitle File.
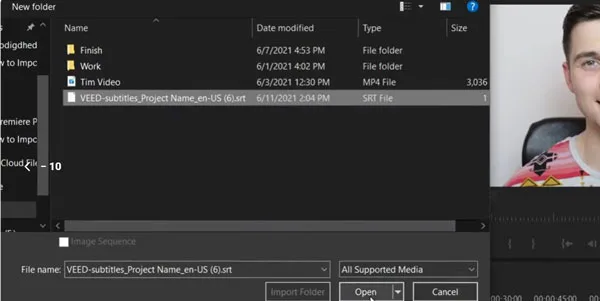
In the menu, click on File and then Import. Go to your SRT file. Choose the file and then click Import. You can also drag the file into the Project Panel. The file looks like a project asset.
Step 3: Add the Subtitle Track to Your Sequence
Find the SRT file that you imported. Drop the file onto your timeline panel. A new caption track shows up by itself. The whole subtitle sequence fills in the track.
Step 4: Synchronize Subtitles with the Video
The subtitles are synced by the SRT timestamps. To verify alignment, play the sequence. If you need to, change the whole sequence clip. Move the clip along the timeline to the left or right. The Properties menu lets you change the look of everything.
What Are the Best Subtitle Formats for Exporting?
The platform you use will affect your export choice. There are two main ways to do this. Sidecar files let viewers turn subtitles on and off. This works quite well with online platforms.
VTT and SRT captions are the ideal formats for subtitle files. Burning captions onto a video makes them permanent. This is great for watching embedded videos without sound.
Know More: Premiere Pro workflow relies heavily on optimized hardware. A powerful CPU and substantial RAM are necessary. A capable GPU and fast SSD storage ensure smooth editing. Intel i7/i9 or Ryzen 7/9 CPUs are recommended. 32GB RAM is best for 4K or higher resolutions. NVIDIA RTX 3060/4070 or equivalent is recommended GPU hardware. Use NVIDIA Studio Drivers for stability. Fast NVMe SSDs are critical for media cache.
Adjusting playback resolution reduces system load. Enable GPU acceleration using the Mercury Playback Engine. Regularly clean your media cache files easily. Allocate more RAM to Premiere Pro. Close unused panel applications quickly. Update your graphics driver and operating system regularly. AI features can consume significant resources. Tools like Riverside integrate with Premiere Pro.
Be cautious when using the beta version of the software. Test your third-party plugins before projects. The macOS Ventura 13.6.1 system offers good performance. The Export Settings control final output quality.
Common Subtitle Issues & Fixes
There are a lot of common problems that users run across. A lot of the time, subtitles don’t sync up. It can also happen that the SRT file doesn’t import. When you export, it can mess up the formatting. Check to see if the subtitles are still not showing up after export.
1. Subtitles Not Syncing
If the subtitles don’t sync, the timecodes are inaccurate. It’s easy to fix files that you imported. Choose the complete subtitle clip. To match audio waveforms, drag the block. To change the time of the segments in the Text panel for automatic captions,
2. SRT File Not Importing
Check the format if the SRT file isn’t imported. Make sure the extension of the file is SRT. Look at the encoding of the file. It has to be in UTF-8 format. Check the file’s integrity. You must follow the precise SRT format.
3. Exported Subtitles Have Formatting Issues
SRT VTT files don’t keep track of typeface information. The video player decides how it looks. This is a problem with subtitle file types. Check the export options for burned-in captions. When applying the style, make sure to choose all of the clips.
4. Subtitles Not Displaying After Export
Check the export type if subtitles don’t show up after export. You need a separate SRT file for sidecar files. You need a media player that works with it. If you want permanent subtitles, make sure “Burn Captions Into Video” is checked. If you need to, export the video again.
Adobe Premiere Pro Alternative: Using Sonix for Better Accuracy
Some experts employ services from other companies, including Sonix. They want faster turnaround times with possibly improved accuracy. These services have better ways for people to work together. Sonix is an automated platform that works on the web. It makes very accurate transcripts.
How to Integrate Premiere Pro with Sonix for Subtitle Generation
To do this integration, you need to export the audio from Premiere Pro. You handle the media through the Sonix online service. You bring the finished subtitle file back in.
Step 1: Upload the Video File
First, put your media into the Sonix service. You can only export the audio track from Premiere Pro. Select MP3 as the audio output format. Sign in to your Sonix account. Press the button that says “Upload.” Choose the audio or video file you want.
Step 2: Choose the Language and Transcribe the File
A dialog box asks you which language you want to choose. Pick the main language you speak. Choose any other options that apply. Press the option that says “Start Transcribing Now.” Sonix works on the file. You will get an email when it is ready.
Step 3: Review and Edit the Transcript
You need to check the automated transcript. In the editor, open the finished transcript. Read the content attentively. The editor makes sure that the audio and the text highlighting are in sync. Fix the text.
Step 4: Create Subtitles Out of the Transcript
Change the perfect text into a format with time codes. Go to the Subtitle or Export menu. Sonix transforms the long text into short lines of subtitles. You can adjust things like the maximum number of characters.
Step 5: Review and Edit the Subtitles
Do a last check on the timing and reading speed. Check out the subtitles in the Sonix preview player. Make sure they appear and disappear in a natural way. Use the interface to change the timing of each subtitle.
Step 6: Burn-in or Otherwise Export
You can export in two different ways. For Premiere Pro, option A is the best choice. Save the file as an SRT. Add the SRT file to your Premiere Pro project. You may also use Sonix to burn in the subtitles. After that, download the final video file.
FAQs
How to add subtitles in Adobe Premiere Pro on a Mac?
The steps are the same for both macOS and Windows. The menus in the software interface are the same. Click on the Text panel. Hit the button that says “Transcribe.” Then click on “Create Captions.”
How to edit captions in Premiere Pro?
You can change the time of the text. To edit text, go to the Text panel. To change the length of the time, drag the edges of the clip. To modify how Select clips look, utilize the Properties panel.
How to add subtitles in Premiere Pro automatically?
Turn on the Automatic Speech Recognition feature. First, open the Text panel. Click the button that says “Transcribe.” After that, click “Create Captions.” This puts synchronized subtitle clips on the timeline.
How to create captions in Premiere Pro?
The words “captions” and “subtitles” mean the same thing. The technique makes a transcript. Use the Text panel. The Create Captions feature makes a track out of text. Change the look in the Properties window.
Final Thought
For web platforms, use a sidecar file that can change. For permanent visibility, use burned-in subtitles. If everything seems too much hassle for you, visit Zenith Clipping for an easy solution!