
It is important to create a pixel-perfect design. Then how can you use Photoshop to create complex and random particle arrangements? The answer is using scatter brushes. Because Scatter Brush is an amazing tool that has excellent functionalities that make things like catching to eyes. So today we will guide you on how to use the Scatter Brushes in Adobe Photoshop.
Firstly, open up your brush palette and select a brush. As every brush in Photoshop is potentially a scatter brush. So you pick a star because it helps to show off the varying level of effects due to its complex shape.
Spacing
Built into the brush you simply chose are different attributes that are outstanding to simply that brush. One of the most significant attributes is spacing. A default round brush is truly only a circle shape that has the spacing set to 0. This makes a strong line when you click and drag. Other brushes have a marginally higher spacing setting. Instead of hauling a strong line, it will look like a series of firmly divided stamps that follow my drawing line.
So you can easily control this act. Go to the Brush palette (Window>Brush), then find settings for controlling every part of the brush. To begin, ensure you have the “Brush Tip Shape” class chose on the left. At the below of this palette, you’ll get the spacing options for the brush.

Cranking the separating up diminishes the frequency with which the star is stepped in our line. You’re moving the correct way, but still, we need to create some more attractive particle effects.
Making It Scatter
Modifying the spacing on a brush is decent, but for making scatter you need significant vertical and horizontal moves between each stamp. To do this, go into the “Scattering” area below the brush tip shape on the left side of the Brush palette.
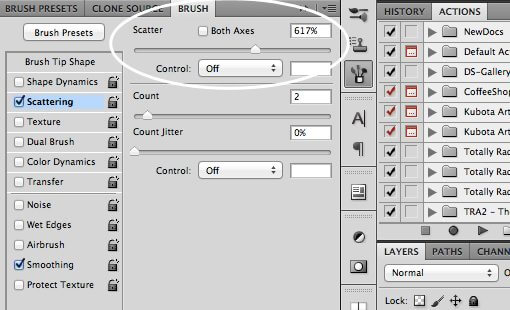
Here you can wrench up the Scatter slider to make a quite arbitrary distribution. To play with the frequency of the stamps, adjust the Count slider. As a result, the brush will look like a scatter brush.
JitterBug
You’ll see different “Jitter” sliders throughout the Brush palette. The word “Jitter” itself alludes to deviations from a norm, so when you apply that to a brush setting it implies that you’re bringing more variety into the outcome inside a given range.
Size Jitter
Let’s see a decent jitter model in brush options. In our following stage, you need to begin varying the size of our stars. Repeating the similar fundamental shape is exhausting and jitter sliders permit us to make the scatter considerably more organic. Under the “Shape Dynamics” category, there is a Size Jitter Slider. Crank this to the max.
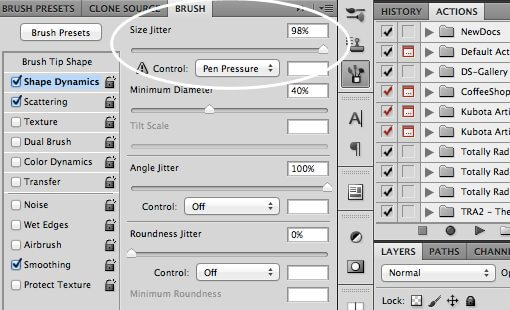
Then, click and drag your brush and the stars should come out in every single diverse area and unique size. Extravagant!
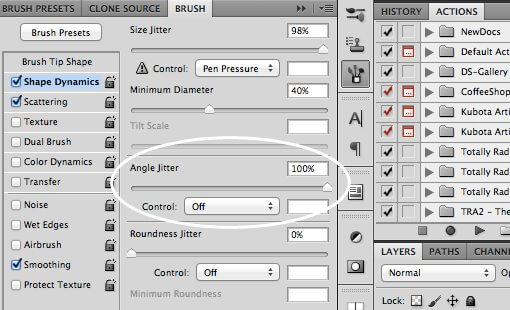
Angle Jitter
Notice that, despite the fact that the sizes are diverse now, the stars all look a little too similar. Because they all share the same exact orientation. To fix this, move to the angle jitter. Our stars are everywhere in various areas, sizes, and pivots.
Opacity Jitter
Under the “Move” section, you’ll find the Opacity Jitter, that helps to blur the stars in and out.
Color jitter
Under the “Color Dynamics” section, there is an option to jitter between the foreground and background and adjust the hue and saturation.
Roundness Jitter
If you need to go nuts, you can return to the “Color Dynamics” class and turn up the Roundness Jitter. This will make the stars seem as though they’re tilted in 3D space. The outcome appears to be seemed really layered and amazing.
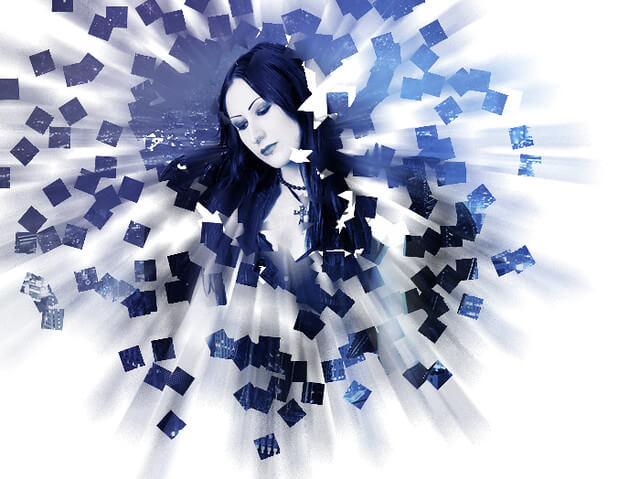
Some beautiful Scatter Brush effects
Some beautiful Scatter Brush effects
Bokeh Textures
At present, Bokesh Textures are very popular. These utilize the blurry spots that outcome when lights are captured out of the center.
Making these effects with scatter brushes is quite simple. Simply grab a hard round brush and set some of the parameters we just learned above. Here you just need to increase the spacing, scatter, and opacity jitter.
The outcome looks photographic however the dots were created in Photoshop. The cool lighting impacts are the marvel of Color Dodge in action. Let’s see how this functions in another model.

Disintegration Effect
To use this Disintegration Effect, you need to create two layers. make the 1st layer on top black. Then create another one on the bottom “practically dark”.
One the dark layer, get a delicate white brush. Then paint with a size a roundness jittered scatter brush. The outcome should look really outstanding now.
Now to get a nice glowing effect, you take the top layer with all the scatter brushwork, then set it to Color Dodge.
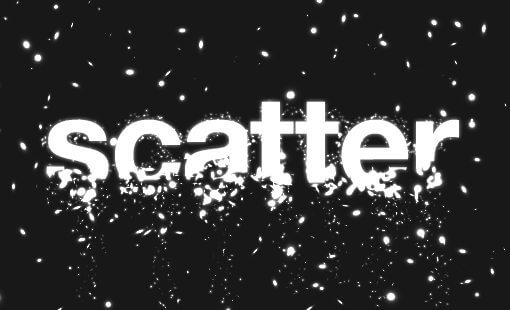
Now write some texts, and mask out the bottom. Then apply some more bright spots, where the letters vanish and you have the title image.
Frequently Asked Questions
How do I use the brush tool in Photoshop?
It’s not difficult to utilize the Brush apparatus to paint in your report. Find and select the Brush tool from the Tools board, then snap and drag it into the record window to paint. You can likewise press the B key on your console to choose the Brush tool whenever.
How do you scatter an image?
To make the disperse impact, first Duplicate the subject’s layer and Warp the duplicate utilizing the Forward Warp Tool situated inside Liquify. Add a Layer Mask to both the duplicate and the first, Filling the layer veil of the distorted artist with dark to conceal it away.
Why is my Photoshop brush scattering?
A Scatter worth of 0% implies that dispersing is switched off. Each new brush tip follows typically following the past one. To expand how much dispersing, essentially drag the Scatter slider towards the right. Watch out for the see region at the lower part of the Brushes board to see what’s going on.
How do I randomize my brush size in Photoshop?
Utilize the Jitter slider to arbitrarily change the thickness of the brush stroke as you paint. Higher Jitter values bring about more irregularity to the size of each brush tip. Join Control choices with haphazardness for intriguing outcomes.
How do you smooth out a brush in Photoshop?
To smooth brush strokes in Photoshop, select the Brush Tool, then increment the Smoothing rate in the upper settings bar. To make smooth brush strokes without an excess of slack, set the smoothing to add up to 10% – 45% for ideal execution. Presently your next brush stroke will seem smoother.
What does Transfer do in Photoshop brushes?
Transfer option can likewise be found under the Brush panel and this is where you can change the way of behaving of the perceivability of your brushes. In particular, you can characterize the Control and Jitter choices of the brush Opacity and Flow values.
What is a stomp brush?
Stomp brush surface, otherwise called crows foot, step brush, or texture, is not difficult to make on drywall surfaces utilizing essential drywall compound. The subsequent surface has a fan-like or sunburst impact made by the spread-out fibres of the surface brush.
What happens when you press the key after selecting a brush?
If the chosen brush has the Airbrush trait empowered, tapping the numeric keys will change the Flow naturally and adding the Shift key will change Opacity. Hold the Tilda key to flip among paintings and delete with the ongoing brush.
Why is my brush so pixelated in Photoshop?
This is likely because you are not choosing the brush tool. The keyboard shortcut for the Pencil tool is you got it, “B.” When the pencil tool is chosen, all of the brushes will seem pixelated. Lok at your tool and ensure you have the Brush tool chosen.
Final Words on Using the Scatter Brushes in Photoshop
Hope you have now got a clear idea about using the Scatter Brushes in Photoshop. Because these brushes are very helpful and feature lots of simple controls. This is how you can create an interesting, natural, and excellent design.
Sources: All images have been collected from here
Read other Blogs…


