Scanned photos are important for keeping memories safe. But sometimes they get dust and scratches that make them look ugly. This noise ruins the picture, and you are not able to see Facey. Even though phone cameras are good now, they do not fix old photos like professional tools do.
Noisy photos are not good for sharing with family or printing. Grandparents love to see old pictures, but if they are full of spots, it makes them sad. Cleaning scanned photos is a special job that needs the right software.
Types of Digital Noise
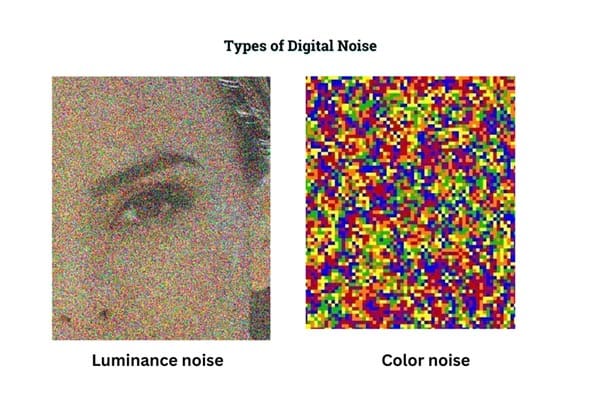
Digital noise typically appears as unwanted speckles or grain in an image, especially under low light or high ISO conditions.
Digital noise is the ugly spots that ruin your photos. It makes pictures look dirty and unclear. Even if you take a photo with a good camera, noise can still appear and spoil everything. Usually, noise happens when the photo is too dark or the camera is not good in low light.
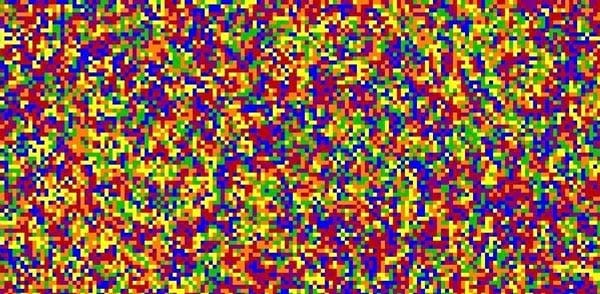
Don’t know what noise looks like? No problem. Noise can be small dots or weird colors that do not belong in the picture. Some noise is big and some is tiny, but all kinds make photos look bad. You can see more noise when zooming in close on the image.
Brightness noise looks like grain, and color noise is like the wrong spots on a photo. Both types make images messy and hard to see details. But with the right tools, you can clean the noise and make photos nice again. This way, your pictures stay clean and pretty forever.
1. Color Noise
Appears as random red, green, and blue pixels scattered across the image, especially in shadow areas.
You should look closely at your photos to see different kinds of color noise. Some noise is red, some blue, or green dots that are not supposed to be there. These wrong colors make the picture look messy, like a rainbow spilled on it. Bright areas and shadows are where color noise hides most.
If you zoom in too much, the color noise becomes very easy to see. It looks like tiny spots of the wrong colors dancing in your photo. Dark photos get more color noise because cameras struggle to see the right colors at night. But even day photos can have color noise if the camera is not good.
To fix color noise, you can use special tools that know how to remove only bad colors. Some tools remove too much and make photos look boring and gray. The best way is to find a balance where the noise is gone, but real colors stay bright and happy. This makes your photos clean but still colorful like they should be.
2. Luminance Noise
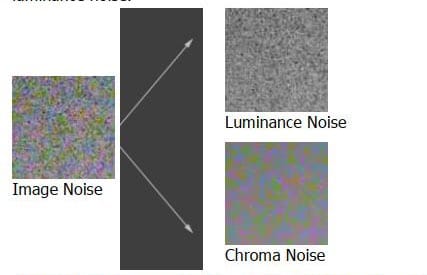
Appears as grainy textures and brightness fluctuations without affecting the color, similar to film grain.
Old photos have a special place in everyone’s hearts. The grainy look of old pictures makes us remember good times. But too much grain, called luminance noise, can ruin the memory. This noise makes photos look like sandpaper and hard to see faces.
You feel sad when friends get clean old photos, but yours are all noisy? Don’t worry! This guide helps you fix luminance noise well. We tell you everything – what causes noise, the best tools to fix it, and how to keep details while removing grain.
Many free apps say they can remove noise. But they never work the same way pro noise removal tools do. This is because real experts use special software that understands how to clean noise without killing picture quality. They work pixel by pixel like doctors fixing sick photos.
Free apps just blur everything to hide noise, which makes photos look fake and plastic. But Pro Tools knows the difference between noise and real details. They keep important stuff sharp while only removing bad grain. That is why professional editing always wins against quick auto-fixes from phone apps.
HOW TO REDUCE NOISE IN PHOTOSHOP: REDUCE COLOR NOISE
The settings you pick in Photoshop change how clean your photo looks after fixing color noise. Many people ask the first thing: ‘What slider do I move to make spots go away?’
Fixing color noise needs careful adjusting, not just pushing buttons. So you gotta look close at your photo before changing numbers. Since color noise is tricky, your settings should mix soft colors but keep details too.
Too much smoothing makes photos look fake and plastic. But not enough leaves have ugly color dots. The best way is to go slow with the Color Noise slider until spots disappear, but the picture still looks real. Try 25% first, then a little more if needed.
Remember – zoom in close to check if skin and hair still look natural after. That’s how you know you did a good job!
1. Open The “REDUCE NOISE” FILTER
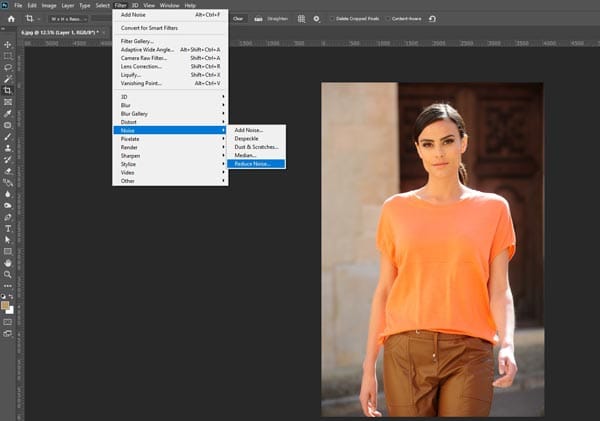
Go to Filter > Noise > Reduce Noise to open the noise reduction dialog box.
You can use filters to make your photos look better and cleaner. Not all filters work well; you should pick the one that fixes your photo problem. If your photo has a lot of dots and looks messy, the “Reduce Noise” filter can help. This filter makes the photo smooth and takes away the extra grain.
Also, you should check your photo before using the filter. If your photo is too dark, the noise will look worse. Fix the brightness first, then use the noise filter. This way, your photo will look better and not blurry.
You can also try other filters like “Sharpen” if the edges look soft. But too much sharpening can make the noise come back. So use a little bit only. Always save a copy before editing so you don’t lose the original photo.
Remember, the best filter depends on your photo problem. If the noise is small, little editing is enough. If the noise is big, you may need more work. Choose the right tool for the right job!
2. Set The “Reduce Color Noise” Slider
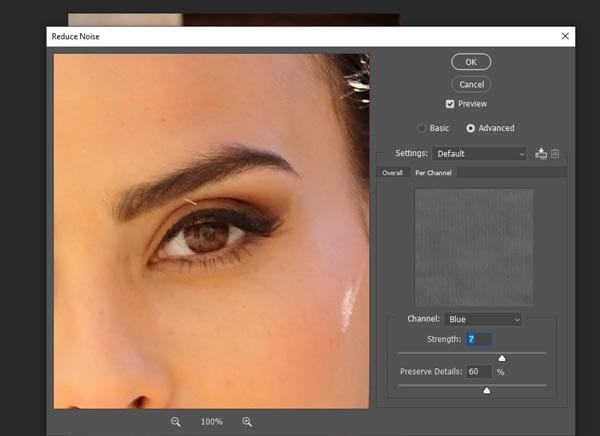
Adjust the “Reduce Color Noise” slider to minimize color speckles without affecting image details. Start with 20–40% and tweak as needed.
You should try different sliders to fix the noisy colors in your photos, like too much red, blue, or green. Moving sliders left or the basic way to edit. These simple changes can make a big difference when you mix them with other settings. For starters, you can slide the “Reduce Color Noise” bar a little bit. This is an easy trick to make photos look clean.
If your photo has a lot of grain or weird spots, then the “Luminance” slider will make it smooth. For a better look, try using the “Sharpen” tool after fixing the noise. High, medium, or low settings all give different results. You can try many things, like adjusting contrast, playing with brightness, and more.
HOW TO REDUCE NOISE IN PHOTOSHOP: REDUCE LUMINANCE NOISE
Grainy photos hold little value in a photographer’s mind. The frustration of seeing dots and speckles creates an annoying problem. This is a common issue that is worth fixing through noise reduction tools. Are you tired of looking at noisy photos? You can try Photoshop too and make pictures better, following our noise tips.
This is a simple guide for reducing luminance noise in Photoshop. We put every important step, including where to find sliders, how much to adjust, and other good tricks to make photo editing easy for beginners.
First, open your photo in Photoshop, then go to the Filter tab. Pick Camera Raw Filter, where noise tools live. Look for the “Luminance” slider – this one makes grainy spots go away. But be careful! Slide too much and the photo looks like plastic. Move little by little until the noise is gone but details stay.
A good tip is to zoom in to 100% so you see real changes. Also use the “Luminance Detail” slider to keep sharp edges. If the photo looks too soft after, try the “Sharpening” tool a little bit. Always check before and after by clicking the preview button.
Remember – less is more with noise editing. Better to do small fixes than one big move. Now your photos can look clean without losing what makes them special!
1. Switch to Lab Color Mode
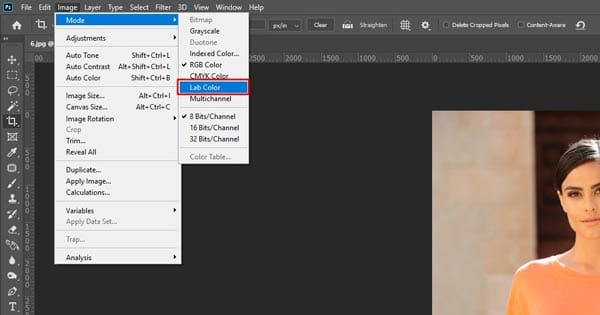
Go to Image > Mode > Lab Color. This separates luminance from color for more precise editing.
Photos look clean when colors stay natural. But sometimes colors get messed up – too bright, too dark, or just wrong. Lab Color mode can fix these color problems and make photos look right. Even if you have never used Lab Color before, it is easy to learn. Small color changes in this mode can make a big difference in your photo.
First, go to the Image menu in Photoshop. Pick Mode, then choose Lab Color. Now your photo works differently. Lab Color separates colors from brightness – this helps fix problems without ruining the picture. You can make colors better, but keep shadows and lights the same.
Remember not to make too many changes. Big moves in Lab Color can make photos look fake and weird. Small adjustments work best. Use the Curves tool a little bit to make colors pop, but not too much. If skin tones look strange, go back a little and try again.
A good tip is to edit “a” and “b” channels for colors and “Lightness” channels for bright/dark. This way, you control colors without making photos too dark or too light. Always check before and after to see if changes look good.
Lab Color mode is powerful but simple. Just a few clicks can make your photos look perfect without hard work!
2. Create A New Layer
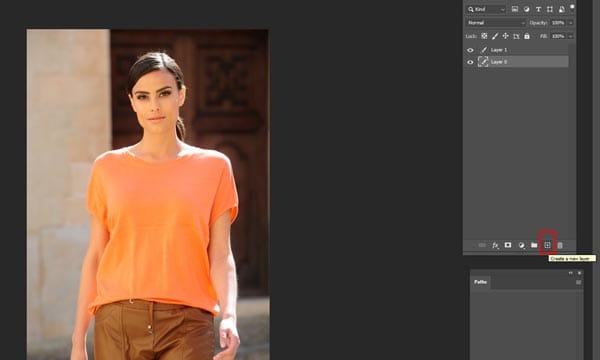
Duplicate the background layer (Ctrl+J / Cmd+J) for non-destructive editing.
You can use layers to add changes to your photo without ruining the original. Instead of editing directly on the picture, you should make a new layer to keep it safe. You can use paint on a new layer if you want to add colors or draw. Brush tools and erasers also work well on new layers. Same way, you can use text or shapes on new layers if you want to write something.
Also, you should think about what you do before making a new layer. If you want to fix spots, then copy the photo to the new layer first. Then you can try to fix it without worrying about messing it up. The layers panel shows all layers, so you can turn them on/off to see changes.
Remember to name your layers so as not to get confused. Just double-click where to say “Layer 1” and type what it is. This helps when you have many layers. You can also change how layers work by clicking blend mode – try “Overlay” or “Soft Light” for cool effects.
The best thing about layers is that you can delete them if you do not like them. Just drag the layer to the trash can icon. Or make it invisible by clicking the eye icon. This way, you can always go back if you make a mistake. Layers make editing easy and safe!
3. Select the “Lightness” Channel
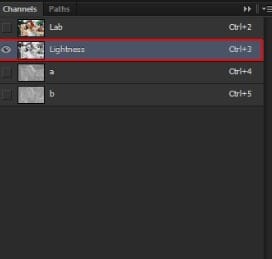
Go to the Channels panel and select the Lightness channel. This is where luminance noise exists.
The Lightness channel is the best place to fix dark and bright spots in photos. Even if you never edited in Lab Color before, this channel helps make pictures look clean without changing colors. Most people use RGB mode all the time, but do not know about Lightness power.
Do you remember how Lab Color works? No problem. Working in the Lightness channel will be your new favorite way to fix photos. You can make dark areas brighter or light areas softer without making colors look wrong. Just click on Lightness in the Channels panel, and you are ready to start.
You can use the curves tool on Lightness to make the whole picture better. Push the line up a little to make the photo brighter, and push down to add more shadows. The best part is the colors stay the same while only the lights change. This way, skin tones and clothes colors do not get weird.
A good tip is to hold the Alt key while moving sliders to see exactly where changes happen. Also, try sharpening filters on the Lightness channel only – this makes edges crisp without adding color noise. Always look before and after by clicking the eye icon on the channel.
Remember – Lightness channel is a secret weapon for good photos. Now you can fix problems easily and make pictures look perfect every time!
4. Duplicate the “Lightness” Channel
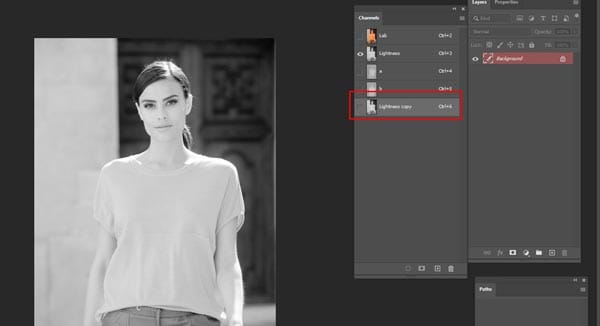
Copy the Lightness channel by dragging it to the New Channel icon. This will act as your mask.
The Lightness channel is a perfect tool for making photo edits without messing up colors. The clean look of black-white tones, sharp details, and smooth shadows is the best part for fixing pictures. You can also use the power of this channel for problems like dust spots, scratches, or too much grain.
Clothes like “Curves adjustment”, “Levels tool”, and “Sharpen filter” work well with the Lightness channel. You can copy this channel to a new layer, then fix problems without touching the original. Try walking through different edits, jumping between tools, or sitting with one adjustment to see changes.
Natural edits will bring out the real look of a photo better than too many filters. Remember to make a new channel before starting work – this way, you always have a clean start if you make mistakes. Just right-click the Lightness channel and pick “Duplicate Channel” to begin.
A good tip is to use a soft brush at low opacity when fixing spots on new channels. This makes changes look real, not fake. Also, tri-blend modes like “Overlay” if you want to make details pop more. Always check how a photo looks by clicking the eye icon on other channels.
Now you are ready to make perfect edits with the new Lightness channel! Just like walking in the field, take time and enjoy making pictures better step by step.
5. ADD EFFECT TO NEW CHANNEL
Use Filter > Noise > Reduce Noise or Gaussian Blur on the duplicated channel to smooth out noise.
Apart from the Lightness channel, other channels like “a” and “b” are good for making colors better in photos. You can add a special look or fix color problems when working with these channels. The smooth changes that filters make on new channels can give a picture a cool style.
For black-white photos, try adding grain or blur just on a new channel. This makes the picture look like an old film camera. Girls can use a soft glow effect, guys can try strong contrast – both look awesome when done right.
The best way to add an effect is to right-click the channel and pick “Apply Image”. Then play with settings until you like what you see. Try to stand with simple effects first, like a little sharpening or blur. Or go fancy with special filters that make colors pop in different ways.
A good tip is to always make a copy of the channel before adding effects. This way, if you do not like it, just delete it and start again. Also, remember that effects on color channels change how pictures look more than on the Lightness channel.
Now you are ready to make photos look special with channel effects! Just like taking a picture at golden hour, take time to try different things until you find the perfect look.
6. Invert the Image
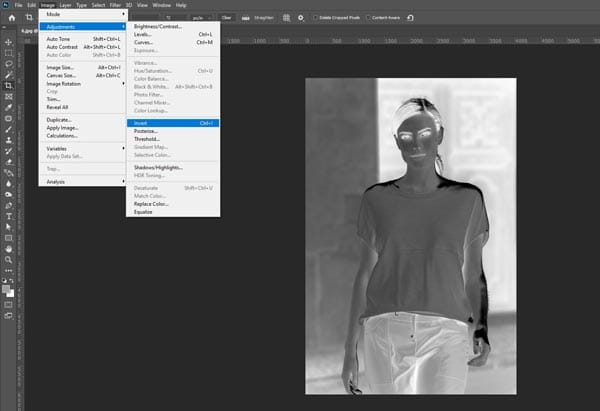
Press Ctrl+I (Cmd+I) to invert the duplicate channel so that the noise reduction targets only the noisy parts.
Photos look better when editing looks natural. But sometimes channels need the opposite look to fix problems. Invert light parts and dark parts – this helps see issues better. Although inverters are mostly used for special effects, it does not mean normal photos do not need them.
Little inverters can help find dust spots or scratches you have not seen before. Like when you put your finger over the light, you see a difference. This trick is good for cleaning old photos or fixing mistakes. Just go to the Image menu, pick Adjustments, then click Invert.
Remember not to use too much vinegar. Full inverted photos make photos look negative and ruin the real look. Little bit to find problems, then undo after fixing. Use a layer mask if you want to keep some parts normal while other parts are inverted.
A good tip is to invert the channel then use a brush with black or white to fix spots. Also, try inverting just one channel (like red or blue) to see color problems better. Always make a copy of the photo before inverting it in case you want to go back.
Now you know the secret invert trick! Like makeup hides blemishes, inverters help hide photo problems but keep a real look.
7. Blur The Selection
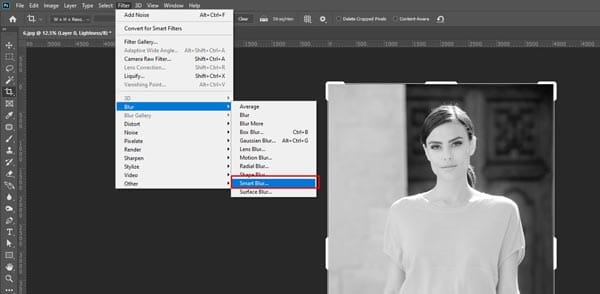
Apply a Gaussian Blur to the inverted channel mask for a soft and natural transition.
Photo editing feels special when you know the right tools. The happy feeling of making rough spots smooth creates magic in pictures. This simple trick is worth trying to make your photos look pro. Are you tired of seeing sharp edges in your edits? You can fix this, too, by learning how to blur selections properly.
This is an easy guide for blurring parts of a photo without messing up the whole picture. We tell you everything – how to select areas, which blur tool to pick, and smart ways to make edits look natural for beginners.
First, make a selection with a lasso or marquee tool where you want to blur. Then go to the Filter menu, find the Blur section. Gaussian Blur works well for most fixes. Slide the radius a little bit – too much makes it look fake. Watch the preview to see changes happen live.
A good tip is to blur the background behind the person to make them stand out. Or blur the skin a little to hide spots, but keep eyes sharp. Always use a layer mask so you can erase blur where not needed. Remember – a small blur often looks better than a big blur!
Now your photos can have perfect soft spots without looking edited. Like senior year memories, the best edits are ones that feel real and natural!
8. Set The Opacity
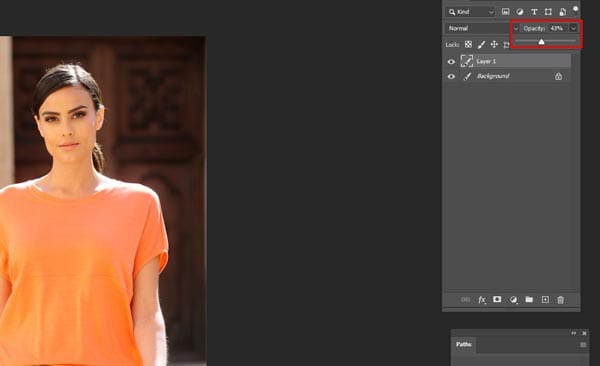
Adjust the opacity of the blurred Lightness layer to control the strength of the noise reduction effect.
For light edits, try 30-40% opacity – this keeps the original photo clear but adds small changes. If you want a strong effect, use 70-80% but not 100% because it looks too fake. Find the opacity slider in the layers panel – it says “Opacity” with a number next to it.
If you work with a brush tool, lower opacity helps build color slowly. For an erase tool, less opacity makes things fade nicely instead of disappearing quickly. Try different numbers to see what works best for your photo.
9. Flatten The Final Image

Once satisfied, flatten the image (Layer > Flatten Image) or save it with layers intact for future edits.
Since you spend time editing photos, you should think about flattening the image before saving. This important step makes sure all your edits stay together and the file does not get too big. Flattening is needed for both web pictures and print photos. Usually, editing programs keep layers separate while working. However, you need a flat image for final use. And if you are a photographer, flattening helps send files faster to clients.
Don’t worry about losing edits! Flatten does not ruin your work – it just puts everything together. Photoshop and other programs let you save copies with layers, too. So always keep a layered version, then make a flat copy for sharing.
Good tip is: Click the “Layer” menu at the top, choose “Flatten Image”, Save as a new file name, Keep original with layers safe.
Now your photo is ready for print or the internet! Like good retouching makes portraits perfect, flattening makes sure edits look right everywhere.
ADDITIONAL OPTIONS TO REDUCE NOISE IN PHOTOSHOP
Taking photos and fixing noise are like best friends that work together. Raw pictures often have grain and spots that need noise tools to clean them and make the picture smooth. The normal problems in photos are too much ISO, dark shadows with noise, color speckles, dust marks, and lots more.
There are many free filter apps that say they fix noise well. But the clean look they make is not the same as Photoshop or Pro Tools. This is because Photoshop has special noise tools and smart people who know how to use them correctly. The hand-done noise cleaning makes sure every little dot gets fixed properly. This kind of careful work does not happen in free apps or auto-fix filters.
- Use Camera Raw Filter: Under Filter > Camera Raw Filter, adjust Luminance and Color Noise sliders.
- Use Smart Objects to apply noise reduction as a Smart Filter for re-editable changes.
- Apply noise reduction selectively using masks or adjustment layers.
Photoshop has many ways to fight noise: “Surface Blur” for keeping edges sharp but killing noise, “Dust & Scratches” filter for old photo spots, “Camera Raw” noise sliders for color and light noise, “Median” filter for really bad noise problems.
The best way is to try a little bit of each and see what works well for your photo. Always zoom in close to check if details stay while noise goes away. Remember – a good noise fix takes time, but makes the photo look pro!
ADVANCED WAYS TO REDUCE NOISE IN PHOTOSHOP
The tools you use for cleaning photos make a big difference in how good a picture looks. That is why many people ask, “How do you make a picture smooth without losing details?” before I start editing.
Good noise fix needs smart thinking, not just quick clicks. You must look at what kind of noise your photo has and where the noise is worst. Since noise cleaning is careful work, you need to use both computer help and your hands to fix it.
Here are the best ways to do it: First, make a copy layer so you don’t ruin the first photo. Use a select tool to only fix parts with the most noise. Try sharpening after cleaning to make edges pop again. Mix the blur tool with the hide layer to keep some spots sharp.
- Use Frequency Separation to isolate and reduce texture-level noise while preserving skin tones.
- Combine Photoshop with third-party plugins like Topaz DeNoise AI or Nik Dfine for AI-powered precision.
- Blend multiple exposures to naturally reduce noise in low-light photography.
Do a little bit at a time! Many small cleans are better than one big clean that makes a photo soft. Your eyes know when pictures look clean but still real.
Different photos need different fixes – dark photos need more help than bright ones, faces need to be less clean than walls, and always look closely to see if the fix works well.
Now you can make photos with no noise like an expert! Just like picking good clothes, picking the right tools to make a photo look its best.
Final Thought
Noise reduction is a balancing act. Remove enough to clean the image, but preserve natural texture and detail. Always zoom in and compare before/after at 100% to ensure the image remains sharp and realistic.
Let Zenith Clipping do the magic while you sip your coffee and look awesome. We turn your photo chaos into pixel-perfect perfection faster than you can say “Photoshop who?” Whether it’s ecommerce images, portraits, or your cat’s modeling portfolio, we’ve got you covered.