
Photoshop Shape Tool permits you to draw vector shapes inside Photoshop. They are so great, that you don’t need to switch its partner, Adobe Illustrator, to draw vectors except if there is an explicit component you want. This instructional exercise for amateurs will tell you the best way to utilize the shaping apparatus without any preparation. Eventually, we will make a basic undertaking of drawing a straightforward tree utilizing the Shape Tools.
Photoshop Shape Tool
In this instructional exercise, we will make our custom shape by following around an article in a picture. If you have a characteristic ability for drawing and can draw your shape freehand without expecting to follow around anything, fantastic! There’s no distinction between following an object or drawing one freehand and there’s no advantage to one way or the other of getting it done (other than boasting privileges), yet I for one find it simpler to follow around objects (I have no regular gifts), and that is the very thing that we’ll do here.
The Best Way To Make Shapes Using Photoshop
Step 1: Select The Pen Tool
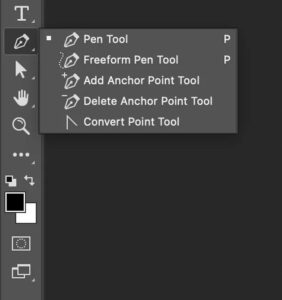
As I referenced, you can make custom shapes in Photoshop utilizing the fundamental Shape tools like the Rectangle or Ellipse Tool, yet take a stab at following our gingerbread man with those tools and you’re probably going to need to chomp his head off (sorry, only a tad gingerbread man humor). What we truly need is the Pen Tool, so select it from the Tools range.
Select the Pen Tool. You can likewise choose the Pen Tool by pressing the letter P on your keyboard.
Step 2: Select The “Shape Layers” Option In The Options Bar
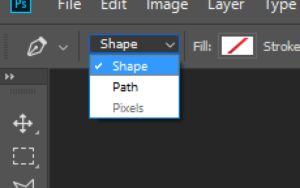
With the Pen Tool chosen, look into the Options Bar at the highest point of the screen. Over on the left, you’ll see a gathering of three symbols. The three symbols in the options bar permit us to choose how we need to manage the Pen Tool.
These symbols address how you can manage the Pen Tool. The symbol on the right is turned grey out, and that is because it’s just accessible when we have one of the essential shape tools chosen (the Pen Tool and the shape apparatuses share the majority of similar choices in the Options Bar). As we found in our “Making Selections With The Pen Tool” instructional exercise, the symbol in the center is utilized when we need to draw ways, yet that is not the thing we believe should do here. We need to utilize the Pen Tool to draw shapes, and for that, we want to choose the symbol on the left, which is the Shape layers symbol:
Select the “Shape layers” symbol to draw shapes with the Pen Tool. The “Shape layers” option is chosen as a matter of course at whatever point you grab the Pen Tool so you presumably won’t have to choose it yourself. It’s really smart however to check and ensure it’s chosen before you start drawing your shape.
I ought to call attention to here that there’s no distinction between drawing ways with the Pen Tool and drawing shapes with it. Both are made the very same way, by clicking to add anchor focuses, then, at that point, hauling out heading handles if necessary to make straight or bent way sections (once more, see our Making Selections With The Pen Tool instructional exercise if you’re new to these terms). Whether or not you’re “formally” drawing shapes or ways, you’re drawing ways. The thing that matters is that with shapes, Photoshop fills the way with variety, even as you’re drawing it, which permits us to see the shape. This is going to make somewhat of an issue for us, as we’ll find in a second.
Step 3: Start Drawing Your Shape
Since we have the Pen Tool chosen alongside the “Shape layers” choice in the Options Bar, we can start following around the item. I will begin by following around the highest point of the gingerbread man, clicking with the Pen Tool to put anchor focuses, and hauling out course handles to make bent-way portions around the side and top of his head.
We can see the anchor focuses and bearing handles in the screen capture beneath, yet notice that we likewise have somewhat of an issue. Photoshop is filling the shape with the Foreground tone (mine is right now set to dark) as I draw it, hindering the gingerbread man from view:
Photoshop fills the shape with the Foreground tone as you draw it, impeding the object from view.
Step 4: Decrease The Opacity Of The Shape Layer
To fix the issue of Photoshop hindering our object from view as we attempt to follow around it, basically, go to your Layers range and lower the obscurity of the shape layer. My Layers range that I at present have two layers – the Background layer on the base which contains my gingerbread man photograph, and the shape layer above it, named “Shape 1”. I can see that the shape layer is chosen since it’s featured in blue, so to bring down its darkness, I should simply go up to the Opacity choice in the upper right corner of the Layers range and lower the worth. I will set my haziness to around half:
Bring down the obscurity of the shape layer involving the Opacity choice in the upper right of the Layers range.
Now that I’ve brought down the mistiness of the shape layer, I can see my gingerbread man effectively through the shape tone, which will make it a lot simpler to keep following around him. The item is currently apparent through the shape variety after bringing down the shape layer’s darkness.
Step 5: Continue Tracing The Object
With the gingerbread man now noticeable through the shape tone, I can keep following around him with the Pen Tool until I’ve finished my underlying shape. The underlying shape around the item is presently finished.
If I take a gander at the shape layer in my Layers range, I can now see the state of the gingerbread man characterized. The state of the object is presently plainly apparent in the Layers range.
Everything looks OK. We’ve followed around the essential state of the article, and contingent upon the shape you’re utilizing, this might be sufficient. For my situation, however, my gingerbread man shape needs a touch more detail. At any rate, I figure we ought to remember his eyes and mouth for the shape, and likely even his necktie and the two enormous buttons beneath it. So how would we add these subtleties to the shape? Straightforward. We don’t! We take away them from the shape!
Step 6: Select The Ellipse Tool
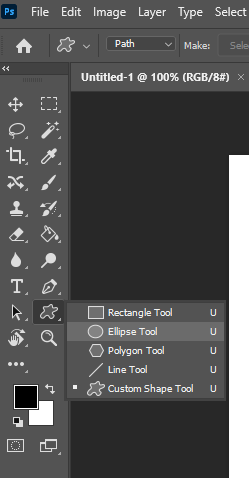
How about we start with his eyes? We could choose his eyes with the Pen Tool if we needed, however since they’re round, we’ll have the option to choose them all the more effectively utilizing the Ellipse Tool. Select the Ellipse Tool from the Tools range. Naturally, it’s taking cover behind the Rectangle Tool, so click on the Rectangle Tool, then hold your mouse button down briefly until the fly-out menu shows up, and afterward select the Ellipse Tool.
Click on the Rectangle Tool in the Tools range, then hold your mouse button down until the fly-out menu shows up, and choose the Ellipse Tool from the list.
Step 7: Select The “Deduct From Shape Area” Option
With the Ellipse Tool chosen, look into the Options Bar and you’ll see a progression of symbols gathered that seem to be little squares joined in various ways. These symbols permit us to do things like add another shape to the ongoing shape, deduct a shape from the ongoing shape, or converge one shape with another. Click on the third symbol from the left, which is the Subtract from shape region symbol:
Click on the “Deduct from shape region” icon in the Options Bar.
Step 8: Drag Out Shapes To Subtract Them From The Initial Shape
Since we have the “Deduct from shape region” option selected, we can start adding little subtleties to our shape by basically removing openings of it. I will start by hauling a curved shape around his left eye:
At the point when I discharge my mouse button, the curved shape around the eye is in a flash deducted, or “cut out”, from the underlying shape, making an opening for the eye. The left eye from the first picture on the Background layer beneath it is currently appearing through the opening:
The left eye has now been “cut out” of the underlying shape. In the first place, I’ll drag a circular shape around it.
Furthermore, when I discharge my mouse button, a subsequent circular opening is removed from the underlying shape, making the subsequent eye, once more permitting the first picture underneath it to appear on the other side.
A subsequent opening is presently removed from the underlying shape, making the subsequent eye. Since the two buttons beneath his necktie are additionally round, I can utilize the Ellipse Tool to remove them from my shape also. To begin with, I’ll drag a shape around the top button.
Releasing my mouse button deducts the shape from the underlying shape, making an opening for the button and permitting the picture beneath it to appear on the other side.
A subsequent opening is currently removed from the underlying shape, making the subsequent eye. Also, I’ll do the same thing for the base button, first hauling my shape around it:
What’s more, when I discharge my mouse button, a fourth opening is made in the underlying shape. The two buttons have now been removed from the underlying shape.
If I take a gander at my shape layer and see the thumbnail in the Layers range as of now, I can see the two openings for the eyes and the two openings for the buttons that I’ve removed from the shape.
The shape layer’s thumbnail presently shows the openings cut out of the shape for the eyes and fastening. We will change back to the Pen Tool to add the leftover subtleties to the shape straightaway!
Step 9: Subtract Any Remaining Details From The Shape Using The Pen Tool
I will change back to my Pen Tool right now since I have a couple of additional subtleties I need to add to my shape that I will not have the option to choose with the Ellipse Tool.
I need to add his mouth to the shape, as well as his tie, so with my Pen Tool chosen and the “Take away from shape region” choice chosen in the Options Bar, I’m going to follow around his mouth and tie to deduct them from my underlying gingerbread man shape.
Here, we can see the ways I’ve drawn around them, alongside the first gingerbread man picture appearing through the openings I’ve made. The mouth and tie have now been removed from the initial gingerbread man shape utilizing the Pen Tool.
How about we polish off our gingerbread man shape by taking away those squiggly lines of icing sugar from his arms and legs. Once more, I’ll utilize the Pen Tool for this. Here, I’m drawing a way around the icing sugar along his left arm, and we can see the state of the icing sugar being removed from the underlying shape as I go:
I’ll get done with following around this one, and afterward follow around the other three too until all of the four columns of icing sugar have been deducted from my underlying shape. The columns of icing sugar along his arms and legs have now been deducted from the underlying shape.
If we take a gander at the shape layer’s thumbnail in the Layers range, we can see all the more plainly that each of the four lines of icing sugar, alongside his eyes, mouth, necktie, and buttons, have now been removed from the shape.
The shape layer thumbnail in the layer ranges shows all of the subtleties that have been removed from the underlying gingerbread man shape.
Right now, I’d say the gingerbread man shape is finished! We’ve utilized the Pen Tool to follow around beyond him, making our underlying shape, and afterward, we utilized a mix of the Pen Tool and the Ellipse Tool, alongside the “Deduct from shape region” choice, to remove every one of the more modest subtleties in the shape.
Step 10: Make The Opacity Of The Shape Layer Back To 100%
Now that we’re finished following around the various pieces of our object, we never again need to see the first picture through the shape, so return to the opacity option in the upper right corner of the Layers range and put the murkiness esteem in a difficult spot to 100%.
Increment the mistiness of the shape layer back to 100%. I’m likewise going to conceal my Background layer briefly by tapping on its Layer Visibility symbol (the “eyeball” symbol) so we can see simply the shape without help from anyone else against a straightforward foundation. You don’t need to conceal your Background layer if you would rather not. I’m just doing this to make it simpler so that we might see the actual shape.
Tapping on the “Layer Visibility” symbol for the Background layer to conceal it briefly from view.
With my unique picture on the Background layer presently covered up and the darkness worth of my shape layer put off to 100%, here’s the gingerbread man shape I’ve made:
The finished gingerbread man shape appears against a straightforward foundation. However, we’re not finished at this point. We need to characterize it as a Custom Shape, and we’ll perceive the way to do that next!
Step 11: Specify The Shape As A Custom Shape
To characterize our shape as a Custom Shape, first, ensure your shape layer is chosen in the Layers range. Likewise, you’ll have to ensure that the shape layer’s see thumbnail is chosen. You can perceive that it’s chosen since it will have a white feature line around it, and you’ll likewise have the option to see your way frames around your shape in the record. If they see a thumbnail that doesn’t have a feature line around it and you can’t see your way frames, just snap on the thumbnail to choose it. Click straightforwardly on the shape layer’s see thumbnail to choose it if necessary.
Note: If you at any point need to conceal the way frames around your shape, basically click on the shape layer’s see thumbnail again to deselect it.
With the shape layer and its see thumbnail chosen, go up to the Edit menu at the highest point of the screen and select Define Custom Shape:
Go to Edit > Define Custom Shape. Photoshop will spring up the Shape Name exchange box, requesting that you enter a name for your shape. I will refer to my shape as “Gingerbread Man”:
Enter a name for your shape into the “Shape Name” discourse box. Click OK when you’re finished to exit out of the exchange box, and your Custom Shape is currently good to go! You can finish off your Photoshop report right now since we’re finished making and saving our shape. Now we will see where to track down it and how to utilize it!
Step 12: Open A New Photoshop Document
Open another clear Photoshop archive by going up to your File menu at the highest point of the screen and picking new. This raises the New Document exchange box. For this tutorial, you can pick any size you need for your report. I will pick 640×480 pixels from the Preset menu:
Make another clear Photoshop archive.
Step 13: Select The Custom Shape Tool
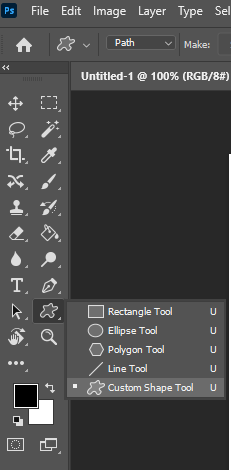
With your new clear Photoshop archive open, select the Custom Shape Tool from the Tools range. As a matter of course, it’s taking cover behind the Rectangle Tool, so click on the Rectangle Tool, then hold your mouse button down briefly until the fly-out menu shows up, and afterwards select the Custom Shape Tool from the rundown:
Click on the Rectangle Tool, then, at that point, hold your mouse button down until the fly-out menu shows up, and afterward select the Custom Shape Tool.
Step 14: Select Your Custom Shape
With the Custom Shape Tool chosen, right-click (Win)/Control-click (Mac) anyplace inside your Photoshop report. You’ll see the Shape choice box show up, permitting you to choose any of the presently accessible Custom Shapes. The shape you just made will show up as the absolute last shape in the choice box. Just snap on its little thumbnail to choose it.
“Right-click” (Win)/”Control-click” (Mac) anyplace inside the report to get to the Shape choice box, then click on your Custom Shape’s thumbnail to choose the shape.
Step 15: Drag Out Your Shape
With your Custom Shape selected, just snap inside the archive and drag out the shape! To compel the extent of the shape as you drag so you don’t incidentally mutilate its vibe, hold down your Shift key as you drag. You can likewise hold down your Alt (Win)/Option (Mac) key if you need to drag the shape out from its middle. If you want to reposition your shape as you’re hauling, just hold down your spacebar, drag the shape into its new area, and then discharge your spacebar and keep hauling out the shape.
As you’re dragging out the shape, you’ll see just the fundamental way framework of the shape shows up. The fundamental way framework of the shape shows up as you’re hauling out the shape.
At the point when you’re content with the size and area of the shape, essentially release your mouse button and Photoshop fills the shape with your ongoing Foreground tone (mine is set to dark):
Release your mouse button and Photoshop fills the shape with variety. We will polish things off by taking a gander at how to change the shade of our shape, alongside how to resize and pivot it, next!
Step 16: Double-Click On The Shape Layer’s Thumbnail To Change The Shape Color
There’s a compelling reason need to stress over the shade of your shape while you’re procrastinating and adding it to your archive. Photoshop will consequently fill the shape with anything variety you as of now have chosen as your Foreground tone, however, to change the shape’s tone whenever simply double-tap on the shape layer’s thumbnail. Not the shape preview thumbnail on the right (which is called a vector cover thumbnail). You need the thumbnail on the left, the one that seems to be a variety sample with a touch of slider bar under. Double-tap on it to change the shape’s tone.
This will raise Photoshop’s Color Picker. Pick another variety for your shape with the Color Picker. Utilize the Color Picker to pick another variety for your shape.
Click OK when you’re finished to exit out of the Color Picker, and the new variety is applied to your shape
The shade of the shape has now been changed. You can change the color of your shape as the need should arise, and however many times you need!
Step 17: Resize The Shape With Free Transform
Color isn’t the main thing you don’t need to stress over with shapes. An extraordinary aspect concerning working with shapes in Photoshop is that they use vectors rather than pixels, and that implies you’re allowed to change the size of them whenever you need, as frequently as you need, with practically no deficiency of picture quality!
If you conclude you want to make your shape bigger or more modest whenever just select the shape’s layer in the Layers to range, then, at that point, utilize the keyboard easy route Ctrl+T (Win)/Command+T (Mac) to raise Photoshop’s Free Transform box and handles around the shape. Resize the shape by hauling any of the corner handles. Hold down Shift as you drag the handles to compel the extent of the shape, once more so you don’t inadvertently contort its appearance. You can likewise hold down Alt (Win)/Option (Mac) as you drag the handles to resize the shape from its middle.
To turn the shape, essentially move your mouse anyplace beyond the Free Transform box, then, at that point, snap and drag your mouse to pivot it. Snap and drag your mouse anyplace beyond the Free Transform box to turn the shape.
Press Enter (Win)/Return (Mac) when you’re finished to acknowledge the change and exit out of Free Transform. You can add however many duplicates of your custom shape as you like to your report, changing the variety, and size and turning off everyone depending on the situation. Each duplicate of the shape will show up just like its own different shape layer in the Layers range.
Here, I’ve added a few additional duplicates of my Gingerbread Man shape to my report, everyone set to an alternate tone, size, and point. Notice how regardless of what size you make them, they generally hold their sharp, fresh edges.
Add however many duplicates of your custom shape as you like to your plan, changing the variety, size, and point of everyone.
FAQs
Is there a shapes tool in Photoshop?
From the toolbar, snap and hold the Shape tools icon to raise the different shape tools options like Rectangle, Polygon, Ellipse, Triangle, Line, and Custom Shape. Select a tool for the shape you need to draw.
How do I make squares in Photoshop?
On the canvas, hold down the Shift key and left-snap and drag the square to the size you need it. Holding down Shift keeps the square shape. Without holding down Shift, you get a rectangular shape. When you have the blueprint of the square with the Rectangular Marquee tool, fill it, out or use Stroke.
How do you build a circle in Photoshop?
With the cursor situated towards the upper left corner, snap and drag the mouse to the base right corner while holding Shift on the console. Holding Shift permits an ideal circle to be made. If that Shift isn’t held, the circle will seem to be an oval.
How do you make a triangle in Photoshop?
Pick the Shape tool and select the Triangle tool from the available choices. Position the pointer on the material and click and drag to draw a triangle shape on another shape layer. Hold the Shift key while dragging to make a symmetrical triangle.
How do you make an oval in Photoshop?
In the Tools Panel, select the Ellipse Tool (U), and make certain to have the Tool Mode set to shape in the top toolbar. Click once over the material and in the new window, set the Oval size you need and click OK.
How do I draw a curved line in Photoshop?
After defining a straight line, press ALT and left-click on the mouse to adjust its course. As we will get a curved line, move the course to the upper side. Click on an alternate point and drag the mouse down. It will make a curved line in Photoshop.
Final Words
So now you know how to make shapes in Photoshop. That covers the nuts and bolts of how to make and involve custom shapes in Photoshop, I trust you’ve enjoyed this article and can apply these strategies in your future tasks.


