
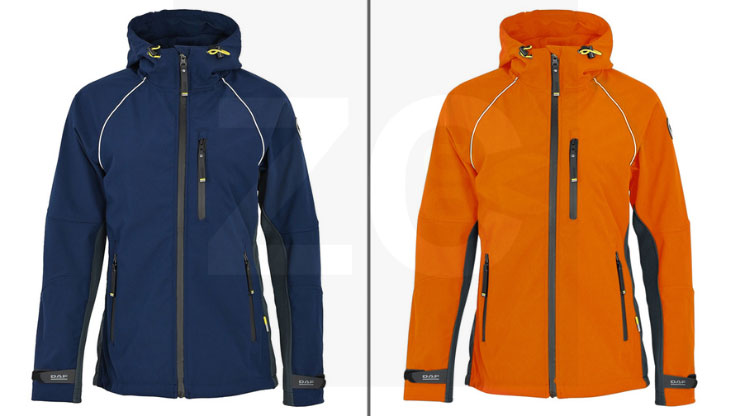
Changing the shirt or product color in Photoshop is a straightforward process. It involves creating a new adjustment layer that will only affect the image’s color. Next, the Hue/ Saturation or Color Balance Option will allow you to adjust the color according to your liking.
Changing shirt color in Photoshop is extremely useful when conducting product photography, enhancing the visual impact, or marketing a product.
Are you confused about changing the shirt color in Photoshop? This in-depth guide provides details on two methods to modify shirt color in the software: the Color Balance Method and the Layer Mask Technique. Let’s get started!
Method 1: Color Balance Method to Change Shirt Color in Photoshop
When searching “How to change shirt color in Photoshop,” on Google, the methods may seem pretty simple. However, practical application is very different and much trickier than search results.
This step-by-step guide breaks down the steps of changing shirt color in Photoshop, simplifying the process to help you get the perfect results:
Step 1: Open Image in PhotoShop
Launch PhotoShop and open the photo of the shirt that you will be modifying. Click File, and then Open to import the picture of the shirt.
Step 2: Select The Shirt Using a Selection Tool
Use an appropriate selection tool, such as the Magic Wand or the Quick Selection Tool to select the shirt area within the image.
Tip: You can modify the tool settings, such as changing the tolerance or brush size, to make more detailed selections of the shirt.
Step 3: Create a New Adjustment Layer
Click the “Create new fill or adjustment layer” icon. You will find it in the Layers Panel. Then select “Color Balance.” This will create an adjustment layer on top of the image layer.
Step 4: Adjust the Color Properties
In the Properties Panel, you will find sliders to adjust the color balance, allowing you to control the balance of the colors in the image.
Change the shirt color by focusing on the mid-tones and shadow sliders. Use different values until you are satisfied with the result. Here are some examples based on the colors you want to achieve:
- More Blue: If you want to make the shirt more blue, move the Cyan-Red slider towards Cyan while decreasing the Magenta-Green slider towards Green.
- Warmer Tones: To achieve warmer tones like red or orange, move the Cyan-Red slider to Red and increase the Magenta-Green slider to Magenta instead of Green.
Step 5: Save and Export
Once you have achieved the color of your choice, Save and Export the Image.
Method 2: Shirt Color Change in PhotoShop Using Layer Mask
In PhotoShop, the Layer Mask allows you to modify only the selected part of the image. For instance, if you select just the shirt, any color modifications will be applied to the shirt only while the rest of the image remains unchanged.
Here is a breakdown of using the mask layer to change the shirt color in Photoshop:
Step 1: Open The Image
Open the photo of the shirt you want to edit in Photoshop. Make sure the image is high resolution and the best quality to make accurate adjustments.
Step 2: Selecting the Shirt
Before you begin with color adjustment, it is critical to tell PhotoShop which areas of the image you want to modify. So, start by selecting the shirt using an appropriate selection tool.
Tip: PhotoShop features an array of tools to make selections on an image. Choosing the most appropriate tool depends on the content of your image. In some cases, it may become necessary to use many selection tools for perfect results.
When dealing with detailed selections such as a shirt, using the Select and Mask tool in PhotoShop makes things much easier. Instead of using different selection tools, the Select and Mask Tool creates the best selection.
Go to the Select Menu and choose Select and Mask. You can also use the keyboard shortcut to complete this step (Command + Option + R or Ctrl + Alt + R on a PC).
If the Selection Tool is already active, a button for Select and Mask options may be visible in the options bar above the main document window. Click that to get started.
The Select and Mask feature on PhotoShop combines several different useful selection tools on the left side window and customizable options on the right.
You can use the Object Select, Brush, and Quick Selection tools to make your selection. Use the Refine Edge Tool to make your selection, a tool that is useful for complex textures.
Once all parts of the shirt are selected, look for the Output Settings at the bottom right of Select and Mask Workspace. The Output To option must be set to Selection. Next, click OK to exit the Select and Mask Workspace.
Step 3: Create a Hue/ Saturation Adjustment Layer
Start the color change process by using a Hue/Adjustment layer, a super-easy way to modify image colors.
With your selection still active, go to the Layer Menu, pick the New Adjustment Layer, and click Hue Saturation. Give this layer a name, then click OK.
A new entry will appear in the Layers Panel at the bottom right of the screen.
When creating the New Adjustment Layer, Photoshop used the selection to create a layer mask automatically.
One advantage of using this technique is that any color changes you make will be restricted to the shirt only and no modifications will be made to the rest of the image.
The Adjustment Layer Option also activates the Properties Panel, allowing you to customize the adjustment.
Step 4: Modify Shirt Color
With all selections made and the Adjustment Layer activated, it’s time to actually modify the colors! Simply move the Hue slider to change the shirt color in real-time.
Note: Not every hue will have a natural effect on the image, especially if the photo has complex lighting. Thus, pick a color that looks most natural.
The mask may not be as precise as you thought and may have some reddish fringing around the edges of the shirt. This becomes even more prominent when editing more contrasting colors.
You can easily adjust your layer mask with a few simple steps.
First, set your foreground and background colors to default through the keyboard shortcut D. Then, switch your brush through the keyboard shortcut B.
Select the layer mask by clicking the layer mask thumbnail in the Layers Panel.
Once selected, all other brushwork and edits will only be applied to the layer mask.
If an area of the shirt does not change color, you can paint it with white pixels. On the other hand, if an area is changing color even though it shouldn’t, paint black pixels overtop.
The layer mask updates in real-time and you can see the updated color adjustment results.
Why Choose Us to Change Shirt Color in Photoshop?
Choosing Zenith clipping to change shirt color in Photoshop offers several advantages that set us apart.
The following are some key reasons.
Expertise in Photoshop:
We feel proud that we are a team of skilled professionals who are experts in using Photoshop. You will be happy to have our experience in color manipulation, especially when it comes to changing shirt color in Photoshop. Of course, we maintain high-quality and realistic results based on those facts.
Attention to detail:
When you talk about color changes, precision in color is important. Our goal is to pay close attention to details, such as fabric texture, lighting, and shadows, to ensure that the new color is consistently incorporated into the overall design.
Customization Options:
Fortunately, we are open to offering our customized color change service to meet your needs. Simply tell us if you would like a drastic color change or a more subdued hue adjustment.
Quick Turnaround:
We value your time, and we prioritize efficiency without compromising on quality. We are dedicated and committed to delivering fast results and meeting your deadlines effectively.
Affordable Services:
Since we understand the value of your investment and do not have any hidden fees, we are always affordable and approachable, catering to a wide range of clients.
Client Satisfaction:
Our main motto is customer satisfaction. Our commitment to quality has earned us a reputation. Also, we feel free to work closely with our clients to fulfill their missions and vision.
Security and Privacy:
We are strict here to maintain security and privacy. Your images and information are always safe here at Zenith Clipping.
FAQs:
Can I use The Color Replacement Tool To Change Shirt Color in Photoshop?
The color replacement tool can be used to change shirt color in Photoshop, but methods such as the Select and Mask Workspace or the Color Balance Adjustment Layer provide more promising results.
These tools offer greater control over the outcome of the image, while the color replacement tool does not.
Can I change the shirt’s brightness or darkness without changing the shirt’s color?
You can darken or lighten the shirt in an image without modifying its color by skipping the Colorize step in the Hue/ Saturation window. Simply use the hue slider to change the brightness or darkness according to your preferences.
Can I undo the Color Change if I don’t like the result?
If you don’t like the color changes, select the adjustment layer in the Layers Panel, then click CTRL + Z on your keyboard. This will undo the last action. You can even delete the adjustment layer by selecting it and pressing delete.
Conclusion:
Adobe Photoshop boasts several tools for changing the color of a shirt. Some of the best options include the Hue/Adjustment Layer, Color Balance, and the Select and Mask Workspace, which have been explained above.
Each method has its limitations and advantages, depending on the results you are trying to achieve. You can also use several techniques to change the shirt color in Photoshop as per your liking.


