You can use tools to make old photos look better and clearer. Not all tools work the same; you should pick ones that fix your photo problem. If the photo is too dark, use a brightness tool. If the photo is too blurry, use a sharpening tool. Other tools, like contrast and noise reduction, also help make photos look good.
Also, think about the photo type when choosing tools. If the photo is black and white, color correction is not needed. But if the photo is colored and faded, the saturation tool can make colors pop. A clean scan of the photo before editing will give the best results.
Editing apps have many filters, but not all filters are good for old photos. Some make photos look worse. Stick to basic edits first, like sharpness and brightness. Too much editing can ruin a photo forever. Always save a copy before changing the original photo.
If a photo has scratches or spots, use a healing tool to fix them. Small fixes make a big difference. But big damages may need expert help. Practice on bad photos first before trying on important ones.
Good lighting when taking photos of old photos also helps. No shadows or glares. Flat surface and steady hands make sure the new photo is clear. Then editing becomes easier.
Remember, old photos are memories. Handle with care and patience. Even little improvements can bring back lost details. Happy editing!
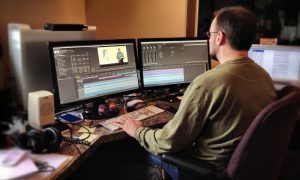
Step 1: Open in Photoshop

Open the blurry image in Adobe Photoshop by dragging it into the workspace or using File > Open.
Since you are working on old blurry photos, you should think about using Photoshop to fix them. This software will help make your photos sharp and nice to look at. Using Photoshop is good for both beginners and experts. Normally, free apps give basic edits. But you may need more tools to fix really bad photos. And if you are new, learning Photoshop can make your editing skills better.
Don’t worry about it being hard! Photoshop is not too scary once you try. Adobe, a big company for editing, lets you use Photoshop for not too much money. You can even pay monthly, so it’s cheap. Some versions are free to try first. So think about using Photoshop for old photos as a smart choice.
The first thing is to open your photo in Photoshop. Just click “File” then “Open” and pick your blurry picture. If the photo is too big or small, you can change the size later. But first, get it inside Photoshop.
You see many buttons, but don’t panic. You only need a few tools you need for fixing blur. Like the “Sharpen” tool and the “Brightness” slider. Too many edits can make a photo look fake. So go slow and check after each change.
If you mess up, just press “Ctrl+Z” to undo. Always save your work as a new file so the original stays the same. Practice on bad photos first before your favorite ones.
Photoshop can seem big, but just start small. Even little fixes can make old photos look new again. Happy editing!
Step 2: Duplicate the Background Layer

Press Ctrl+J (Cmd+J on Mac) to duplicate the background layer. This allows non-destructive editing so you can compare before and after easily.
The blurry photo is like a puzzle that needs fixing before it can shine. This step is an important bridge between bad photos and good ones. The memories in old pictures are worth saving with proper editing. Even if phone apps can do quick fixes, Photoshop tools are best for making photos look professional, whether you print them or keep them digital.
Making a copy of the background layer is like making a safety net for your work. It saves the original photo while you try edits. Parents and grandparents love it when old family photos get clear again to hang on the walls or share with family. Blurry or damaged photos are not good for keeping special memories safe forever.
First, right-click on the background layer in Photoshop. Then pick “Duplicate Layer” from the menu that pops up. You can also press Ctrl+J for a fast way. Annewlayer will appear the same as the original, but now you can edit without worry.
This copy layer is your playground – try sharpening, fixing colors, or removing scratches here. If you make a mistake, just delete this layer and start over. The original stayed safe underneath like a backup. Always do this step before any big edits!
Smart photographers always work on a copy, not the original. Same rule for old photos – protect the first version. Now you are ready for the next steps to make the photo beautiful again. Happy editing!
Step 3: Use the Unsharp Mask
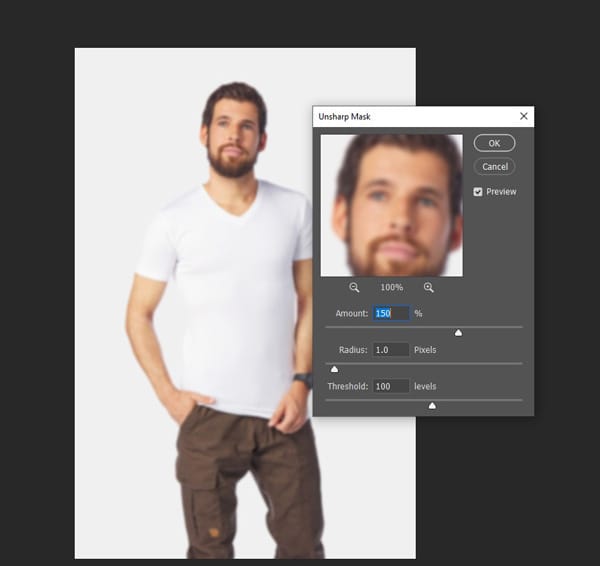
You should try different tools to fix various problems in your old photo, like blurriness, dull colors, or scratches. Blur, noise, and sharpening are the basic editing tools. These simple tools can make a big difference when you use them together in the right way. For blurry photos, the Unsharp Mask works best. This is a classic tool all photo editors use for sharpening.
Go to Filter > Sharpen > Unsharp Mask. This tool enhances edge contrast to give the illusion of sharpness.
- Start with settings like:
- Amount: 150%
- Radius: 1.0 pixels
- Threshold: 10 levels
- Adjust based on the image.
If your photo has soft edges or looks fuzzy, then Unsharp Mask will make details pop out. For a more natural look, try small amounts first, then increase if needed. High, medium, or low settings all create different sharpening effects. You can try different amounts like 50%, 100% or 150% to see what works best for your photo.
First, go to the Filter menu at the top. Then pick Sharpen and click Unsharp Mask. A new window will open with three sliders. Amount controls how strong the sharpening is. Radius changes how many pixels get affected. Threshold stops sharpening on smooth areas so skin doesn’t look weird.
Start with Amount 100%, Radius 1,0, and Threshold 0. See how the photo looks, then change the numbers little by little. Too much sharpening makes photos look crunchy and fake. Just enough makes old photos look clear like new again.
Step 4: Click OK, and Make Final Adjustments

The Photoshop window is the perfect place for finishing your old photo editing. The sharpened image, color fixes, and cleaned-up spots are the best elements for the final look. You can also use the extra tools like brightness or contrast if your photo still needs small changes.
After applying Unsharp Mask, you can further fine-tune:
- Lower layer opacity if the effect is too strong.
- Apply a layer mask to target specific areas.
- Use Edit > Fade Unsharp Mask right after applying it for more subtle control.
Buttons such as OK, Cancel, and Preview help you control the editing. You can click OK to save changes, Cancel if you don’t like them, or Preview to check before finishing. Natural-looking photos will show your real memories better than over-edited ones.
First, look at your photo one last time. Zoom in to check if edges are too sharp or if colors look strange. If something’s wrong, press Cancel and try different numbers. If it looks good, click OK to lock in your changes.
Now you can make final tweaks. Try the Brightness slider if the photo is too dark. Use Contrast if the colors look flat. Don’t forget to save as a new file so the original stays safe!
Additional Tips for Sharpening Blurry Pictures
Old blurry photos are like treasures that need digging to shine again. This shows how far you have come in making bad pictures look good. The faces and places in these photos are worth fixing so you remember them correctly. Even if a phone can do a quick fix, real computer editing makes pictures best for keeping or sharing with family.
Sharpening tools help save special times that get lost in a blur. When photos get clear, you can see grandma’s dress pattern or dad’s young face properly. These are not just pictures – they are family stories. Fast phone edits don’t save the real feeling like good editing does.
Try to work on a copy of the photo first so the original stays safe. Use different sharpening tools to see which works well – sometimes one tool is better than the other. Always look closely to check if the edges look real after fixing. If colors look washed out, fix that before sharpening. Save your work lots with new names so you don’t lose it.
The best edits make the photo look clear but not fake. Go slow with small changes, not big ones all the time. Some photos need many tries to get right. When you finally see hidden details come back, all the work feels worth it. Clear faces and sharp things bring old times to where they belong. Keep trying, and soon you will fix all blurry photos. Happy editing!
Use Layer Masking to Sharpen Only Parts of the Image
Add a layer mask to your sharpened layer. Paint with black to hide sharpening where it’s not needed (e.g., skin or backgrounds), and with white to reveal sharpening (e.g., eyes, text, edges).
The tools you pick for fixing blurry photos change how the whole picture looks and which parts get clearer. That is why many people ask before editing, “How can I make only some parts sharp?”
Good photo fixing needs smart editing, not just clicking buttons. S,o thinking about which parts need sharpening most is important before starting. Since old photos often have some clear parts already, your editing should mix sharp and soft areas nicely.
Layer masking lets you choose exactly where to sharpen. First, make a copy of your photo layer like we talked before. Then click the layer mask button at the bottom – it looks like a rectangle with a circle inside. Now you paint with a black brush where you DON’T want sharpening. Use a white brush to sharpen it back if you make a mistake.
This way you can make faces sharp while keeping the background soft. Or fix blurry trees, but leave the sky smooth. It makes the photo look more real than sharpening everything the same. Remember to use soft brush edges so changes blend well.
Try different brush sizes for big areas and small details. Zoom in close to see where you need the most help. Layer masking takes practice, but soon you’ll control exactly how your photo looks!
Don’t Get Too Caught Up Zooming In
Avoid sharpening at extreme zoom levels (like 300%). View at 100% for a realistic representation of how the final image will appear.
Even though zooming in helps you see problems better, it doesn’t mean you should fix them all. What looks bad super close might look just fine at normal size. The people who see your photo won’t be looking with a magnifying glass like you are.
Boys and girls both should remember – too much sharpening makes photos look fake. When you sharpen every single spot, faces start looking plastic and weird. Better to fix just the big blurry parts and leave some softness that looks real.
Here’s a good trick: after editing, zoom in, always zoom back out to check. If it looks good at normal size, then you have done enough. Walk away for a few minutes, then look again with fresh eyes. Most times, you’ll see it looks better than you thought when not staring too close.
Adjust the Unsharp Mask Settings Carefully on Each Photo
Every photo is different. For high-resolution portraits, use a smaller radius and higher threshold. For low-res images, use a slightly higher radius but a lower amount.
Sharpening and unsharp masks are like best friends that work together. Blurry photos have different problems that need special settings to fix them and make the picture look clear. The common troubles in old photos are soft edges, graininess, faded details, and many more.
There are many quick sharpening filters in free photo apps. But the good sharpening you get cannot compare to doing it yourself with an unsharp mask. This is because manual adjusting lets you control every setting for each photo’s special needs. The careful sharpening makes sure all important details become clear just right. This kind of perfect fixing is not in automatic filters or app quick fixes.
First, find an unsharp mask in your editing program. Look at the photo to see what kind of blur it has. Try a small amount first, like 50% then go up if needed. Sethe t radius between 1-2 pixels, usually for most photos. Use a threshold to keep smooth areas looking natural.
For Very Low Quality/High Blur Images, Try a Photoshop Plugin
Plugins like Topaz Sharpen AI, ON1 NoNoise AI, or Nik Collection’s Sharpener Pro can sometimes outperform Photoshop’s built-in tools for severe blur.
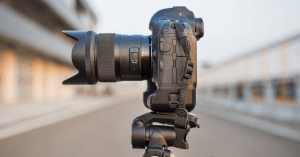
Tips for Avoiding Blurry Images in the Field
A steady camera is the best way to capture clear pictures. Whether you’re shooting fast action or still subjects, keeping your hands stable and settings right will make your photos sharp. Usually, photographers learn this after taking many blurry shots. So naturally, you’ll develop better habits with practice.
Don’t know how to prevent blur? No problem. These simple tricks will help you get crisp images every time. You can brace your elbows against your body or lean on a solid surface to stay steady. Using faster shutter speed, proper focus, and good lighting will create amazing shots as well.
- Use faster shutter speeds.
- Always stabilize your camera (tripod or image stabilization).
- Avoid digital zoom.
- Use burst mode for moving subjects.
- Focus carefully; manual focus is helpful in low light.
First, check your shutter speed – too slow causes motion blur. Hold your breath when pressing the shutter button to reduce shake. If the camera has image stabilization, always turn it on. For moving subjects, use continuous focus mode. Remember – it’s better to take many shots than miss the moment.
Bright light helps cameras focus faster. Cloudy days need higher ISO, but don’t go too high or photos get noisy. When possible, use a tripod or rest the camera on a stable surface. These small changes make a big difference in sharpness.
Final Thought
Sharpening can’t fully restore a severely blurred image, but Photoshop gives you powerful tools to improve sharpness noticeably. Combine Unsharp Mask with layer masking and plugins for best results.
Whether it’s grandpa’s mysterious 70s sideburns or that one family trip photo where everyone’s a smudge, Zenith Clipping will sharpen it up like it was taken yesterday. Say goodbye to blur and hello to brilliant clarity!
Click now and discover how to turn fuzzy memories into frame-worthy masterpieces, because every pixel deserves a glow-up!