Lightroom retouching helps make photos look better. Raw photos often look flat or messy. Lightroom fixes this easily. It is not just for pros. Anyone can learn it fast. You make colors pop and fix brightness. Make skin smoother, too, if needed. It makes your pictures way nicer than before.
But remember, don’t do too much retouching. If you make the skin too smooth, it looks fake and plastic. Eyes too white look scary. Keep it natural-looking. Lightroom has tools to help you not overdo it. Like the sliders don’t push them all the way. See how the photo looks on different screens, also. A little change makes a big difference. Start slow and practice lots.
Importing and Organizing Your Photos
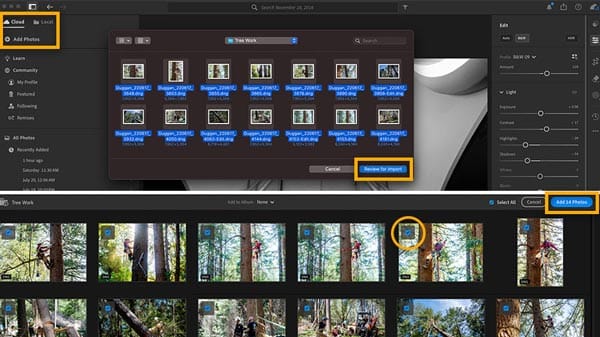
The first thing you do is put your photos in Lightroom. You connect the camera or card to the computer. Press the “Import” button. It shows all your pictures. You pick which ones you want to bring in. Give them names or put them in folders. This helps find them later easily.
Organizing is super important. Like putting toys in the right box. You use Collections or Keywords. Say you take dog pictures. Make a Collection called “Dogs”. Put all the dog photos there. Or use Keywords like “Sparky” or “Beach”. Later, you type “Sparky” and all Sparky photos show up. Saves a lot of time when you have many photos. Don’t skip this step; it is messy otherwise.
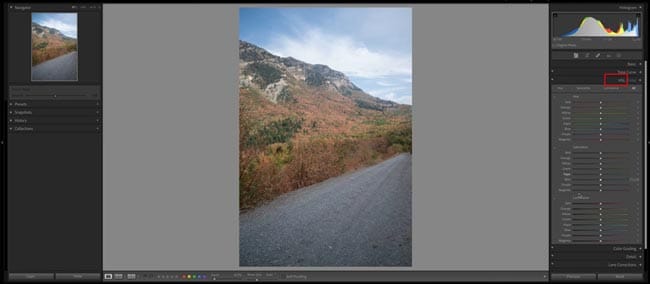
Understanding the Lightroom Interface
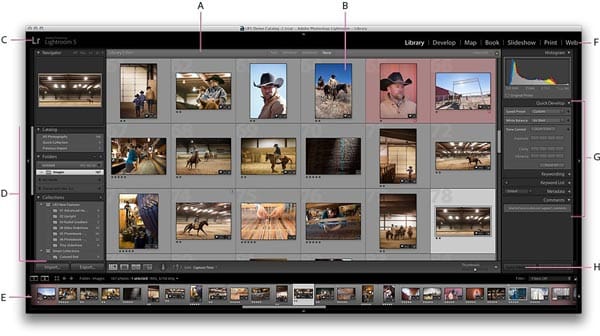
The Lightroom screen has different parts. Don’t be scared, it’s simple when you know. On the left side, see your folders and collections. Like a list of your photos. Click one, and it shows in the middle. The middle is where you see your photo big.
On the right side, see all the tools. Sliders and buttons for changing stuff. Like making it brighter or darker. Colors or sharpness. Bottom got a filmstrip. Shows more small photos that are easy to click. Top got the menus for more things. Play with each part. See what it does. It feels confusing at first, but you get used to it fast. Just remember left for photos, middle see, right fix.
Basic Adjustments: Exposure, Contrast, and White Balance
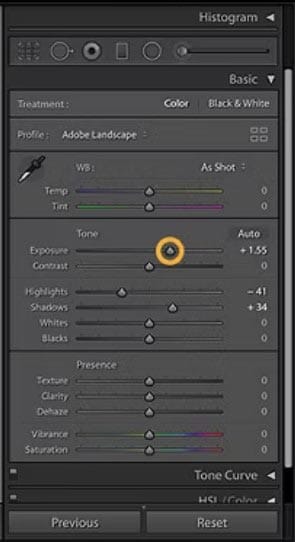
These are the first things you fix. Exposure is how bright or dark the whole picture is. If it’s too dark, move the slider right. Too bright, move left. Simple. Contrast makes darks darker and lights lighter. Makes the picture look less flat. Good for most photos.
White Balance fixes the color that feels wrong,l ike if the photo looks too blue or too yellow. Like under lights or shade, mess it up. Lightroom got presets: “Daylight”, “Cloudy”, “Tungsten”. Pick one to see if it looks better. Or use the Temp slider. Slide to blue if too yellow. Slide to yellow if too blue. Tint sliders fix green or pink colors. Make the colors feel right and natural.
Using the Tone Curve for Precise Control
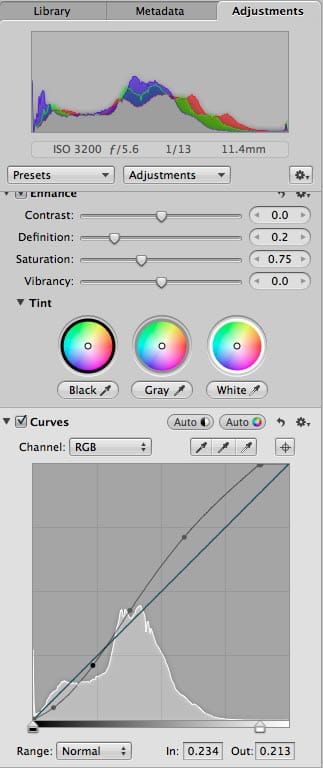
The Tone Curve looks like a line on a graph. It is scary but powerful. It lets you control brights, darks, and middles separately. Like the lights, the shadows, the not-too-bright-not-too-dark parts. You click on the line and pull up or down.
Pull up a part to make it lighter. Pull down makes it darker. Like, if you pull up the middle, the whole photo gets lighter, but mostly the middle. If shadows are too dark, pull up the left part of the line. If the sky is too bright, pull down the right part. gentlygentle. Small moves do big things. Use it to make photos richer or fix problems the sliders can’t.
Color Correction with HSL and Color Grading
HSL means Hue, Saturation, Luminance. It lets you change specific colors. Say the grass looks dull. Go to the HSL panel. Find the green slider. Push Saturation up, green gets stronger. Push Luminance up, and green gets brighter. Hue changes the green to more yellow-green or blue-green.
Color Grading makes the mood. It changes the colors in shadows, middles, and lights separately. Like making shadows a bit blue. Or make highlights warm like sunset. Use the little wheels. Drag the dot inside the wheel to pick a color. Then how standard wrong you wa?t it. Good for making photos feel happy, sad, old-timey, or just nicer. Experiment fun!
Sharpening and Noise Reduction
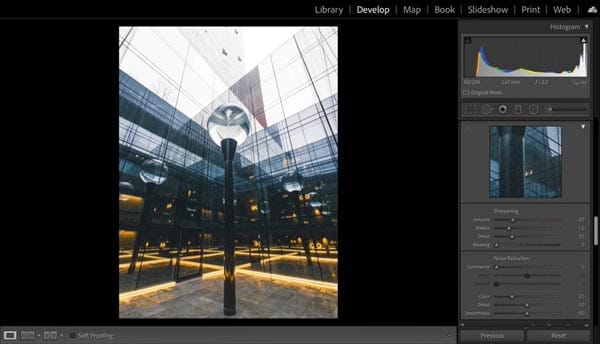
Photos sometimes look blurry or fuzzy. Sharpening helps make edges crisp. Like eyes or hair look clearer. Go to the Detail panel. Find Sharpening. Amounts: How sharp? Ning. Radius: How wide the edge it affects. Detail sliders keep textures. But too much makes it look crunchy and bad. Be careful.
Noise is yucky grain or speckles, especially in dark areas or photos taken with not much light. Noise Reduction gets rid of this. Luminance noise is gray specks. Color noise is weird colored dots. Push the Luthe minance slider to smooth the grainy look. Push the Color slider to kill color dots. But too much noise reduction makes photos look plastic and soft. Use just enough to clean it up. Balance is key.
Skin Retouching with the Masking Tools

Making skin look nice in pictures is super important for portraits. Everyone wants their skin to look smooth but not fake, like plastic. Using the masking tools in Lightroom is how you do it like a pro. You don’t just make the whole face blurry. That looks weird, and people can tell you edited it too much. You gotta be careful and only fix the bad bits like spots or little wrinkles that show up wrong in the photo.
First, you pick the Adjustment Brush or maybe the Radial Filter. Then you paint over just the skin parts you want to fix, not the eyes or lips, or eyebrows. That’s the masking part! After you mask the skin, you can change the settings like Clarity and Texture. Sliding them down a bit makes the skin smoother. But you gotta not slide too much!
Using the Healing and Clone Tools for Spot Removal
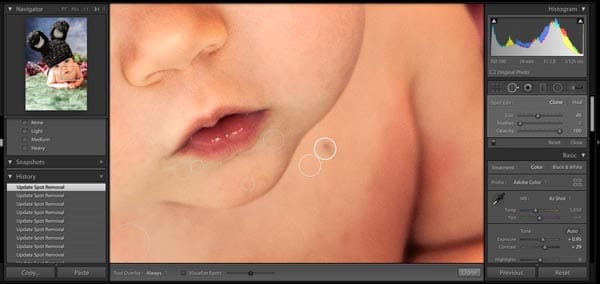
Nobody likes spots or dust marks on their perfect photo. It ruins the whole look! The Healing Brush and the Clone Stamp in Lightroom are your best friends for getting rid of these annoying things. They work kinda magic. The Healing Breath sh is great for little spots or pimples on the skin. You just click, on the spot, and Lightroom looks around and copies the good skin over it. Makes it disappear like magic! But you gotta use it on small spots, not big patches.
The Clone Stamp is different. You tell it exactly where to copy from. Like, you find a clean bit of wall next to a dust spot and tell the Clone Stamp “copy this bit”. Then you stamp it over the dust. This is good for things like dust on your camera sensor that shows as black dots in the sky, or maybe a trash can in the background you don’t want. You need to be careful picking the spot to copy from so it matches and doesn’t look obvious. Using these tools makes your photo look so much cleaner and professional, like nobody ever had a spot or left trash lying around! It takes a little time, but it is worth it.
Creating and Applying Presets
Do you edit lots of photos and want them all to look kinda the same? Like, have the same colors and feeling? Then you need to make presets! Presets are like magic buttons you make yourself. You do all the hard work of changing the Light, Color, Effects, and Detail settings once to make one photo look amazing. Then you save all those settings as a Preset. It’s super easy! Just click the ‘+’ button in the Presets panel.
Now, the best part. You got another photo that you think should look similar? Just click your new preset! Boom! Lightroom puts all those same settings on the new photo instantly. Saves you tons of time clicking buttons. You can make presets for different things: one for making beach photos sunny and warm, one for making city photos look cool and moody, even one just for making skin look nice quickly. You can use them on one photo or a whole bunch at once. Sharing presets with friends is fun too! Presets help you have a style and work faster, like a real pro photographer does.
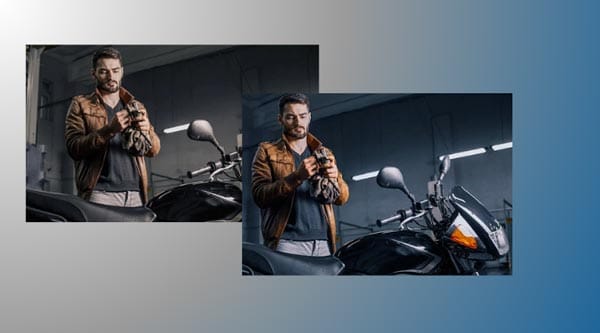
Before & After: Comparing Your Edits
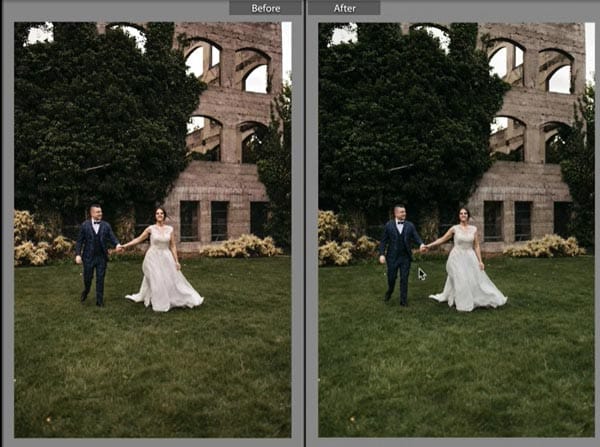
How do you know if your editing is making the photo better or worse? You gotta look at the Before and the After pictures side! In Lightroom, this is simple. There is a special button, usually the ” key or a little switch in the Develop module. Click it and you see your original photo (before), then click again and see your edited version (the After). It flashes between them.
Doing this a lot is super important. Sometimes you get so focused on changing things, you might make the colors too strong or the skin too smooth without realizing it. Seeing the Before reminds you what the real scene looked like. Does your edit still feel real? Does it look better? Maybe you made the sky bluer, but now the person’s face looks blue too! Oops. Comparing helps you catch mistakes. It also shows you how much awesome work you did fixing spots or making the colors pop. Always before and after, while you edit to make sure you are on the right track and not making the picture weird. It is the best way to learn what good editing looks like.
Exporting Your Final Image with the Right Settings
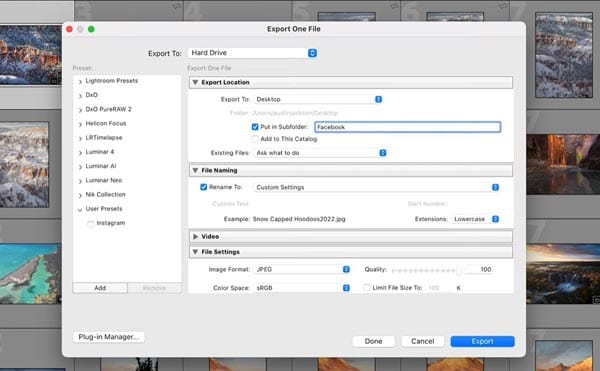
You finished editing! Yay! Now you gotta get the picture out of Lightroom so you can share it online or print it. This is called Exporting. But you can’t just save it any old way. You need the right settings so your photo looks good everywhere. Go to File > Export. A big box pops up with lots of choices. Don’t be scared!
First, pick where on your computer you want the photo saved. Easy. Then, the important bits: What kind of file? For putting on websites like Instagram or Facebook, use JPEG. For printing or if you might edit more later, use TIFF or PSD. See the Quality slider for JPEGs? Put it between 80 and 100. Too low makes the picture look blocky. The Size bit is important too. If you put it online, you can make the long edge 2048 pixels or 1500 pixels so it loads fast. But if you are printing a big poster, you need way more pixels! Like 4000 or more! Also, pick sRGB for Color Space if it is going online. Finally, give your photo a good name and click Export! Now your masterpiece is ready to show the world, looking just like it did in Lightroom.
Pro Tips for a Consistent Editing Style
Want all your photos to look like your photos? Like people see one and say, “Oh, that must be [Your Name]’s picture!”? That has a consistent style. It makes you look like a pro. How do you do it? First, think about what you like. Do you love bright, sunny photos? Or dark and moody ones? Super colorful or more faded and vintage? Pick a feeling.
Then, use similar edits lots of times. Maybe you always make the shadows a bit blue or the highlights a bit warm. Or you always add a tiny bit of grain. Using the same presets you made (remember those?) on lots of your photos helps a ton! Also, look at the colors. Do you boost greens a lot? Or make oranges less bright? Try doing similar things each time. Don’t go crazy changing everything in every photo. Pay attention to how bright your pictures are overall too. Keeping a style takes practice at your old photos and seeing what edits you used most. Stick with what works and feels like you. People will start to recognize your look!
FAQs
How do I start retouching in Lightroom?
Begin by adjusting exposure, contrast, and white balance.
How can I smooth skin in Lightroom?
Use the “Clarity” slider to soften skin without losing detail.
How do I enhance colors in Lightroom?
Adjust saturation and vibrance sliders for richer, more vivid colors.
How can I sharpen my photos in Lightroom?
Use the “Detail” panel to adjust sharpening and noise reduction.
Final Thoughts
Try things. Mess up? Just hit the Reset button, no harm done. Start with simple stuff like making the photo brighter or fixing one spot. Then try harder things like smoothing skin or changing colors bit by bit.
Why struggle with sliders and presets? Let the experts at Zenith Clipping deliver flawless, high-end photo retouching while you focus on what you do best. Get Your Photos Retouched by Professionals Today!