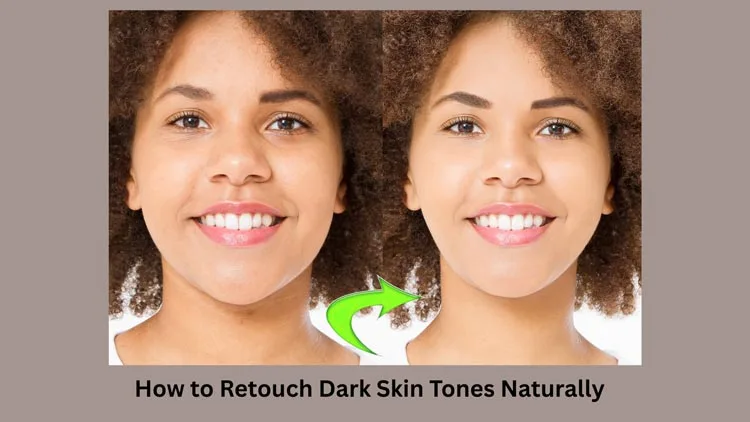
Use tools that suit dark skin. Don’t make the skin too light or dark. Keep the skin looking real. Pick colors that match the skin. Use soft brushes for smooth skin. Don’t overdo the smoothing. The skin should glow softly. Look at the undertones carefully. Red, yellow, or brown undertones need different care. Make the skin even and healthy. Don’t remove all marks. Keep some marks for a real look.
Photo editing in Lightroom Classic uses the Develop Module. The Tone Curve Panel enhances images with precision. The Brush Tool allows detailed corrections. Local Adjustment Brushes refine specific areas. The Targeted Adjustment Tool improves selected areas. Healing and cloning remove imperfections.
Common mistakes are making it ashy or too shiny. Always check the picture in different lights. Use natural light for the best check. Keep the texture of the skin. Don’t make it look like plastic. This way, the retouch looks very beautiful and natural.
The Clone Tool fixes details. The Heal Tool repairs flaws. Adjusting RGB values balances colors. This corrects issues like a cyan-heavy base. Light + airy editing is popular in portrait photography. Manual mode with RAW files provides control. JPEG files also work well. A graduated ND filter simulates sky enhancement. It balances exposures in post-processing.
Let’s dive in below!
Challenges in Editing Dark Skin Tones
Editing dark skin tones is hard because the skin can look ashy or gray if you do it wrong. Sometimes the picture gets too dark or too light, and you lose the details. The shadows and highlights don’t look right. Dark skin has many beautiful undertones, like red or gold, but they go away easily with bad editing. This makes the skin look flat and not real. It needs careful work to keep it looking natural.
Photo editing in Lightroom Classic enhances images with precision. The Develop Module is used for edits. The Tone Curve Panel adjusts contrast. The Brush Tool is used for selective edits. Local Adjustment Brushes allow fine-tuning. The Targeted Adjustment Tool refines areas. Healing and Cloning remove imperfections.
The Clone Tool fixes details. The Heal Tool repairs flaws. Balancing colors with RGB values corrects a cyan-heavy base. Light + airy editing is popular in portrait photography. Manual mode with RAW or JPEG files ensures control. The graduated ND filter adds creative effects. This completes the professional editing workflow.
Many free apps don’t work well for dark skin. They make everything the same color. Too much editing makes the skin look fake. It looks like plastic. Professional editors use special tools. They make the skin glow naturally. It doesn’t look shiny. They edit each part carefully. Free tools make things blurry. They can make the skin too orange. This isn’t good for dark skin photos.
Choosing the Right Lighting for a Natural Look
Lighting is super important for dark skin photos. Bad lighting makes the skin look muddy or too dark. You need a soft light, not a harsh one. Like near a window when cloudy or in shade outside. Golden hour light makes the skin look warm and pretty. But flash can make a bad shine or make your face too bright. Natural light is always the best choice.
For indoor shoots, it uses a big soft light or a bounce light off walls. This makes even light on the face. Avoid small bright lights that make strong shadows. Dark skin looks rich and deep in good light. It shows the true color better. If light is too strong from above, it makes the under eyes too dark. Side lights make a nice glow on cheeks. Always test lights before shooting to see how skin looks. The right light makes editing much easier later.
Color Calibration and White Balance Tips
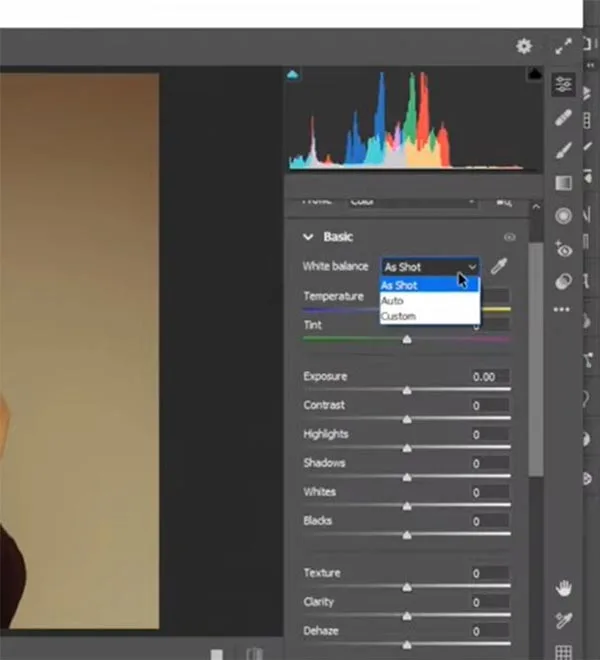
Color calibration makes skin tones true. Wrong white balance turns dark skin green or yellow. Auto settings mess up. Set custom white balance. Use gray cards to adjust. ShootF in RAW. Check background color. It affects skin tone.
Adjusting color and skin tone requires attention to dynamic range. Correcting unwanted color casts is crucial. Special care is needed for brown skin tones. Accurate representation of melanated skin ensures flattering results.
When editing, use curves and HSL sliders gently. Push orange and red a little for warmth, but not too much. Saturation must be careful, or the skin will look fake. Watch the highlights so they are not too pink or orange. Compare with real skin color always. Use reference photos if needed. Remember, different dark skin has different undertones. One preset does not fit all. Adjust for each person’s special needs.
Skin color changers help match foundation shades. They avoid racial bias in traditional standards. Shirley cards favored Caucasian skin tones. Balancing colors ensures inclusivity in portraits.
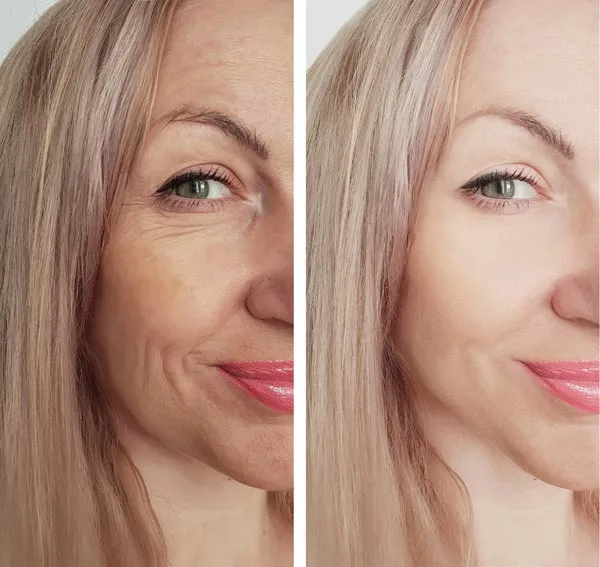
Preserving Skin Texture and Undertones
Skin texture is important for a real look. Don’t use too much smooth tool, or it looks plastic. Keep pores and small lines visible. Use a healing brush only on big spots, not every tiny thing. Dark skin has a pretty shine, but too much retouching makes it flat. Use a dodge tool soft on highlights to keep the glow.
Advanced editing techniques enhance highlights and shadows. Dodging and burning add depth and dimension. The temperature brush adjusts warmth or coolness. It creates natural skin tones. Healing and cloning tools remove blemishes. Color manipulation creates mood and consistency. Skin retouch methods produce polished results.
Undertones must not be removed. They give life to skin. Don’t make all skin the same color everywhere. Cheeks may be a little redder, forehead a little yellower. That’s normal. Use color pickers to check that values stay in range. Avoid big color shifts. Subtle changes keep it natural. Zoom out often to see the whole picture. Texture and undertones together make skin look alive, not like a doll.
Using Frequency Separation the Right Way

Frequency separation is a proper method. It splits the skin texture and color into two layers. You fix color problems without messing up the texture. First, make a low-frequency layer for color. Use a soft brush to even skin tone here. Fix dark spots or gentle redness. Don’t blur too much.
Modern editing tools use AI technology. They enhance photos effortlessly. Apps like YouCam Makeup offer beauty filters. They have perfect skin and facial features in real-time. Classic looks are achieved with black and white presets. Black and whites add timeless elegance. Film stocks emulate vintage styles. Film scanned effects include Kodak Portra 400. Pretty Presets provide versatile options. They elevate any photo.
Then, a high-frequency layer for texture. Fix shiny areas or big pores here. Clone or heal carefully. Don’t overdo it. Blend layers good after. This way, the skin looks smooth but still real. Not like plastic. But it takes practice to do right. Wrong use makes skin look patchy or fake. Watch tutorials many times. Go slow. Better do a little than too much. Good for fixing problems, but keeping natural beauty.
Avoiding Over-Lightening and Desaturation
A big mistake is making dark skin too light. It looks wrong and washes out. Keep the richness of the dark tone. Don’t push exposure too high. Use curves gently on midtones, not highlights. Desaturation makes skin look dead and ashy. Add a little vibrance instead, but be careful.
Understanding camera settings is key to high-quality images. The Tone Curve Panel controls brightness and contrast. Educational material helps improve skills. It keeps photographers updated. Fieldwork and studio work require mastery of these concepts. They ensure professional results. Technical knowledge with practical experience leads to success.
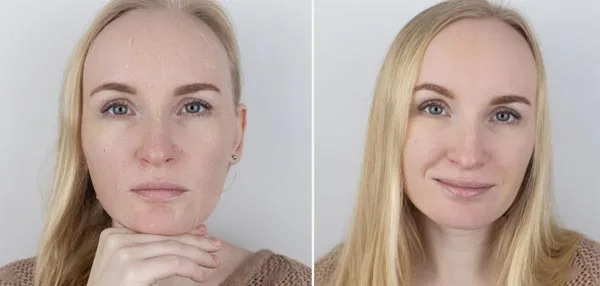
Check that the blacks do not get gray. Use levels to keep deep blacks. Compare before and after to not over-edit. Skin should still look like the same person. Avoid “beauty mode” filters; they make it too light and smooth. Respect the natural skin color. Dark is beautiful, not something to fix. Editing is for enhancement, not change. Clients get sad if their skin looks lighter than real.
Enhancing Highlights and Shadows Subtly
Highlights on dark skin look like a soft glow. Use a dodge tool on small areas like cheekbones or nose bridges. But a very soft brush and low opacity. Don’t make white spots. Just a little bright. Shadows should be deep but still show details. Use a burn tool gently in creases or under the chin. Not too dark.
Look where light hits naturally and boost a little there. But keep it soft. No hard lines. Highlights are not all the same color either. Warm lights have gold highlights. Cool lights have silver. Match to photo lighting. Shadows are not pure black. They have color too. Add a tiny bit of purple or blue in deep shadows for dimension. But very little! Subtle is the keyword.
Working with HSL and Color Grading Panels
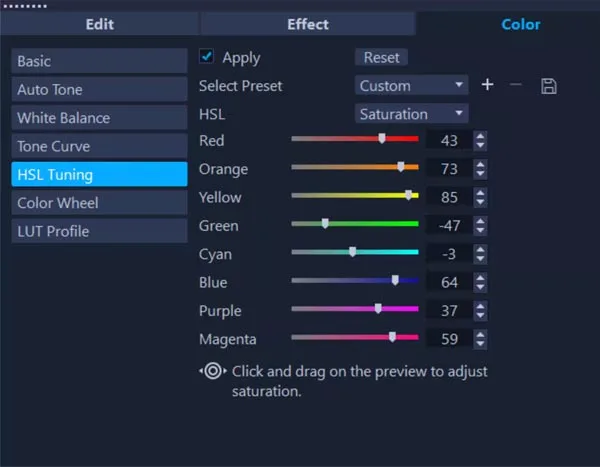
HSL panels help you change colors in skin. Dark skin got red, orange, and yellow tones. Push sliders gently. Too much and the skin looks wrong. The saturation slider makes the color,r, strong but careful. Making skin too orange is not good. The luminance slider makes the color light or dark. Push orange luminance up a little bit to make the skin glow nicely. But too much and the skin looks ashy. Not good.
Color grading panels let you add color to shadows or highlights. Add a little blue in the shadows for a cool look. Add a little gold in highlights for a warm sun feel. But very little! Dark skin needs balance. Do not make shadows too blue or green. Highlights not too yellow. It makes my skin sick. Play with the sliders slowly. Look at the skin closely. Stop when it looks natural. Not like cartoons. These tools are powerful but easily messed up.
Importance of Retouching Dark Skin Tones
Facebook Live Editing Sessions share knowledge. Instagram Reels help educate photographers. Editing apps enhance selfie cam features. In-app purchases cater to diverse skin tones. This focus promotes inclusivity and respect.
Retouching dark skin tones is gaining attention. Dustin Lucas and John Schell advocate for authenticity. Brands like Mastin Labs offer tools for melanin-rich skin.
Common Mistakes to Avoid When Retouching Dark Skin
A big mistake is making the skin too light. People think light skin is better. It is not. Dark skin is beautiful. Keep it dark. Don’t push the exposure slider all the way. The skin looks gray and flat. Another mistake is too smooth. The skin looks like a plastic doll’s. Not real. Keep the bumps and pores. Only fix big spots, not everything.
Desaturating too much makes skin dead. No life. Skin needs color. Also, don’t make them all the same color. Cheeks may be a little red. The forehead is a little dark. That’s normal. Don’t remove undertones. They are pretty. Too much contrast is bad. Make shadows too black. Lose details. Highlights are too white. It looks like grease. Always check on different screens. Phone screens and computer screens are different. Ask someone else to look too.
Always work slowly. Small changes. Check before and after lots. Zoom in and out. Use good tools, but not too many. Presets are usually bad for dark skin. I need custom work each time. Remember, every skin is different. What works for one does not work for another. Practice makes it better. Watch how real skin looks in light. Copy that. Do not make fantasy skin. It’s really beautiful.
FAQs
1. How can I avoid color casts when retouching dark skin tones in Lightroom?
Color casts can be avoided with key adjustments. Set the white balance correctly. Use the Temperature Brush to adjust warmth. Aim for a neutral tone. The Tone Curve Panel tweaks shadows, midtones, and highlights. It keeps the skin tone natural. Adjust the exposure in the Develop Module. Balance the skin tone for a true-to-life look.
2. What are the best editing tools for enhancing dark skin tones in photos?
When working with brown or melanated skin tones, enhance natural depth and warmth. The Brush Tool allows precise adjustments. Local Adjustment Brushes lighten or darken skin areas. Dodging and burning add dimension by highlighting and contouring. The Targeted Adjustment Tool adjusts specific color ranges. AI-based tools like YouCam Makeup balance skin tones. They smooth imperfections without losing texture.
3. How do I balance dynamic range when editing dark skin tones?
Balancing dynamic range keeps texture in dark skin tones. Adjust exposure and contrast in the Lightroom Develop Module. Use the Tone Curve Panel for selective adjustments. Refine shadows, midtones highlights. Use the Targeted Adjustment Tool for skin tweaks. Keep it subtle to avoid unnatural results. Balance skin beauty with soft contrast.
4. What is the best approach to skin retouching for dark skin tones?
Retouching dark skin requires balance. Use Healing and Clone Tools to remove blemishes. Avoid over-smoothing. Preserve the skin’s natural glow. Don’t flatten the complexion. Use the Brush Tool for dodging and burning. Emphasize natural contours. Check color balance. Avoid unnatural warmth or coolness. Refine adjustments. Preserve skin richness. Achieve a polished look.
Final Thought
Retouching dark skin needs respect. Don’t change how a person looks. Just make it the best version. Clean up, not create a new face. Skin color is important. Keep it true. Don’t lighten it thinking it’s “better.” That’s wrong. Dark skin is gorgeous.
Enhance Beauty, Not Erase It. Let Zenith Clipping help you retouch dark skin tones with natural precision and professional finesse. Try our expert photo retouching service today!