Professional retouchers use special tools and skills to make photos look their best. They fix every small detail by hand, which free apps or AI cannot do. Lighting and contrast in black and white photos are very important. If not adjusted correctly, the photo looks flat or too dark.
Many people think black and white is easy to edit, but it is not true. Skin tones and textures must look natural even without color. Stains on clothes or background distractions must be removed carefully. Free apps only give basic filters, but professional editing makes photos timeless.
For best results, always hire expert retouchers. They know how to balance shadows and highlights perfectly. Hand-drawn edits make sure every part of the photo looks smooth and clean. This level of quality never comes from free software or automatic edits.
Step 1: Start with a High-Resolution Image
You need a good photo to start retouching. High-resolution images are best because they have more details. If the photo is blurry or small, editing will not look nice. Always pick the clearest picture you have before making changes.
Bigger photos let you zoom in close without getting pixelated. This helps when fixing small things like skin spots or hair strands. Low-quality images get worse when you try to edit them. They become more fuzzy, and the colors look weird.
Direction:
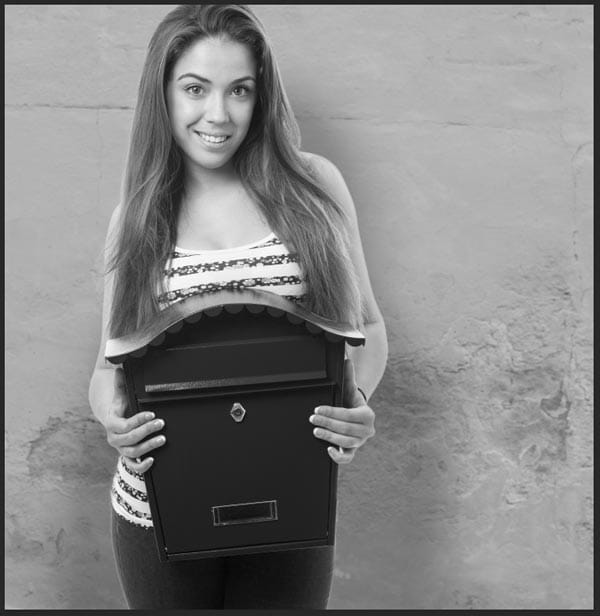
- Use a well-lit, high-resolution portrait for best results.
- Ensure there is good contrast between shadows and highlights to make your retouching more impactful in black and white.
Professional retouchers always work with high-res photos. It gives them more control over every little part of the picture. If you start with bad quality, no editing can make it perfect. Even the best software cannot fix a photo if it is too small or grainy.
Check your camera settings before taking pictures. Set it to the highest resolution possible. This saves time later and makes retouching much easier. Remember, good edits start with a good photo!
Step 2: Convert to Black and White the Right Way

Just removing colors does not make a good black and white photo. You need to adjust the settings properly for the best look. Many people just click “grayscale,” but this makes the photo flat and boring.
A good way is to use a “black and white adjustment layer” in editing software. This lets you change how much dark or light each color becomes. Like making reds darker and blues lighter for more contrast. Face skin tones need special care so they do not look too pale or dirty.
Direction:
- Go to Image > Adjustments > Black & White or use a Black & White Adjustment Layer.
- Adjust sliders (reds, yellows, blues, etc.) to control how different skin tones and details are rendered.
- Avoid using desaturation (Ctrl+Shift+U) as it removes control.
Always check histogram after converting. It shows if the photo has a good balance of blacks, whites, and grays. If the graph bunches on one side, the photo will be too dark or too washed out. Move sliders till the histogram spreads nicely across the whole chart.
The best black and white photos have strong lights and darks, but still keep details. Don’t let shadows go completely black or highlight pure white unless for an artistic look. Practice makes perfect, so try different ways till the photo looks professional!
Step 3: Clean Up Skin with Healing Tools
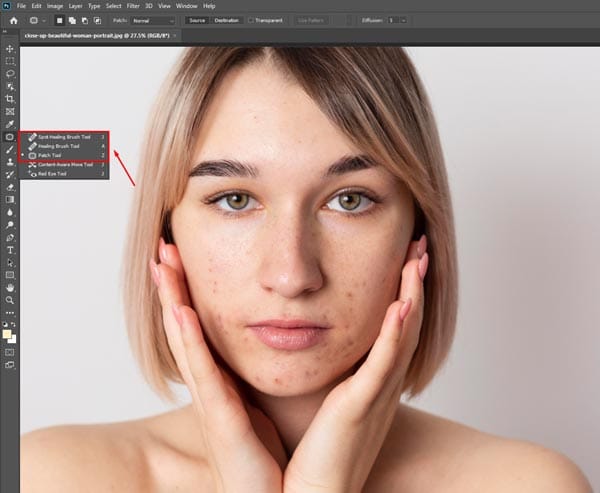
Nobody has perfect skin in photos, but healing tools can fix this. The spot healing brush and clone stamp are best for removing pimples, scars, and other marks. But you must use them carefully, or your skin will look fake and plastic.
First, zoom in close to see all the bad spots. Use a small brush size to fix just the problem area without touching good skin around it. For big spots, clone stamps work better because you can pick which skin part to copy over the blemish. Always pick samples from near the spot so color and texture match well.
Direction:
- Use the Spot Healing Brush Tool or Healing Brush Tool to remove blemishes or dust.
- Zoom in and work carefully to preserve natural texture.
- Work on a duplicate layer for non-destructive editing.
Don’t remove all skin texture because real skin has little lines and pores. If you make the skin too smooth, the person will look like a doll, not a human. Just take away the bad bits but keep a natural look.
Also, remembering shadows on the face is important. If you remove everything, the face will look flat like paper. Keep natural shadows that make your face shape but clean up uneven spots and shine. Practice lots to make skin look perfect, but still real!
Step 4: Dodge and Burn for Depth and Drama
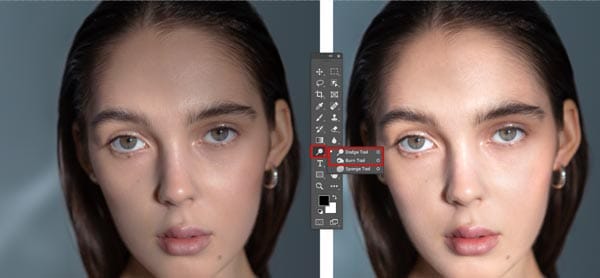
Black and white portraits look classic and cool. But they need some fixing to look better. One way is using dodge and burn. This makes the photo have more depth and drama.
Dodge makes the light parts brighter. Burns make the dark parts darker. This helps the face stand out nicely. You can use a soft brush for a smooth look. Don’t make it too hard, or it looks fake. A good time to do this is after you fix skin and contrast. Go slow and check many times. Zoom in to see small spots you miss. The eyes and hair need more work to pop.
Direction:
- Create a 50% gray layer set to Soft Light, and use the Dodge Tool (to lighten) and Burn Tool (to darken).
- Emphasize highlights on cheekbones, nose bridge, forehead, and deepen shadows around the jawline and eyes.
- Use low exposure (5–10%) for subtle, buildable effects.
Poses that work well are looking side or down. Shadows look best when the face turns a little. Also, try a hand near the face for more depth. Natural light from the window makes soft shadows for a nice effect.
Clothes should be simple, like a plain shirt. Too much pattern makes photos busy. Girls can wear black dresses for a timeless look. Boys can wear white shirts for a clean style.
Step 5: Enhance Details with Clarity and Texture
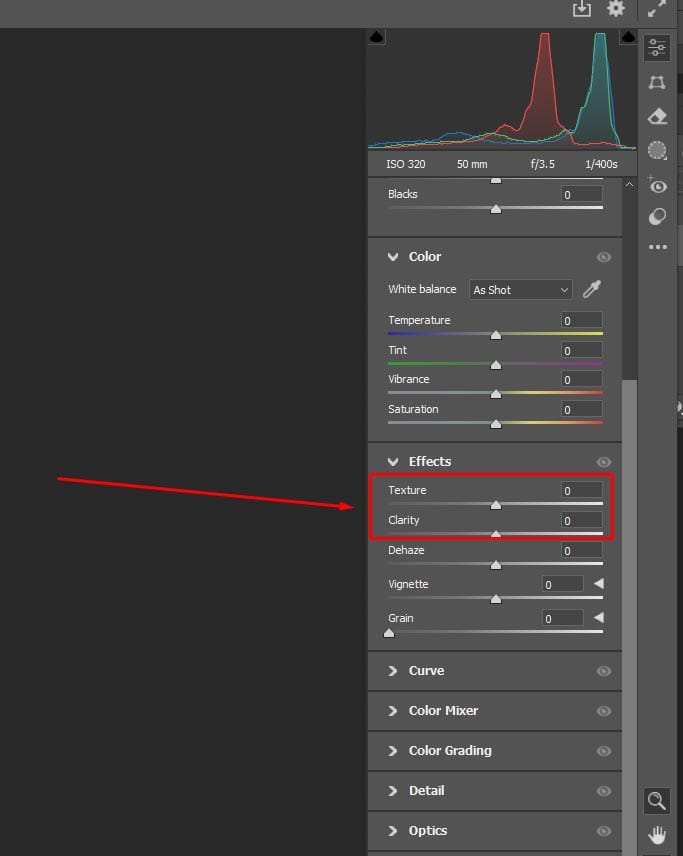
Black and white photos look better when details pop out. Using clarity and texture makes the pictures sharper and interesting. This helps the face and clothes look more real and not flat.
Clarity makes edges more strong, so the face does not look blurry. Texture makes small lines like hair and fabric more visible. But don’t use too much or your skin will look rough and bad. The best way is to slide a little bit and see how it looks. A good time to use this is after you fix the light and shadows. Zoom in to check if the skin is still smooth. Eyes and lips need a little more clarity to stand out nicely. But keep your nose and cheeks soft so you don’t look too hard.
Direction:
- Use Camera Raw Filter > Texture and Clarity sliders to enhance facial structure and wrinkles (if desired).
- Apply selectively using masks—especially important for eyes, lips, and hair.
- Don’t overdo it, or the portrait may look harsh.
Poses where the face is not straight work good. Like looking down or a little to the side. Light from the side makes shadows that clarity makes nicer. Also, hands holding something like a hat or book make a photo more story.
Clothes with simple lines are best for this. Too much pattern makes me too busy when adding texture. Girls can wear plain dresses with little lace. Boys can wear shirts with small buttons for a little detail.
Step 6: Sharpen Selectively
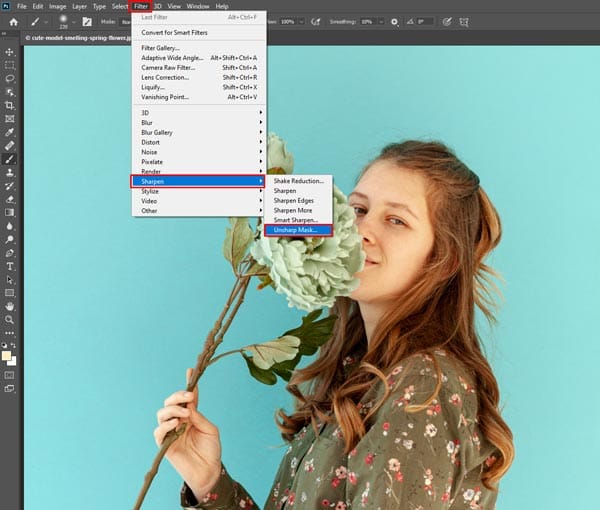
The sharpening you do on a portrait makes a big difference in how the picture looks in the end. Many people ask before editing, “How much should I sharpen the photo?”
Good black and white portraits are not all the same. Some parts need to be sharper, like eyes and hair. Other parts, like skin, better stay a little soft. This way the picture looks more natural but still poppy.
Direction:
- Duplicate the final merged layer, go to Filter > Other > High Pass (set radius to 1–2 px).
- Set the layer blend mode to Overlay or Soft Light.
- Add a mask and apply sharpening only to key areas like eyes, eyebrows, and lips.
First decide which parts are most important in a photo. Eyes always need to be sharp so they are clear and bright. Clothes texture is also good to be a little bit. But skin and background better not be too sharp or look fake.
Best way is to use a brush tool for sharpening. Then you can choose exact spots to work on. Big zoom helps me see where I need sharpness most. Remember to do a little bit first, then check before doing more.
Light in the photo helps decide too. If shadows are strong, sharp help details show better. If the light is very soft, maybe less sharp looks more dreamy. Always think what mood you want the picture to have.
Step 7: Final Tone Curve and Contrast Adjustments
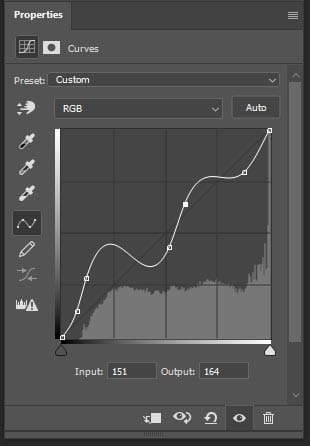
The tone curve is like a magic tool that makes black white photos look perfect. It helps you control how dark or light every part of the picture is. Even if you have never used it before, it is easy to learn and makes a big difference.
Some people are scared of the tone curve, but don’t be! It just lines you up or down. Up makes things brighter, down makes them darker. The best part is that you can fix just shadows or just lights without messing up the whole photo.
Direction:
- Use a Curves Adjustment Layer to tweak contrast and midtones.
- Add a slight S-curve for rich blacks and crisp whites.
- Optionally, use Levels for fine-tuning the overall tonal balance.
For portraits, gentle S-shape curves work nicely most of the time. It makes darks a little darker and lights a little brighter, so the picture does not look flat. But don’t make your skin too strong or look strange. Always check if your face looks natural after a change.
This should be the last step after fixing all other things. Because tone curves change how everything looks together. Good idea to make a copy of the photo before, so you can go back if you don’t like it.
Good tone curves make photos feel alive. It can turn an okay picture into a wow picture. When you get it right, you always remember that feeling when you see the photo later.
Final Thought
Do you like black white photos? Now you know how to make them look their best! All the steps we talk about help turn a normal picture into a special one that makes people say “wow”.
Want to give your black and white portraits a flawless, professional finish? At Zenith Clipping, our expert editors specialize in high-end retouching that brings out every detail with precision and artistry. Whether you’re enhancing personal photos or preparing portraits for clients, we deliver fast, reliable, and studio-quality results. Get your free quote today and turn ordinary portraits into timeless works of art!