The lights and glows you add to your pictures make them look prettier and special. That is why many people ask before editing, ‘How do you make lights and glows look real?’
Good photos with lights are not just random bright spots. You need to think about where the light comes from and what mood you want. Since light effects make pictures cool, your edits should also be a mix of real and fantasy.
First, pick the right colors for your glows so they match the photo. If the photo is warm, use yellow or orange glows. If the photo is cool, use blue or white. This makes the light look like it belongs there.
Also, don’t make the glow too strong, or it looks fake. Soft glows are better because they seem natural. You can use a blur tool to make the edges soft and not too sharp.
Last, always check if the light goes the same way as the shadows in the photo. If light comes from the left, shadows must go right. This small thing makes a big difference, and people will believe your light is real!
Step 1: Open the Image
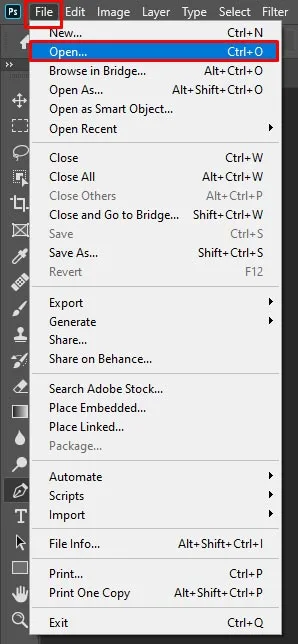
Open your image in Photoshop where you want to retouch the water reflection.
Opening the Image is the best way to start editing. Whether you use a phone or a computer, the tools and buttons will help you make pictures look cool. Usually, people click photos first, then open the app. So naturally, you already know little about this step.
Don’t know how to open it? No problem. Opening the image right will make your edit smooth and remind you of fun later. You can tap on the folder and pick your photo. Clicking, dragging, or zooming the image will help you see better, too.
Step 2: Duplicate the Background Layer
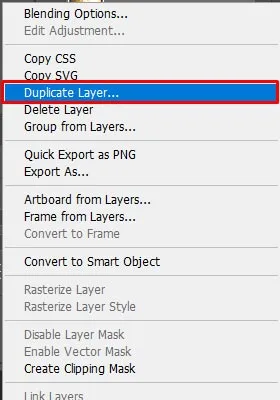
Press Ctrl+J (Cmd+J) to duplicate the background layer and keep the original image intact.
You can use layers to make your editing better and not mess up the original photo. Instead of editing on the same layer, you should make a copy so you can try things safely. You can press Ctrl+J (or Command+J on Mac) to make the new layer the same as the background. This way, if you make a mistake, you just delete the copy and do not ruin the real photo.
Also, when you duplicate a layer, you can change how it looks without hurting the first image. Like, if you want to add glow, you do it on a copied layer, so if it looks bad, you just hide or erase it. Same if you want to test colors or effects—always do it on a new layer!
Another thing is to name your layers so you don’t get confused. If you have many layers, you might forget which one does what. Just double-click on the layer name and type something easy like ‘glow effect’ or ‘color fix’. This helps you stay organized and not make a big mess.
Remember, always duplicate layers before big changes. It saves time and keeps your work clean. If you don’t like editing, just remove the layer and start again. Easy!
Step 3: Create a New Layer

Click the New Layer icon at the bottom of the Layers panel to paint non-destructively.
Do you like drawing on the computer? Creating a New Layer is good for making better art. Pictures made with layers help you remember how you make each part special.
New layers work best when you add colors or draw shapes on top. Clicking the layer button or using the keyboard creates new space to draw. You can also make pictures look deep by putting shadows on one layer and lights on another layer. Try painting on different layers, like you paint on glass sheets stacked up.
Step 4: Choose the Brush Tool
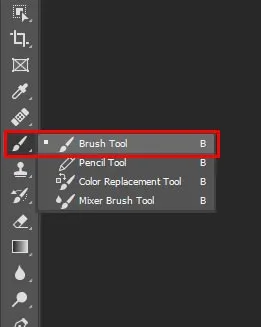
Select the Brush Tool (B) and pick a soft round brush for smooth blending.
You can use brushes to make your drawing more fun and special. Not all brushes are the same; you pick ones that match what you like to draw. If you like to draw flowers, use a soft round brush that makes petals look nice. If you like to draw buildings, use a square brush for straight walls.
You can choose Many brush types! Paintbrush for smooth colors, pencil brush for sketch lines, and even a sponge brush for rough textures. Just like you pick your favorite toys to play with, pick your favorite brushes to draw with.
Also, think about what you are drawing when choosing a brush. A bi,g soft brush is good for the sky and clouds. Small, pointy brushes are good for drawing eyelashes or tree branches. If drawing water, maybe use a wavy brush that looks like waves.
Remember to try different brushes to see which you like best. Some brushes make dots, some make lines, some make shapes. Mixing them makes your art more interesting! Just like mixing colors when painting.
Step 5: Set Foreground Color
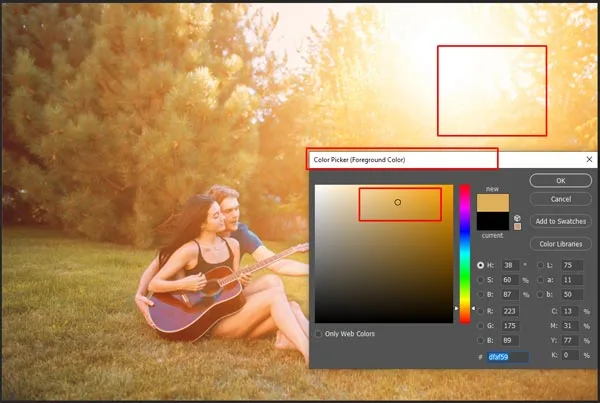
Choose a light tone from your image or use a soft white to simulate reflected light.
The color you pick first is most important for your picture. No matter if you are good at art or just starting, the right color makes your drawing feel happy or sad, or exciting. Most artists pick their main color before they start. So you already know colors are special!
Never thought much about colors before? That’s okay! Choosing the perfect color will help your art look its best and make you smile when you see it later. You can click the color box and pick from the rainbow. Bright colors make things pop, soft colors make things calm.
Try picking colors that match your drawing. If you draw the sun, pick warm yellow or orange. If you draw the ocean, pick cool blue or green. You can even mix colors to make new ones – like mixing red and yellow to make orange!
Standing colors next to each other make pretty pictures, too. Dark color behind light color makes it stand out. Colors that match make the picture feel nice. Every time you change color, your art gets more interesting!
Step 6: Paint the Light
On the new layer, gently paint over the water reflection to simulate highlights or enhance shapes.
Since you put time into making nice art, you should try to paint light, too. This extra step makes your pictures look magical and more real. Adding light is good for both beginners and pro artists. Most art apps have light tools. But you might want to add special glows to your picture did not have before. And if you are a busy artist, painting light fast can save you time.
Not scared of it too hard! Painting light does not take lots of money or time. Art Magic, a famous art tool company, makes easy light brushes that cost little money. You get cheaper if you buy many brushes together. So I think painting light is a good thing to make art better.
Just pick a soft brush and a light color. Click where the sun hits or the lamp shines. Make bright spots little blurry look real. Try different colors – yellow for sun, blue for moon, even pink for neon signs! The more you practice, the better you get. Soon, you make pictures glow like real life!
Step 7: Adjust Opacity
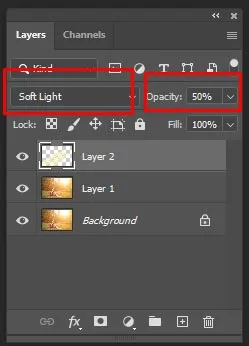
Lower the layer’s opacity (40–70%) to blend the light smoothly into the water.
Drawing and opacity are like peanut butter and jelly – they just belong together! Most pictures look too strong or too weak if you don’t change the see-through amount. Things like too bright colors, shadows too dark, or effects too strong happen a lot.
Many free apps let you slide the opacity up and down. But they never work the same as pro art programs. This is because real artists know how much see-through is perfect for each part. They use special tools that let them change opacity just right for every little spot. This careful changing makes pictures look really good, not fake like computer-made art.
Don’t worry – changing opacity is easy-peasy! Just find the opacity slider (usually looks like the sun with an arrow). Slide left to make more see-through, slide right to make more solid. Try 50% first – that’s like looking through a clean window. For ghosts or smoke, maybe 20%. For strong colors, maybe 80%. Every picture needs to be different!
Remember – small changes make a big difference! Like when you add milk to juice – a little bit changes everything. Same with opacity – tiny slides can make a picture look perfect. Just play with it until it feels right!
Step 8: Add Highlights
Use a smaller brush and brighter color to paint concentrated highlights where light hits the water.
You should try different highlight spots to make your picture look more real and special. Bright dots, soft glows, and shiny lines are the basic highlight types. These simple lights can make your art look magical when you mix them. For sun pictures, put little white dots on leaves and water – this makes it look like real sunlight!
If your drawing has faces or round things, put highlights on the tops to make them pop. For a cooler look, try adding tiny stars in your eyes or on jewelry. Front light, side light, or backlight all make different awesome effects. You can try many highlight tricks, like making some big and bright or lots of small sparkles – so many ways to do it!
Remember – highlights are like magic dust for pictures! Put them where the sun would hit or where things look wettest. Don’t put too many, or it looks fake. Start with a little bit, then add more if needed. Soon, your art will shine like real life!
Step 9: Apply Gaussian Blur
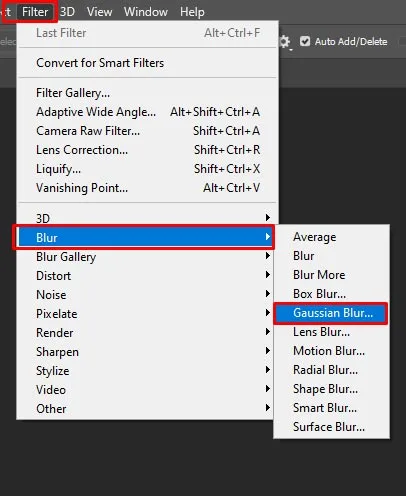
Go to Filter > Blur > Gaussian Blur to soften the painted light and reflections.
Apart from sharp stuff, soft, blurry bits like backgrounds, glows, or faraway things make pictures look more real and pretty. You can add magic, dreamy feels to your art when using blur right. The way light gets fuzzy when you do blur makes everything look like in movies.
For glowy pics, use a small blur to make the lights soft and nice. For backgrounds, use a big blur to make things far away look out of focus. This helps your main thing stand out better.
Good ways to use blur are on stuff behind your drawing, on shiny spots to make them glow, or on edges to make them not too sharp. Try moving the blur number up and down to see what looks best – little blur for little soft, big blur for big soft.
Remember – blur is like magic glasses for pictures! Don’t use too much, or everything gets mushy. Start with a little, then add more if needed. Soon your art will look pro like real photos!
Step 10: Refine with Layer Masks
Add a layer mask to the painting layer and use a soft black brush to erase or blend harsh edges.
You can use layer masks to make your artwork better and special. Don’t just use masks anyhow; pick the right ones that fit what you are trying to do. Use soft mask edges if you want smooth blends or hard edges if you want clean cuts. The layer mask tools should match your art type to make everything look perfect together.
Remember – black hides and white shows on masks! Paint black to erase parts without really deleting. Paint white to bring back hidden areas. Try different brush sizes – big for large areas, small for details. Your art will look so pro when you use masks right!
Step 12: Fine-Tune Colors
Use Hue/Saturation or Color Balance adjustments to match the reflection with the overall scene.
Do you like to make pictures pretty? Try changing colors to make your art look more real. Colors in your artwork help remember how things look with light and shadows.
Art colors look best when you change the bright ones and the dark ones separately. Moving sliders for warm colors or cool colors creates different moods. Putting colors that match together makes a picture feel nice. You can also make colors pop more by changing just the background colors.
Try many color mixes – make some parts more red or less blue. See what looks most like real life. Little changes make a big difference for good artwork!
Final Thought
Want to make your photos pop with realistic light and glow effects? At Zenith Clipping, we specialize in transforming ordinary images into eye-catching visuals with professional-grade enhancements. Whether it’s soft glows, dramatic lighting, or subtle highlights, our expert editors ensure every detail shines just right. Boost your brand’s visual appeal — get started with Zenith Clipping today!
Never tried light effects before? That’s okay! Adding glows to art makes memories that last forever and make you smile when seen later. You can paint small sparkles or big sun rays – both look cool. Making lights bright or soft creates different feelings, too.