
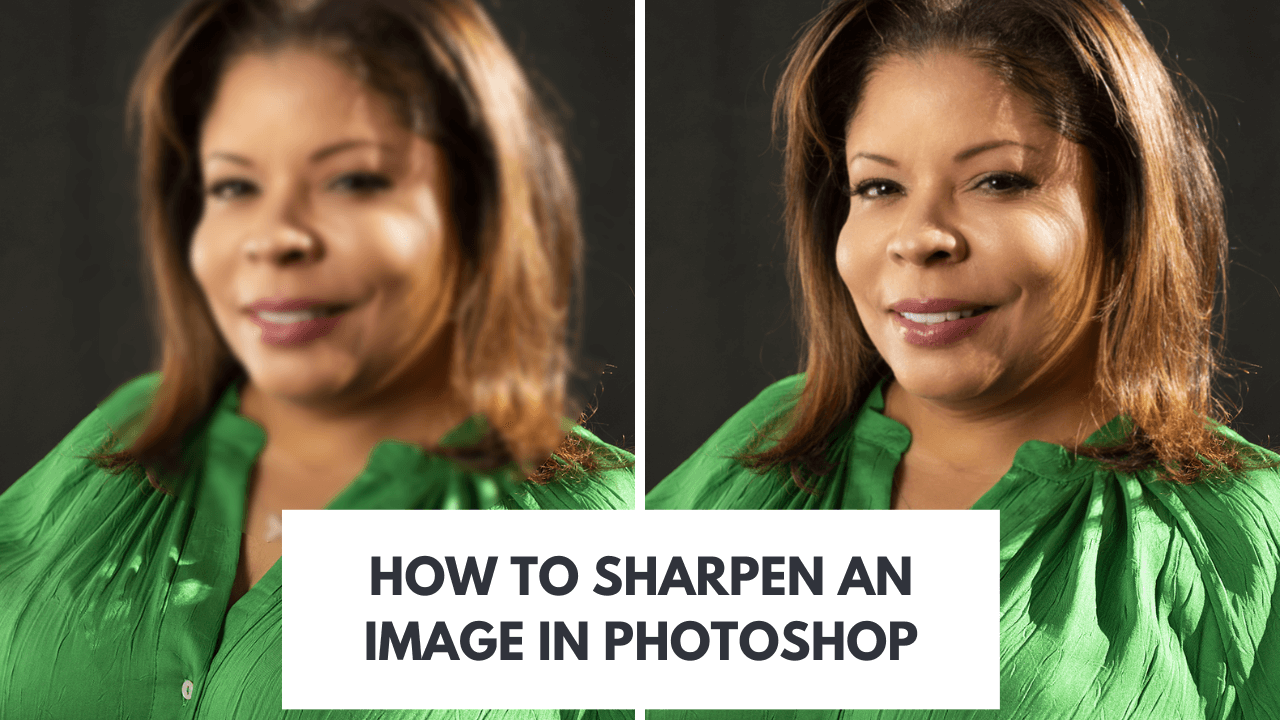
Knowing how to sharpen a picture in Photoshop is helpful expertise for any photographic artist. Foggy pictures occur for various reasons. Perhaps you had your camera self-adjust and it set the center point in some unacceptable spot.
Maybe it’s an issue with your stuff and your focal point essentially doesn’t convey the most honed of pictures. This is a typical issue with non-proficient long-range focal points. Simple to utilize programming for sharpening your photographs with only a single tick. Significantly more compelling than Photoshop.
Or on the other hand, maybe your picture was entirely sharp but looks somewhat fluffy when you transfer it to your informal communities on account of the pressure calculations from Facebook or Instagram.
Whatever the explanation, having the option to sharpen your pictures in Photoshop implies you have an answer at your disposal. There are numerous ways of doing this and one best relies upon your work process and what you need to involve the picture for.
Here I’ll go through the most well-known and helpful process on how to sharpen an image in Photoshop.
What is Image Sharpness?
Image sharpness alludes to how much detail you get from the area in the center. See this picture, for instance – the background is deliberately obscured.
This is a method that makes the subject stand apart because it’s in the center. In any case, not every last bit of it has a similar sharpness. The contrast between the when pictures are in how much detail you can recognize in the face region.
Different kinds of Sharpening
Capture Sharpening
The sharpening that you apply to a picture brings back the sharpness lost through the method involved with catching the picture to a sensor and switching it over completely to a digital design. The demosaicing system.
To counterbalance this deficiency of detail, when you open a RAW record in CameraRAW or Lightroom you will see that the Sharpening “Sum” is set to 25 as a matter of course.
If you open a JPG, rather you will see that the Amount is set to 0, because your camera or the gadget adds sharpening during the pressure cycle.
Inventive Sharpening
Applied specifically founded on a creative plan. An impact tends not to be reasonable or unobtrusive.
Output Sharpening
The last step before yield. Done after you lessen the size of the picture and before sending out it as a JPEG, or before printing the picture. Both printing and downscaling a picture might mellow it, and it might require a touch of honing to bring back some detail.
How Do You Make a Blurry Picture Clear in Photoshop?
It’s difficult to change the focal point of a photo whenever it’s been taken, however, what you can do is add the impact of sharpness in Photoshop.
This is finished by expanding the differentiation on the edges to make them appear as though they are more characterized.
In this way, when Photoshop recognizes a major distinction between lighter and hazier regions, it will expand the differentiation to have the effect more obvious.
There’s a breaking point to what Photoshop can do. If the picture is too foggy then transforming it into an unmistakable picture won’t be imaginable.
Back to the model picture above – I can make the subject keener so you can see every hair on the face, however, I will not have the option to place the background in the center.
Cutoff points of Image Sharpening
The limit of what you can or can’t bring into the center isn’t the one in particular that exists with regards to honing a picture in Photoshop. These tools likewise have a cutoff on how much honing they can do before they begin making upsetting side impacts. One of the greatest such issues is haloing.
Haloing implies that a brilliant boundary begins to seem to encompass the most differentiating region of the picture. This boundary is known as a corona. This issue isn’t just brought about by Sharpening; it can likewise occur with HDR pictures and other alters when they are stretched over the boundary.
Another entanglement comes if you have any clamor in your image. Commotion is an irrelevant issue yet it turns out to be substantially more observable if you apply any sharpening channel or strategy.
Thus, it’s smarter to dispose of any noise before utilizing any of the accompanying methods.
The Most Effective Method To Sharpen An Image In Photoshop
There are numerous ways of expanding sharpness in Photoshop. There are six unique channels inside the Sharpen class alone, in addition to different apparatuses and methods that you can track down in various segments of the program.
This article is around three of the most well-known, and the most helpful as I would see it: Unsharp Mask, High Pass, and Smart Sharpen.
I’ll give you a step by step instructions for each one, except we should begin by momentarily making sense of what they are:
- Unsharp Mask gives you a few settings that you can physically change, joined with an extraordinary calculation. This makes it an extraordinary split the difference between completely programmed and manual change.
- High Pass is the easiest one to use while as yet conveying incredible outcomes. It works with another layer committed to tracking down the edges and working just on those.
- The Smart Sharpen channel gives you the most control. Besides, you can save the change as a preset to use on numerous pictures and make a more proficient work process.
Let’s go more from top to bottom about how you can utilize it all.
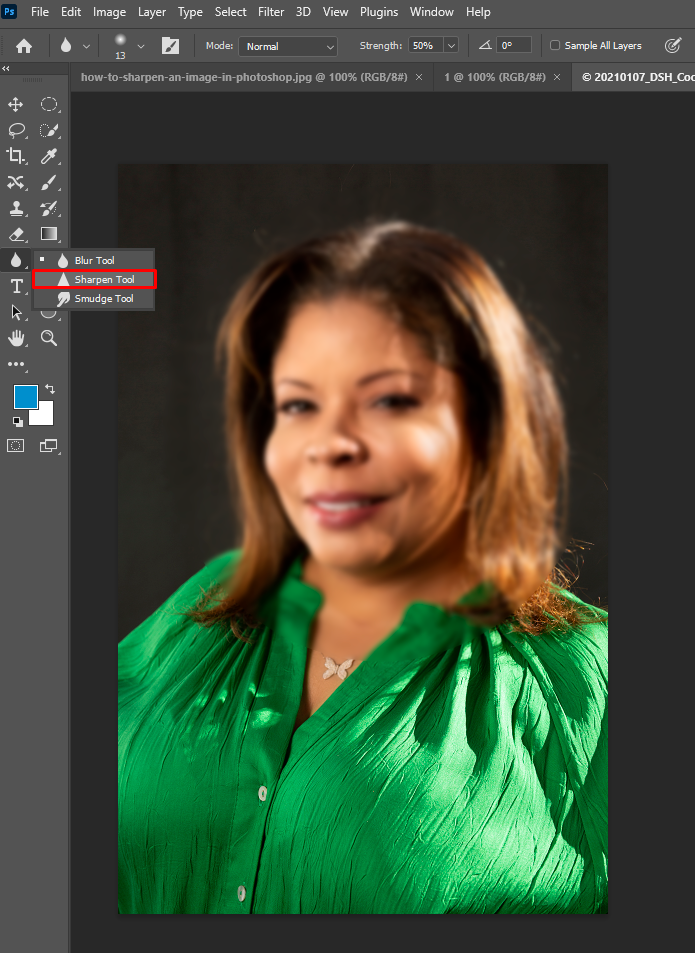
1. Utilizing the Unsharp Mask
Step 1: Duplicate the Layer
Find the picture you want and open it in Photoshop. As a default, it will open as a locked foundation layer. You ought to constantly work in discrete layers. Most importantly, you’ll continuously have the first immaculate to return to if anything turns out badly.
Besides, regardless of whether everything goes as it ought to, working in various layers permits you to apply various measures of Sharpening to various regions, or even use covers to leave a few regions with no honing by any stretch of the imagination.
To copy a layer you can right-tap on it and afterwards select Duplicate Layer from the menu. This will open the properties board for the new layer. Leave the rest for what it’s worth and snap OK. This will duplicate your experience on a different layer.
Step 2: Adjust the Blending Mode
While you have this new layer chosen, open the Blending Modes menu and change from normal to luminosity.
We do this since we’re about to be working with contrast, and the luminosity mixing mode thinks about the softness of the pixels. In that capacity, it won’t play with the variety or immersion of the picture.
Step 3: Apply the Unsharp Mask Filter
Go to the menu Filter, Sharpen, Unsharp Mask. This will open an exchange box.
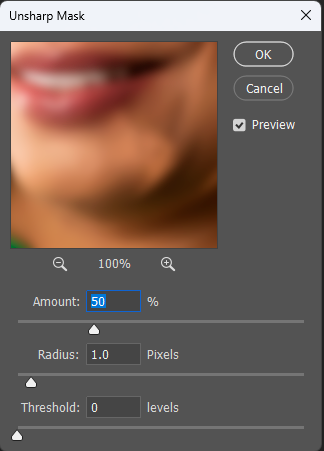
Here you can see a zoomed-in region of your picture to see what the channel is evolving. Ensure the preview option is checked and you can consider changes in the general picture to be well.
Begin moving the sliders to apply the channel. The Amount slider will control how much sharpness. I would say, around 50 will function admirably without causing too many secondary effects. However, this can change from one picture to another, so move it and track down the right equilibrium.
The Radius sets the number of pixels that will be impacted by the channel. Recall how we said the honing functions by expanding contrast at the edges among dim and light regions. Indeed, changing the Radius decides the amount to think about as an ‘edge’ and in this way the number of pixels that are impacted by the impact.
The Threshold slider shows how much differentiation there should be in the middle between zones for it to be viewed as an edge, and for the channel to thusly be applied to it. Then click OK.
Step 4: Fine-Tune
You can calibrate the Sharpening impact on your picture by changing the haziness of the layer. Recall it ought to look sharp yet regular.
You can likewise utilize layer veils to apply the Unsharp Mask to explicit pieces of the picture. Simply click on the Create Layer Mask button from the lower part of the Layers board.
This will make a mask to cover a specific region of the layer. Paint in the dark what you need to cover with the veil and leave white what you need noticeable.
Step 5: Save
That is all there is to it. If you’re happy with the outcome and don’t have to return for real altering, you can Flatten the picture from the Layers menu. Then save your record.
2. Utilizing the High Pass Filter
Step 1: Duplicate the Layer
Open your picture in Photoshop. As I made sense of in the Unsharp Mask technique, it is dependably fitting to work in a different layer. For this situation, it’s not just an idea, it’s expected for the honing system.
This is because the sharpening occurs by mixing the first picture and the layer with the high pass channel. Thus, simply intuitive the foundation layer into the New Layer button to make a duplicate.
Step 2: Convert to Smart Object
Utilizing Smart Objects is likewise a prudent expansion of your work process, in any case, it’s not generally as significant as others.
This method is helpful because it will permit you to return to the channel and change it – remember that you will not have the option to see the impact before applying it.
Having said this, select the foundation duplicate you recently made and right-click on it. Then, at that point, select Convert to Smart Object from the menu. Presently you’ll work non-horrendously, and all of the channels you apply to this layer will be Smart Filters.
Step 3: Apply the High Pass Filter
Now go to the menu Filter, Other, High Pass. This channel puts an unbiased dark layer on top of your picture. Then, on this strong variety, Photoshop will check the edges that it found.
How Photoshop realizes which edges to stamp are set by the sweep. The Radius slider works like the one from the Unsharp Mask: it will decide the number of pixels around the differentiating ones that will be viewed as a component of the edge to hone.
To put it another way, a worth of 1 is to let Photoshop know that only one pixel on each side of the edge ought to be controlled.
Following this, if the slider is at its most reduced value you’ll see just a level dark layer. If you slide it to the most extreme you’ll see your whole picture since everything is viewed as an edge.
Anyway, how would you track down the best worth? You’ll need to see the shape of the subject or the region you need to hone clear-cut with next to no different regions beginning to show up in the dim layer.
Begin at the lowest value and gradually slide it to one side until you figure out the perfect balance. Try not to get excessively stressed, however – because you transformed it into a Smart Object, you can return to the channel and change the range however many times as you need. Finally, click OK.
Step 4: Adjust The Blending Mode
Alright, now the new layer is made on top of your unique picture. The default Blending Mode is Normal. This won’t mix it with the first background. Thus, you’ll just see the dim layer with borders you found in the review. To see the honing impact you want to mix the two layers.
From the Blending Mode menu on top of the board, you can choose the one that turns out best for you.
If you’re working with one of the most recent variants of Photoshop, you can simply drive over them and you’ll see a preview of how your picture will look. If not, you need to apply everyone to find out.
For the most part, Overlay or Hard Light mixing modes function admirably. Be that as it may, you can likewise attempt Soft Light for a more unpretentious impact or Vivid Light areas of strength.
Step 5: Fine-Tune
For this situation, changing the mistiness of the filter is likewise conceivable. Simply click on the sliders close to the channel in the Layers Panel.
You can likewise return to change the Radius value if observe that it was excessively or excessively little. Simply double-tap on it to open the discourse box once more. You can do this as the need might arise.
Step 6: Save
Whenever you’re finished with your channel and you have no more need to return, you can Flatten the layers from the Layers menu and save your image.
3. Utilizing Smart Sharpen
Step 1: Duplicate Layer
The Smart Sharpen Tool is another that is compelling for picture sharpening in Photoshop. Likewise, with the others, the primary thing you ought to do after opening your picture is to copy your layer. This way you safeguard your unique picture.
Step 2: Open the Smart Sharpen Filter
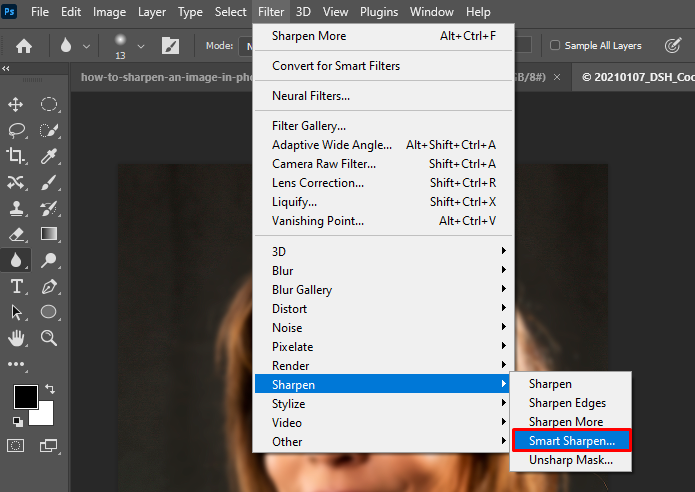
You can get to this from the menu Filter, Sharpen, Smart Sharpen. This will open a discourse box where it will have a default setting.
If you’re not happy with it, you can begin moving the sliders manually to make a custom channel that can be saved as a preset. Or on the other hand, if you as of now have one saved, you can stack it.
Step 3: Customize Your Filter
Begin by moving the Amount slider. This will set how much honing. Then continue to change the span. It works equivalent to the Unsharp Mask channel. The distinction here is the third slider: Noise Reduction.
The Smart Sharpen channel permits you to control this undesirable secondary effect with a slider. Begin changing it to decrease the noise. Try not to go excessively far or the sharpening impact will begin blurring as well.
One more component of the Smart Sharpen is the capacity to eliminate haziness because of explicit issues.
Remember how toward the start I was letting you know that an unsharp picture can occur for various reasons? Indeed, this channel focuses on a portion of these with a particular goal in mind.
Set the Remove menu to Lens Blur on the off chance that the issue comes from the optics you were utilizing. Or on the other hand, utilize the Motion Blur choice if the haze comes from a moving subject or a shake from the camera.
You can open up the part Highlights/Shadows if you want to fix any haloing brought about by the honing system. When you’re prepared just hit OK and the channel will be applied.
Step 4: Fine-Tune and Save
Just like in the others, you can calibrate with covers or mistiness and afterward save your work when it’s prepared.
Final Words on How To Sharpen An Image In Photoshop
I truly believe that you enjoyed reading this article on making your photographs somewhat keener! Keep in mind decide first what you need to sharpen, then focus on what looks generally normal to you. Try not to exaggerate the sharpening, but enticing!
FAQs
What is the Sharpen tool?
The Sharpen tool concentrates delicate edges in a photograph to build clearness or concentration. Oversharpening a photograph gives it a grainy look. You can stay away from oversharpening by setting a lower Strength value in the options bar.
Does Photoshop have a sharpening tool?
The Sharpen tool in Photoshop Elements expands the differentiation among adjacent pixels to give the deception that things are keener. This tool ought to be exercised with self-control, be that as it may. Sharpening can rapidly give way to excessively grainy and boisterous pictures if you’re not careful.
Can a blurred image be sharpened?
A picture sharpener is an altering apparatus that assists with underscoring the surface of your photograph and incrementing its focus. Any digital camera generally obscures a picture somewhat. For that reason, a photograph sharpener is an exceptionally valuable tool that can sharpen foggy pictures and make it more clear.
How do you Sharpen a brush stroke in Photoshop?
To smooth brush strokes in Photoshop, select the Brush Tool. Then increment the smoothing rate in the upper settings bar.


